- Mark your layout first. Use stakes and string to mark where your uprights will go before you touch a single bamboo pole. For a basic A-frame or flat grid trellis, two to four uprights are all you need. Spacing them evenly — typically 18 to 24 inches apart — will make the whole thing look intentional and professional.
- Drive uprights in at least 12 inches deep. For an 8-foot stake, that means you’ll have about 6.5 feet of usable height above ground. Use a mallet rather than a hammer to avoid splitting the bamboo at the top.
- Lash your crosspieces with a square lashing technique. Start by wrapping the twine around the vertical pole just below where the horizontal pole will rest, then bring it up and around both poles in a figure-eight pattern, pulling firmly after each wrap. Finish with two or three tight frapping wraps between the poles to cinch everything together, then tie off with a square knot. It sounds more complicated than it is — watch one two-minute video and you’ll have it down.
- Use the thicker 3mm jute at structural joints and the thinner
I want to tell you about the afternoon I accidentally glued my hand to a bamboo pole in front of my entire neighborhood. It was a Tuesday. My garden looked like a sad tangle of tomato plants leaning against each other like tired commuters on a subway, and I had decided — with exactly zero woodworking experience — that I was going to build a DIY bamboo garden trellis before sundown. Reader, I did not finish before sundown. But I did end up with 47 new Instagram followers and a story I will never live down.
This post contains affiliate links. As an Amazon Associate, I earn from qualifying purchases.
If you’ve been eyeing those gorgeous bamboo trellises in garden magazines and thinking there’s no way you could pull that off, I’m here to tell you: you absolutely can. And if I can do it — a person who once spent twenty minutes trying to figure out which end of a hand saw does the cutting — you are going to be just fine. Let me walk you through exactly how I built mine for under $25, complete with the hard-won wisdom that only comes from publicly embarrassing yourself in your front yard.
Why Bamboo Is the Perfect Trellis Material
Before we get to the tools and the technique, let’s talk about why bamboo is genuinely wonderful for this project and not just trendy. Bamboo is one of the strongest natural materials you can use in a garden setting, with a tensile strength that rivals steel relative to its weight. It’s also naturally resistant to moisture, which means it won’t rot out on you after one rainy season the way cheap wooden dowels tend to do. It’s lightweight, easy to work with, and — this is the part that keeps getting me — it looks absolutely beautiful in a garden. There’s a warmth and an organic elegance to bamboo that plastic or wire trellis panels simply cannot replicate.
For a trellis project, you’ll want to think about the scale of what you’re growing. Lighter climbers like sweet peas, beans, or small cucumbers can be supported beautifully by thinner stakes arranged in a fan or grid pattern. Heavier plants like tomatoes, grape vines, or large squash need something with more girth and a sturdier base. The good news is that bamboo stakes come in a range of sizes, so you can match the material to the job.
Tools and Materials for Your DIY Bamboo Garden Trellis
Here’s everything I used to build my trellis. The total came in right around $25, and I had leftover materials for two more smaller projects. I’ve linked everything I actually bought so you can grab the same stuff without having to guess.
Recommended Products
- For lighter climbers and the vertical uprights of a fan trellis: COLOtime Bamboo Stakes 58 Inch, 20 Pack — These are a great mid-height stake for beans, sweet peas, and shorter flowering vines. The 20-pack gives you plenty to work with for a full trellis panel.
- For the main structural uprights if you’re supporting tomatoes or heavier vines: Cambaverd Bamboo Stakes 8 Feet, 1 Inch Diameter, 10 Pack — These thicker, taller poles are what I used for the main frame of my trellis. The one-inch diameter makes a real difference in stability, and eight feet gives you plenty of height above ground after you sink them in.
- For filling in the grid work or a smaller project: Mininfa Natural Bamboo Stakes 4 Feet, 25 Pack — The 25-pack at four feet is ideal for the horizontal crosspieces of your trellis grid, or for building a shorter trellis for a container garden.
- For tying everything together (and this is where I nearly went wrong — more on that in a moment): Vivifying Garden Twine, 656 Feet, 2mm Green — The thinner 2mm twine is perfect for lashing joints and tying plant stems to the trellis without cutting into them.
- For a sturdier lash at the main structural joints: Vivifying Jute Twine, 328 Feet, 3mm Brown — The thicker jute is what you want where two poles cross and need to hold real weight. It’s also beautiful — the brown color looks completely natural against the bamboo.
Beyond these, you’ll need a mallet or rubber hammer to drive the uprights into the ground, and a pair of garden snips or a small hand saw for trimming any stakes to length. That’s genuinely it.
How to Build the Trellis: Step by Step
Okay, so here’s where things went sideways for me — and where they can go beautifully right for you if you learn from my disaster. I decided to skip the planning phase entirely because I am, at heart, an impulsive person who finds measuring deeply boring. I jammed my uprights into the ground with great enthusiasm, approximately eyeballed the spacing, and then realized I had built a parallelogram instead of a rectangle. My trellis leaned to the left like it was listening to something happening next door.
My neighbor Carl watched this entire process from his driveway. He said nothing. He just nodded slowly, the way you nod at something you’ve decided not to comment on.
Here is what I should have done — and what you should do:
- Mark your layout first. Use stakes and string to mark where your uprights will go before you touch a single bamboo pole. For a basic A-frame or flat grid trellis, two to four uprights are all you need. Spacing them evenly — typically 18 to 24 inches apart — will make the whole thing look intentional and professional.
- Drive uprights in at least 12 inches deep. For an 8-foot stake, that means you’ll have about 6.5 feet of usable height above ground. Use a mallet rather than a hammer to avoid splitting the bamboo at the top.
- Lash your crosspieces with a square lashing technique. Start by wrapping the twine around the vertical pole just below where the horizontal pole will rest, then bring it up and around both poles in a figure-eight pattern, pulling firmly after each wrap. Finish with two or three tight frapping wraps between the poles to cinch everything together, then tie off with a square knot. It sounds more complicated than it is — watch one two-minute video and you’ll have it down.
- Use the thicker 3mm jute at structural joints and the thinner
Tag: DIY bamboo
-
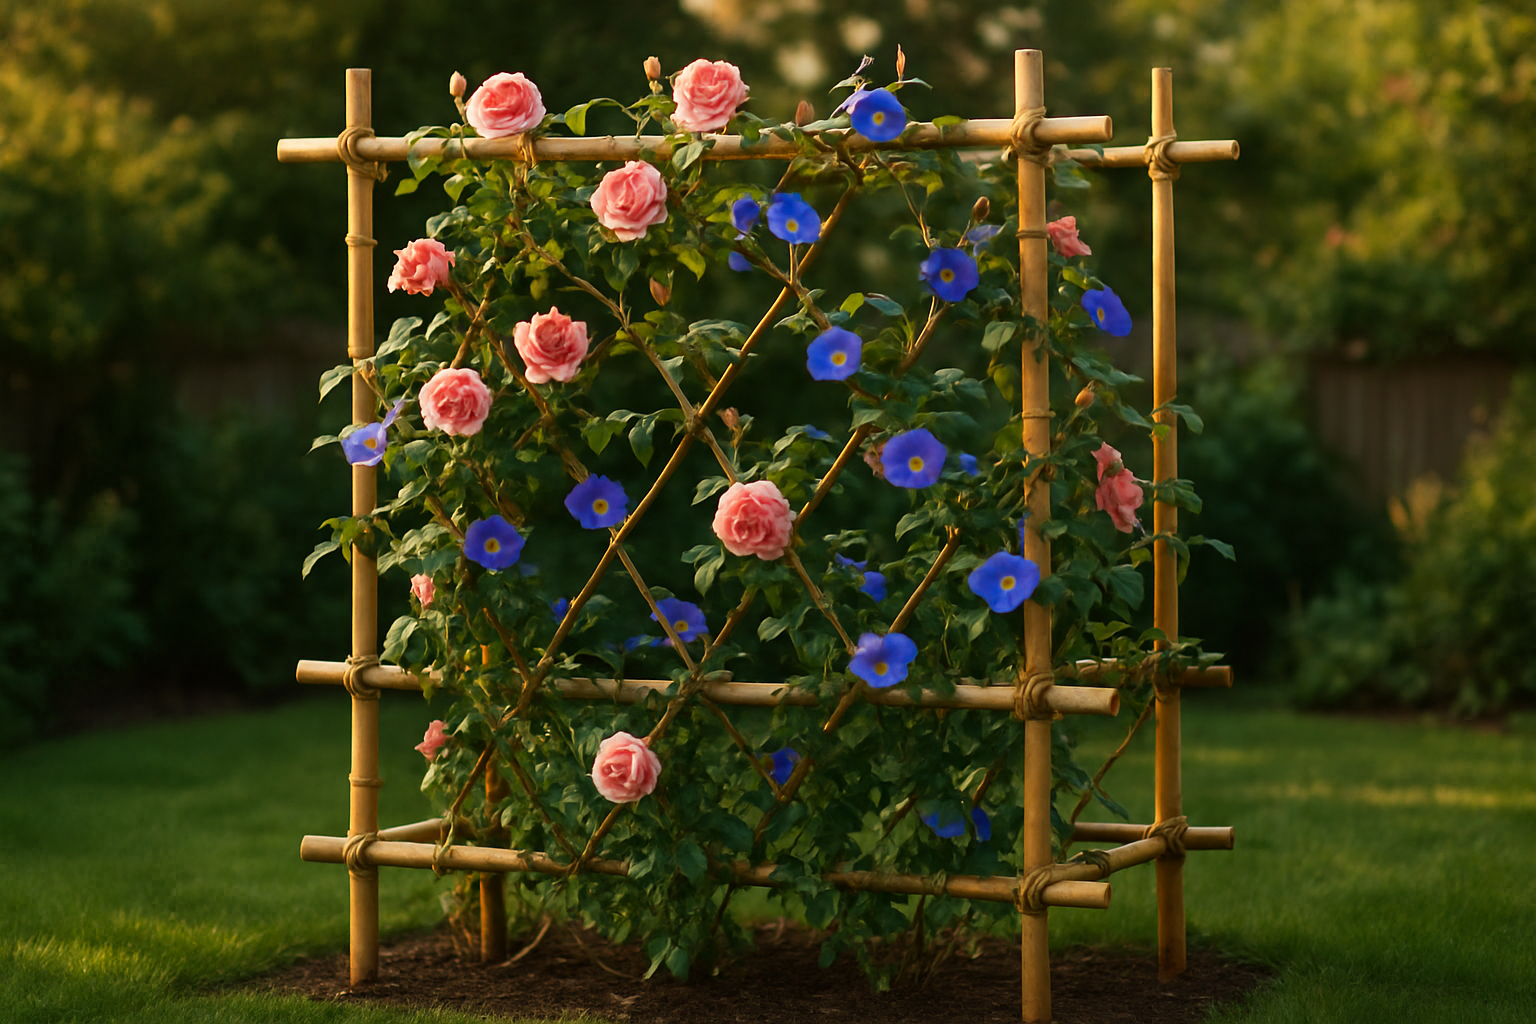
Building a DIY Bamboo Garden Trellis: The $25 Project That Made My Garden Instagram-Famous
-
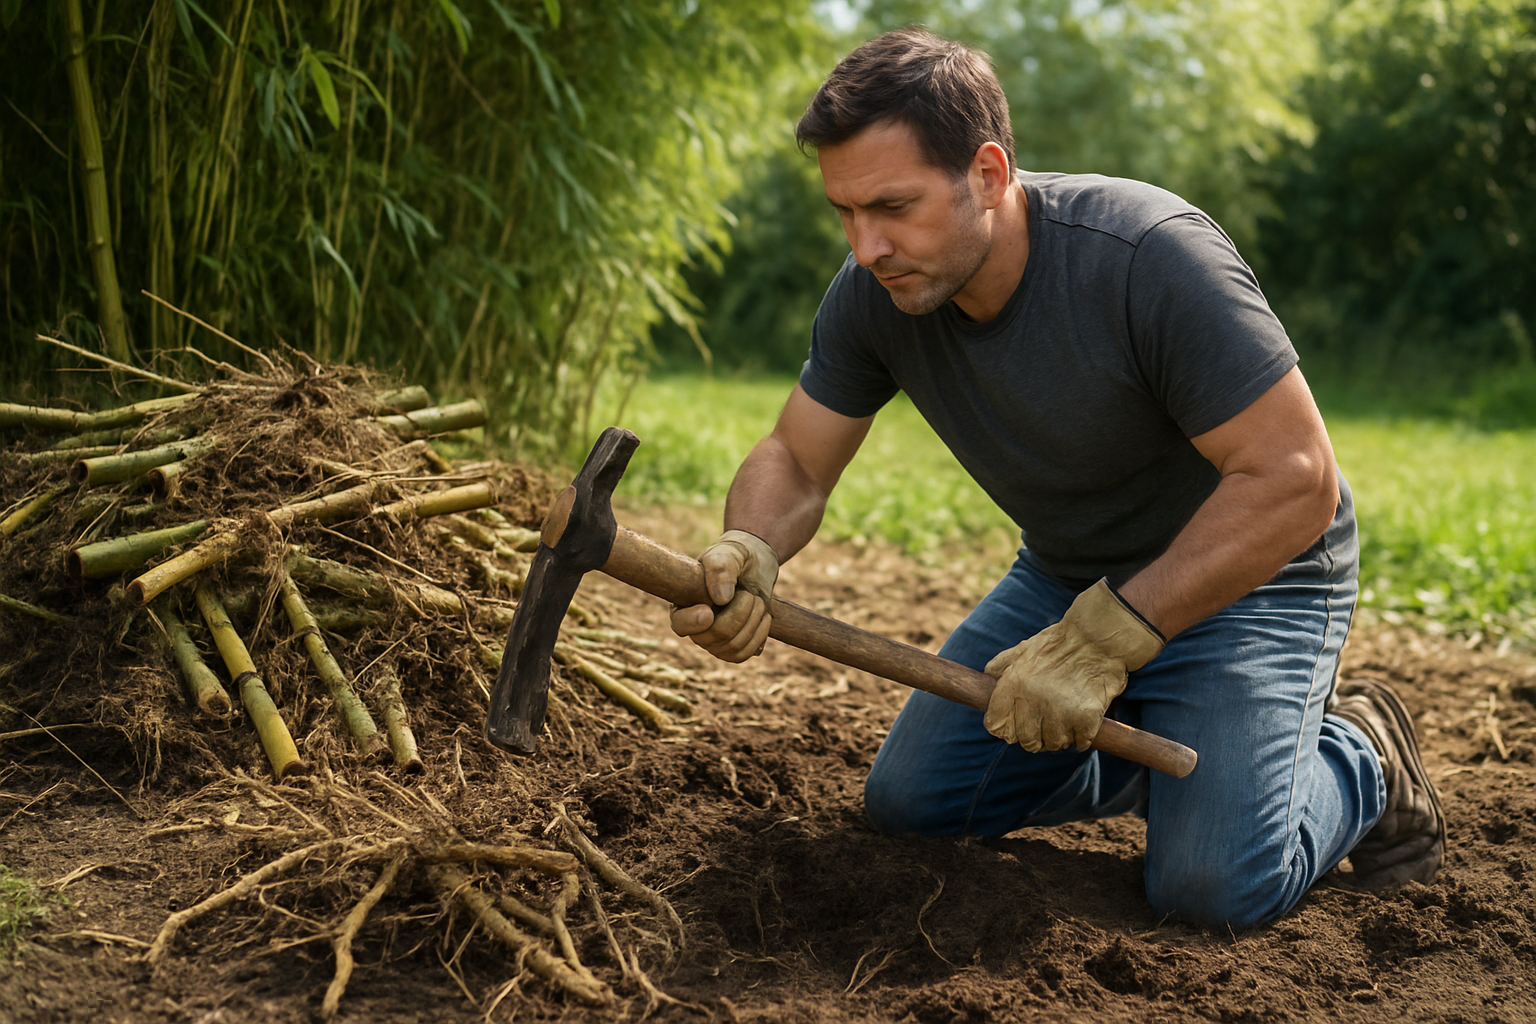
How I Removed 300 Square Feet of Bamboo By Myself (And Lived to Tell the Tale)
- Water the area deeply the day before you dig. Moist soil releases rhizomes far more cooperatively than dry, hard ground.
- Work in sections, not all at once. Trying to tackle 300 square feet in a single session will break your spirit (and your back).
- Wear thick gloves. Rhizome ends are sharp, and you’ll be plunging your hands into the ground constantly.
- ProValue HM-949 3-1/8 lb. Garden Hoe Mattock, 51″ Hardwood Handle — This was my workhorse. The mattock end broke through compacted soil and rhizome tangles better than anything else I tried. Heavy enough to mean business, balanced enough to swing for hours.
- Root Slayer 22011 Garden Shovel with Serrated Blade for Digging and Root Cutting — The serrated blade on this shovel cuts through roots instead of just pushing them aside. I used it constantly for slicing through rhizomes in the trench work. Absolutely worth it.
- Root Slayer RS220 Heavy Duty Garden Shovel with Serrated Blade for Digging and Root Removal — I actually borrowed a friend’s version of this model. If you’re tackling a larger area, having two serrated spades between two people speeds things up considerably.
- Rogue Hoe 7 Inch Wide Blade Heavy Duty Garden Cultivator Field Cotton Hoe Tool — Once the big rhizome clumps were out, this wide-blade hoe was perfect for raking through loosened soil and pulling out the smaller stragglers. Solid, heavy-duty construction that held up to abuse.
- 14 Inch Heavy Duty Curved Hoe, Without Welding, Gardening Tool, Oak Handle — The curved blade on this one was surprisingly useful for getting under rhizomes and popping them up from below. The oak handle felt solid and never gave me any flex under pressure.
- Water the area deeply the day before you dig. Moist soil releases rhizomes far more cooperatively than dry, hard ground.
- Work in sections, not all at once. Trying to tackle 300 square feet in a single session will break your spirit (and your back).
- Wear thick gloves. Rhizome ends are sharp, and you’ll be plunging your hands into the ground constantly.
The day I realized my bamboo had eaten my neighbor’s flower bed was the day I knew things had gotten serious. What started as a charming little privacy screen along my back fence had quietly — sneakily — spread six feet into Linda’s yard, strangling her hostas and creeping under her garden shed. She knocked on my door one Saturday morning, coffee in hand, smile on her face, but I could see it in her eyes. We had a problem. And it was entirely my problem to fix.
This post contains affiliate links. As an Amazon Associate, I earn from qualifying purchases.
I started researching bamboo removal DIY methods that same afternoon, equal parts motivated by guilt and sheer panic about the cost of hiring someone. Every contractor quote I got was somewhere between “ouch” and “absolutely not.” So I rolled up my sleeves, did my homework, and spent three weekends doing it myself. Here’s everything I learned — including what worked, what didn’t, and why the right tools made all the difference.
Understanding What You’re Actually Up Against
Before you grab a shovel and start hacking away, you need to understand the enemy. Bamboo — particularly running bamboo, which is what most people accidentally plant — spreads through an underground network of rhizomes. These are horizontal root-like stems that can travel several feet per year in every direction. When I dug my first test trench, I found rhizomes the diameter of my thumb running four to six inches below the surface in every direction like a tangled highway system.
The hard truth is that you can’t just pull up the canes and call it done. If even a small rhizome segment stays in the ground, it will resprout. Bamboo is extraordinarily resilient — it’s practically designed to survive. Your goal is to physically remove as much of the root mass as possible, then monitor and cut down any new growth repeatedly until the plant exhausts its energy reserves. This process takes persistence, not just muscle.
My Step-by-Step Bamboo Removal DIY Process
Step 1: Cut Down the Canes First
Start by cutting all the canes down to the ground. A sharp pruning saw or loppers work fine here. Get them as low as possible. This immediately makes the work area manageable and, more importantly, signals to the plant to send energy up — energy it will waste on regrowth attempts you’ll cut down again and again.
Step 2: Dig Out the Rhizome Mass
This is the hard part, and I won’t sugarcoat it. I spent two full Saturdays just on this phase. The goal is to loosen the soil around the root mass and pull out every rhizome segment you can find. Work from the outside edges inward so you’re not constantly stepping on ground you’ve already cleared.
A heavy-duty mattock is your single best friend here. Mine was a game-changer for breaking through the dense, tangled rhizome mat that had built up over years. Once things loosened up, I switched between a wide cultivating hoe for clearing debris and a sharp spade for cutting through stubborn roots.
Step 3: Trench the Perimeter
Dig a trench around the entire affected area, at least eight to ten inches deep. This serves two purposes: it lets you see exactly where the rhizomes end, and it creates a boundary you can check weekly for any sneaky re-runners. Anything you find in that trench, cut it and pull it out immediately.
Step 4: Monitor and Cut for the Long Haul
For the next growing season — and possibly two — you will see new shoots appear from rhizome fragments you missed. Cut them immediately at ground level. Don’t let them photosynthesize. Every time a new shoot grows and you cut it, the plant uses stored energy and gets weaker. Stay consistent and you will win.
Tools I Used (And Genuinely Recommend)
The right tools turned an impossible job into a merely brutal one. Here’s what I actually used throughout this project:
Honestly, I’d tried to start this project with a basic garden spade from my garage. I wasted an entire morning and barely made a dent. Once I had the right tools, I made more progress in two hours than I had all day. Don’t skip this part.
A Few Things I Wish I’d Known Earlier