I still remember the morning I walked out to my bamboo grove and felt my stomach drop. What I thought were harmless little bumps on the culms were absolutely everywhere — and my prized Phyllostachys aureosulcata, the one I’d nursed from a small division for four years, was looking pale, stunted, and just… wrong. It took me another two weeks to finally diagnose what I was dealing with: scale insects on bamboo. By that point, I’d already lost a season of growth, spent money on the wrong treatments, and had a full-blown argument with my husband about whether we should just “rip it all out and start over.” This is the story of how I nearly lost my bamboo — and how I finally won.
This post contains affiliate links. As an Amazon Associate, I earn from qualifying purchases. This means I may earn a small commission if you click through and buy something, at no extra cost to you. I only recommend products I’ve personally used or researched thoroughly.
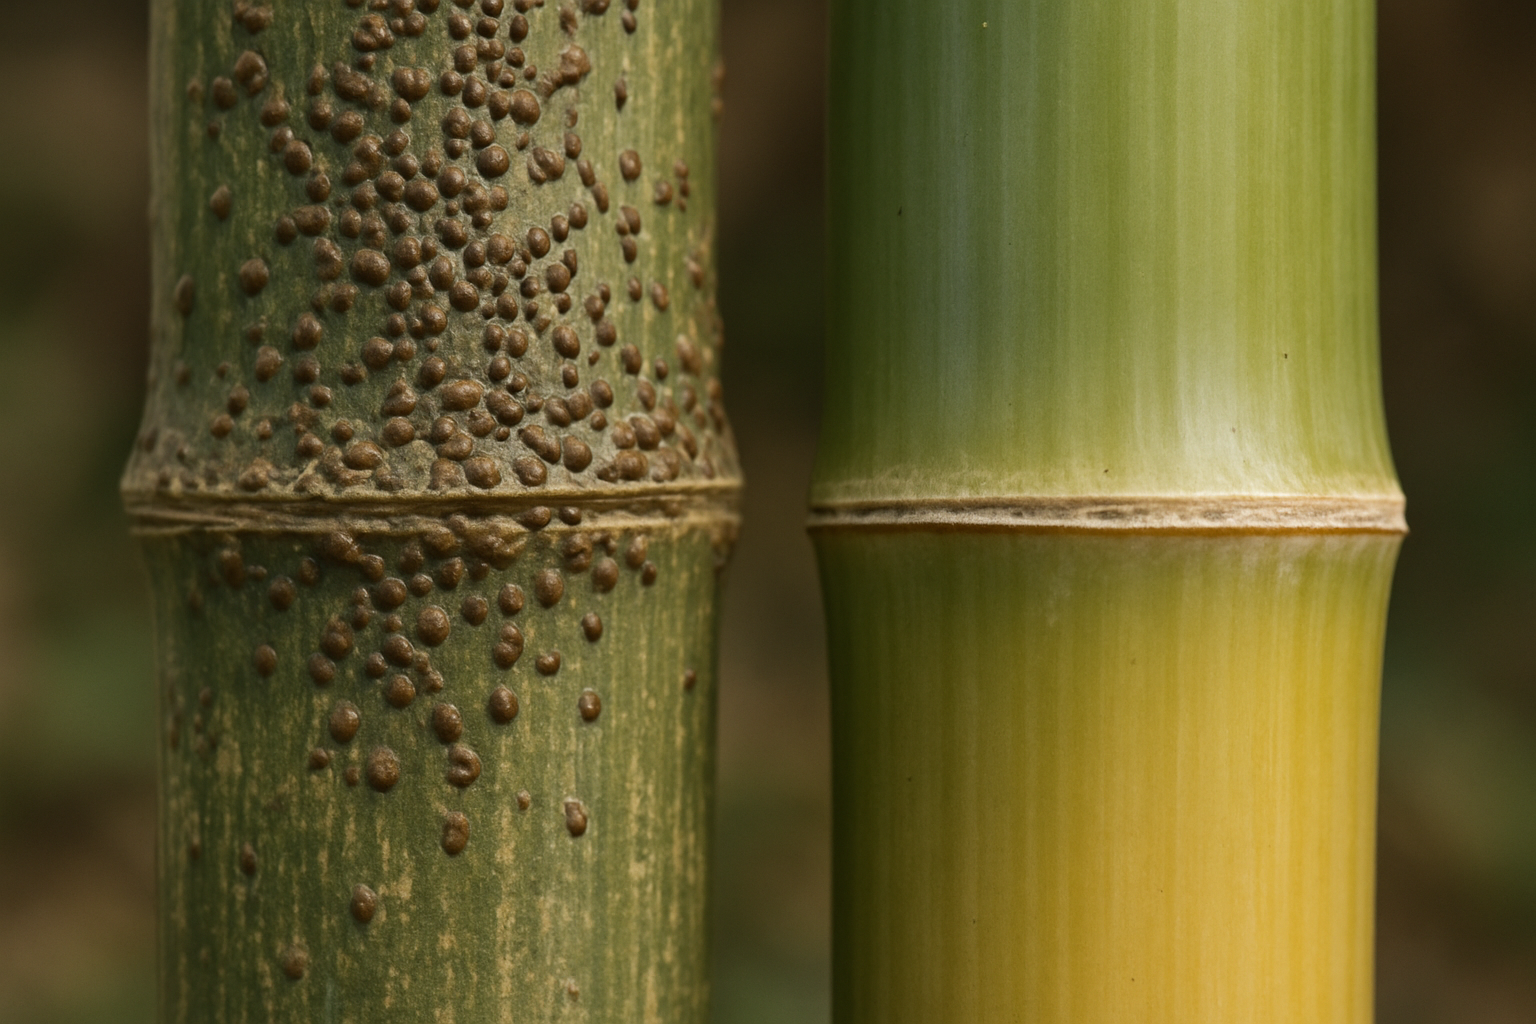
How I Missed the Early Signs of Scale Insects on Bamboo
Here’s the thing about scale insects — they don’t look like bugs at first glance. They look like tiny, waxy lumps. Some look like little oyster shells. Some look like flat brown discs. For weeks, I genuinely thought I was seeing some kind of natural growth variation on my culms. By the time I got close enough with a magnifying glass and did my research, the infestation had spread from one clump to three.
Scale insects feed by inserting their mouthparts into plant tissue and sucking out the sap. On bamboo, this shows up as yellowing or dropping leaves, weak new shoots, and a general decline in vigor. You might also notice a sticky residue on the culms or leaves — that’s honeydew, a byproduct of their feeding — which can then attract sooty mold, turning your beautiful bamboo a grimy black. It’s a cascading disaster, and it happens quietly.
The two most common types you’ll encounter are armored scale and soft scale. Armored scale (like oystershell scale) creates a hard, detachable waxy covering and is generally harder to kill with contact sprays. Soft scale produces a waxy coating that’s part of its body, and while it sounds less intimidating, it can spread honeydew more aggressively. Both are bad news for bamboo.
What Actually Works: My Treatment Protocol
I’ll be honest — my first two months of fighting this were a mess. I tried neem oil sprays I mixed myself (inconsistent results), I tried dish soap solutions (helped a little, not enough), and I spent one genuinely miserable afternoon scrubbing individual culms with a soft brush and rubbing alcohol. That last part actually does help on isolated infestations, but when scale has spread across multiple clumps, you need something more systematic.
The turning point came when I switched to a proper horticultural oil — specifically, a refined paraffinic oil that smothers scale insects by blocking their breathing pores. Unlike neem oil, which can degrade quickly and smells absolutely terrible, horticultural oil is lightweight, effective, and breaks down cleanly in the environment. The key is thorough, repeat application — you have to coat every surface, including the undersides of leaves and the joints of culms, where scale loves to hide.
For a severe or stubborn infestation, I also added a systemic soil drench to my protocol. Systemics work differently — the plant absorbs the active ingredient through its roots, and when scale insects feed, they ingest it. This is especially useful for bamboo because the dense culm structure makes it genuinely hard to get full spray coverage. A systemic approach means you’re treating from the inside out.
Treatment Tips That Made the Difference
- Treat in the crawler stage when possible — newly hatched crawlers are the most vulnerable because they haven’t yet formed their protective covering
- Spray in the early morning or evening to avoid leaf scorch and to protect beneficial insects
- Apply horticultural oil at 7–14 day intervals for at least three treatment cycles
- Don’t forget the soil surface and the base of culms — scale can overwinter in debris
- After treatment, rake and remove fallen leaves and debris to reduce reinfestation sites
- Avoid over-fertilizing with nitrogen during an infestation — lush new growth attracts scale
The Products That Finally Turned Things Around
After a lot of trial and error, these are the specific products I used in my recovery protocol. I’m sharing the exact ones because details matter — not all horticultural oils are equal, and the concentration and formulation make a real difference.
For Spray Treatment
I started with the Monterey Horticultural Oil Ready to Spray (32 oz) for my initial applications because I wanted something I could grab and use immediately without measuring or mixing. It’s OMRI Listed for organic gardening and comes bundled with a measuring spoon, which I appreciated. Once I confirmed it was working, I upgraded to the concentrate for better value — the Monterey Horticultural Oil 1 Quart concentrate is perfect if you have a small to medium grove, and the 1 Gallon version is the better buy if you’re dealing with a large planting or want to stay stocked for the season. All three are the same trusted formula — it just comes down to how much bamboo you’re treating.
For Systemic Treatment
For my worst-affected clumps, I used the Monterey Fruit Tree & Vegetable Systemic Soil Drench (1 gallon) as a soil application. This uses imidacloprid, which the plant absorbs systemically — meaning scale insects are exposed to it when they feed on plant tissue. I’ll note that systemics should be used thoughtfully; avoid applying them when bamboo is in active bloom (rare, but it happens) since pollinators could be affected. For a stubborn, widespread infestation, though, this was the tool that finally broke the cycle for me. There’s also a 1 Quart spray version available if you prefer foliar systemic application or have a smaller area to treat.
Preventing Scale From Coming Back
Once you’ve beaten an infestation, prevention becomes your new obsession — at least it did for me. Scale insects often arrive on new plants, so I now quarantine any new bamboo division for a few weeks before planting it near my established grove. I also do a visual inspection of my culms every spring when I’m doing general cleanup, and I keep horticultural oil on hand year-round.
I still remember the morning I walked out to my bamboo grove and noticed something was terribly wrong. The leaves that had always been a deep, glossy green were pale, stippled, and lifeless — like someone had dusted them with ash overnight. I had no idea then that I was looking at a bamboo spider mites infestation, and I certainly had no idea how bad things were about to get. If you’re here searching for bamboo spider mites treatment options, I want you to know: I’ve been exactly where you are, and there is a way through this.
This post contains affiliate links. As an Amazon Associate, I earn from qualifying purchases. This means I may earn a small commission if you click through and make a purchase — at no extra cost to you. I only recommend products I’ve personally used or would confidently use in my own garden.
How a “Little Yellowing” Turned Into a Full-Blown Crisis
It started in late July during one of the hottest, driest summers our area had seen in years. I noticed a few yellow leaves on my Phyllostachys aurea — my beautiful golden bamboo that I’d been growing for nearly six years. I chalked it up to heat stress and made a mental note to water more. That was my first mistake.
Two weeks later, the yellowing had spread to nearly a third of the canes. Leaves were curling, dropping, and that strange pale stippling had moved across the entire eastern edge of my grove. My neighbor — a retired horticulturalist — came over, took one look, and said quietly, “You’ve got mites. Bad ones.” He handed me a magnifying glass and told me to look at the underside of a leaf. I did, and what I saw made my stomach drop. Tiny, almost invisible creatures were moving across a fine web of silk. Spider mites. Hundreds of them on a single leaf.
I spent that night reading everything I could find. What I learned scared me. Spider mites — particularly the two-spotted spider mite (Tetranychus urticae) — thrive in hot, dry conditions, reproduce at an explosive rate, and can devastate a bamboo grove in a matter of weeks if left unchecked. And I had left them unchecked for nearly a month.
Understanding Bamboo Spider Mites: What You’re Actually Dealing With
Spider mites aren’t insects — they’re arachnids, which is part of why many common insecticides do nothing to stop them. They pierce leaf tissue and suck out the contents of individual cells, which causes that telltale bronze or silver stippling pattern. As the damage accumulates, leaves yellow, dry out, and fall. In severe infestations, you’ll see fine webbing on the undersides of leaves and between stems.
Bamboo is particularly vulnerable during periods of drought stress. When a plant is already struggling to maintain moisture, its natural defenses are weakened, and spider mites move in fast. A few key things that make infestations worse:
- Hot, dry, dusty conditions — mites hate humidity
- Overuse of nitrogen-heavy fertilizers, which creates lush, tender growth mites love
- Killing off beneficial predatory insects with broad-spectrum pesticides
- Crowded plantings with poor air circulation
- Ignoring early warning signs like minor leaf stippling or faint webbing
I had checked nearly every box on that list. The summer heat, a recent fertilizer application, and my own delayed response had created perfect conditions for the mites to explode.
Bamboo Spider Mites Treatment: What Actually Worked for Me
Once I understood what I was dealing with, I attacked the problem from multiple angles. Here’s the honest, step-by-step approach that saved my grove.
Step 1: Water Blast First
Before reaching for any product, I used a strong jet of water from my garden hose to blast the undersides of as many leaves as I could reach. This physically dislodges mites and disrupts their colonies. It won’t eliminate them, but it knocks the population back immediately and makes your treatments more effective. I did this every other day throughout the treatment period.
Step 2: Neem Oil — My First Line of Chemical Defense
Neem oil is the gold standard for organic mite control, and for good reason. It disrupts the mites’ hormonal systems, suffocates eggs and adults on contact, and leaves minimal chemical residue. I used Bonide Captain Jack’s Neem Oil Ready-to-Use Spray because I needed something I could grab and deploy immediately across a large area. It’s also approved for organic gardening, which matters to me since my grove is close to a vegetable bed.
I alternated it with BioAdvanced Organics Neem Oil Ready-to-Use to prevent the mites from building resistance to any single formulation. I applied both products in the early morning or evening — never in direct midday sun, which can cause leaf burn — and made sure to coat the undersides of leaves thoroughly. That’s where the mites live and breed.
Step 3: Systemic Protection for Heavy Infestations
Because my infestation had gone so far, I also added Bonide Systemic Houseplant Insect Control Granules to the soil around the base of my most affected canes. Systemic products are absorbed through the roots and distributed throughout the plant tissue, providing longer-lasting protection from within. This is especially helpful when you can’t reach every leaf with a spray bottle. I used this as a complement to, not a replacement for, my surface treatments.
Step 4: Broad-Spectrum Backup When Things Were at Their Worst
At the peak of my infestation, I brought in BioAdvanced 3-in-1 Insecticide and Fungicide Ready-to-Spray. This product combines insect, mite, and disease control in a single application — which was useful because a secondary fungal issue had developed on some of the weakened canes. I used this sparingly and only on the most heavily affected sections of the grove.
Step 5: Environmental Changes to Stop the Cycle
Chemical treatment alone won’t work if you don’t address the conditions that allowed mites to thrive in the first place. I made these changes alongside my spray schedule:
- Deep watered every 3–4 days instead of light daily watering, encouraging roots to reach deeper moisture