Tag: bamboo disease

  • Bamboo Leaf Spot: The Fungal Disease That Looked Far Worse Than It Was

    Bamboo Leaf Spot: The Fungal Disease That Looked Far Worse Than It Was

    I still remember standing in my backyard on a Saturday morning, coffee going cold in my hand, staring at my beloved Phyllostachys aurea like someone had thrown a bucket of brown confetti all over it. Dozens — maybe hundreds — of leaves were spotted, yellowing, and dropping to the ground in little papery heaps. My stomach sank. After three years of nurturing that grove from a handful of rhizomes, I was convinced I was watching it die. It took me an embarrassing amount of frantic Googling, two panicked calls to a nursery, and about forty dollars in unnecessary products before I finally learned the truth: what I was dealing with was bamboo leaf spot disease, and while it looked absolutely catastrophic, it was far more manageable than I ever imagined.

    This post contains affiliate links. As an Amazon Associate, I earn from qualifying purchases.

    What Bamboo Leaf Spot Disease Actually Is (And Why It Freaked Me Out)

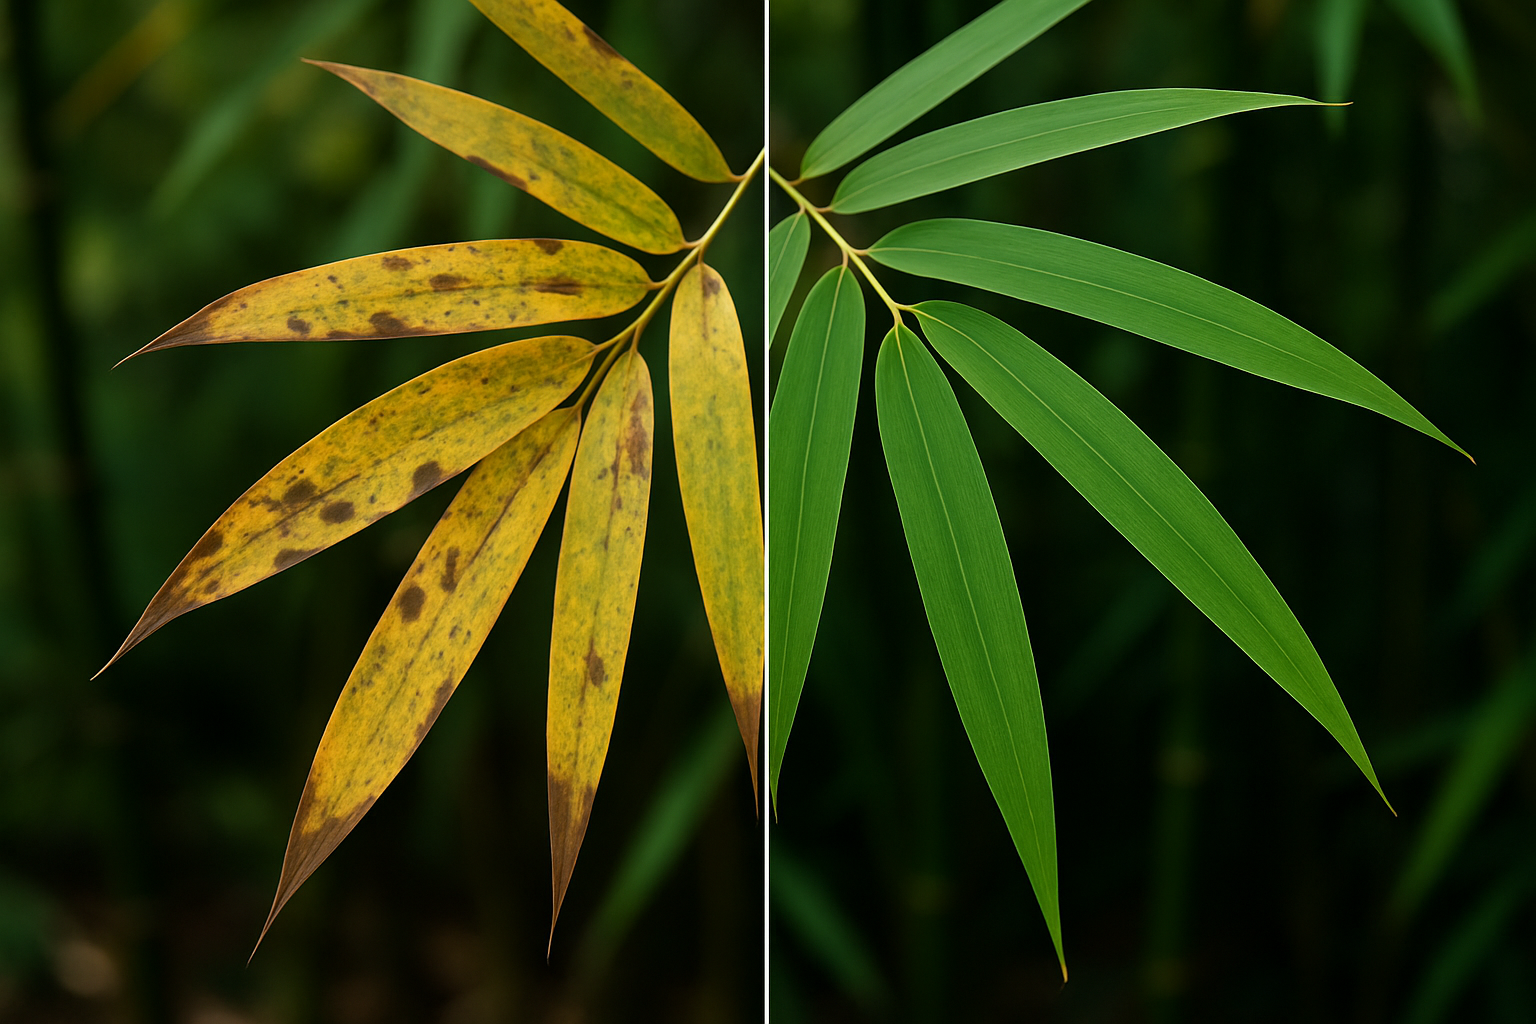
    Bamboo leaf spot is a fungal disease caused most commonly by species of Alternaria, Helminthosporium, or similar fungi that thrive in warm, humid, or wet conditions. The symptoms show up as small brown or tan spots on the leaves, often ringed with a yellow halo. As the infection progresses, those spots can merge, causing whole leaves to yellow and drop. When it hit my grove mid-summer after a stretch of rainy, muggy weather, it spread fast enough that I genuinely thought I was losing the entire planting.

    What made it worse was the timing. My neighbor had just complimented the grove two weeks earlier, telling me it was the most impressive thing on our street. I’d been so proud. And now here it was, looking like it had a terrible disease — which, technically, it did — but not one that spelled the end of the world. I just didn’t know that yet.

    Why Bamboo Gets Leaf Spot (And How to Recognize It)

    Fungal leaf spot on bamboo tends to show up when conditions favor fungal growth: prolonged leaf wetness, poor air circulation, overhead watering, and warm temperatures. It’s more of an opportunistic condition than a death sentence. Here’s what to look for:

    • Small, circular to irregular brown or reddish-brown spots on the leaf blades
    • A yellow or light green halo surrounding the spots
    • Spots that may merge together on severely affected leaves
    • Premature leaf drop, sometimes in large quantities
    • New growth that looks healthy even while older leaves are affected

    That last point is the one that finally gave me hope. Once I slowed down and really looked at my grove, I noticed the new shoots pushing up from the base were perfectly green and healthy. The fungus was attacking older foliage, not the heart of the plant. That was the turning point for me.

    How to Treat and Prevent Bamboo Leaf Spot

    Step 1: Improve the Growing Conditions First

    Before you reach for any spray, take a hard look at what’s going on in your grove. Fungal diseases love stagnant, moist air. Thin out overcrowded culms to improve airflow. Switch to ground-level watering instead of overhead sprinklers. Rake up and dispose of fallen infected leaves — don’t compost them, as the fungal spores can persist. These cultural changes alone can dramatically slow the spread of leaf spot and prevent it from coming back next season.

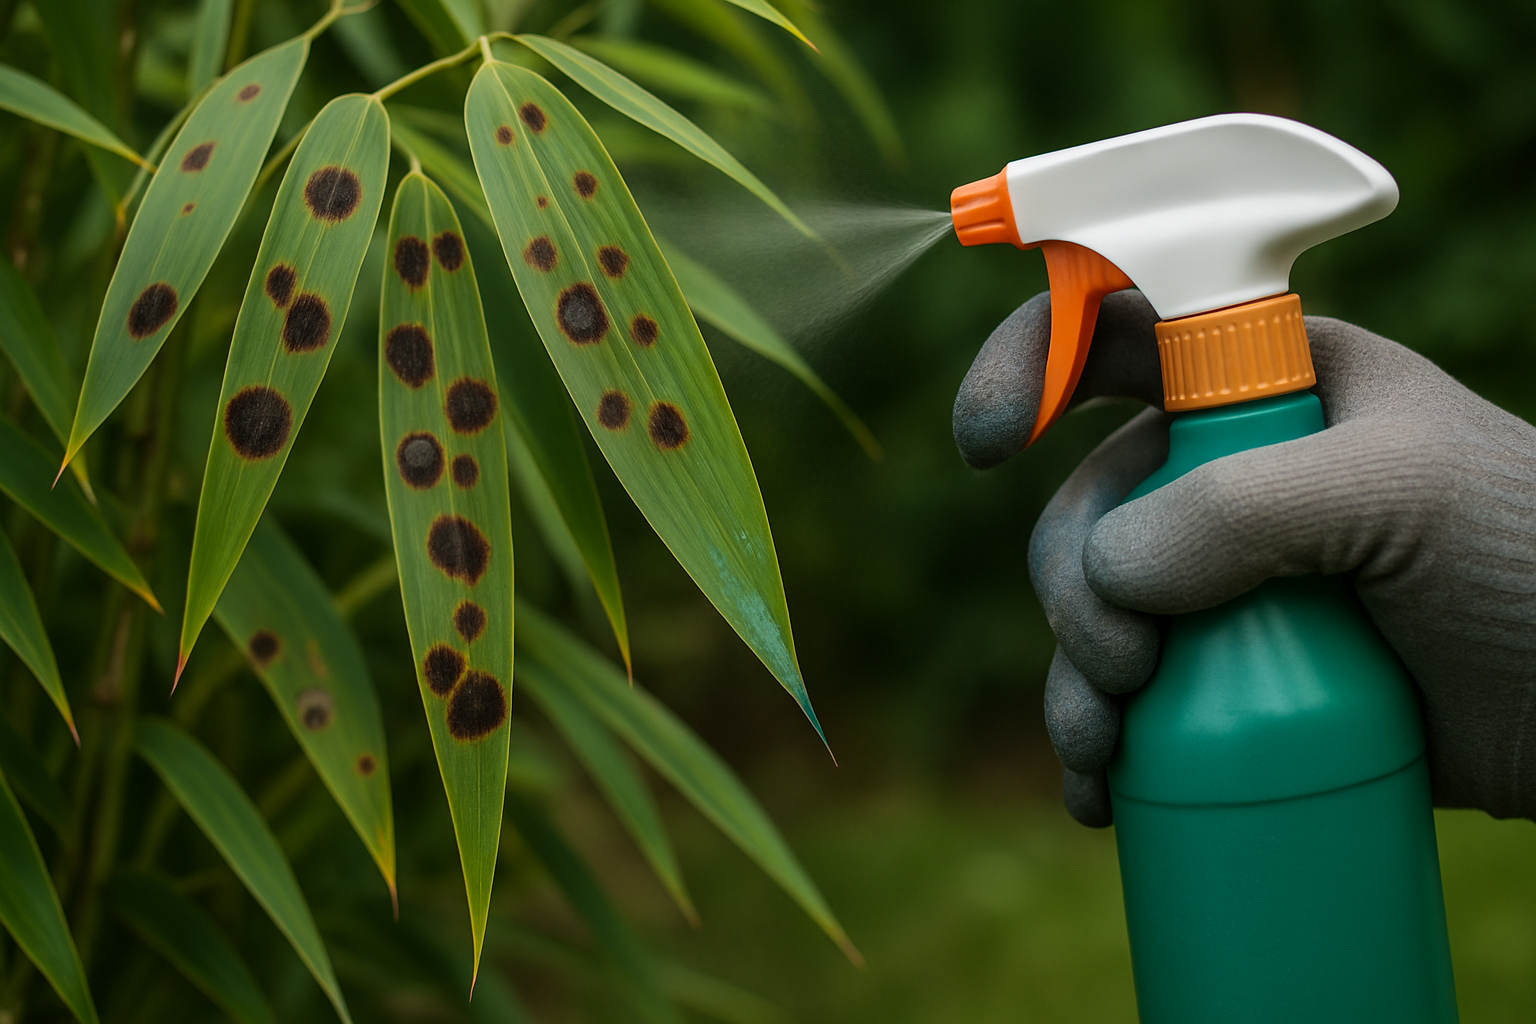
    Step 2: Apply a Fungicide When Needed

    For moderate to severe infections, a copper-based or sulfur-based fungicide is your best friend. These are well-established organic options that work against a broad range of fungal pathogens, including the ones responsible for leaf spot. The key is applying early and consistently — fungicides protect healthy tissue more than they cure infected tissue, so you’re essentially putting up a shield around what’s still green and good.

    I always apply in the early morning so the spray has time to dry before temperatures peak, and I make sure to coat both sides of the leaves. Repeat applications every seven to ten days during periods of wet weather.

    Step 3: Be Patient With Your Bamboo

    Bamboo is remarkably resilient. Even after a significant leaf drop event, a healthy, established grove will push new growth. The rhizome system underground is what drives the plant, and unless that’s compromised, you’re working with a survivor. Give it time, keep up with your treatments, and trust the process.

    Tools and Products I Recommend

    These are the products I either used myself or researched thoroughly when dealing with my own leaf spot outbreak. All of them are organic-friendly options that I feel good recommending to fellow bamboo growers.

    The Happy Ending I Almost Didn’t Stick Around For

    After my diagnosis spiral

  • Iron Chlorosis Turned My Bamboo Ghost-White: The Mystery I Finally Solved

    Iron Chlorosis Turned My Bamboo Ghost-White: The Mystery I Finally Solved

    I stood in my backyard staring at my prized Phyllostachys aurea, and my stomach dropped. The leaves — once a deep, glossy green — had turned a sickly, almost ghostly yellow-white. Not just a few leaves. Nearly the entire grove. I had spent three years and more money than I care to admit building that screen of golden bamboo, and it looked like it was dying right in front of me. I didn’t know it yet, but what I was looking at was bamboo iron chlorosis, and solving that mystery would take me on a two-month journey of frustration, failed fixes, and finally — one genuinely satisfying breakthrough.

    This post contains affiliate links. As an Amazon Associate, I earn from qualifying purchases.

    When “Just Add Fertilizer” Doesn’t Work

    My first instinct was nitrogen deficiency. I mean, yellowing leaves usually mean the plant needs feeding, right? So I dumped a generous helping of balanced granular fertilizer around the base of the grove and waited. Two weeks later, the leaves looked exactly the same — maybe even a little worse. I tried again with a higher-nitrogen formula. Nothing. At this point I was probably $80 into fertilizer that was doing absolutely zero good, and my spouse was starting to give me the look. You know the one. The we spent how much on this bamboo look.

    I finally sat down and did what I should have done from the start: I really looked at the pattern of the discoloration. The key detail I had been ignoring was that the leaf veins were staying green while the tissue between them turned yellow and then almost white. That is the classic signature of iron chlorosis — not nitrogen starvation, not overwatering, not a fungal disease. The plant had iron in the soil, almost certainly, but it could not absorb it. And there is a big difference between those two situations.

    Understanding Bamboo Iron Chlorosis: What’s Actually Happening

    Iron is one of the micronutrients bamboo needs to produce chlorophyll. Without enough available iron, the plant cannot synthesize chlorophyll properly, and the green fades out of the leaf tissue between the veins — a symptom called interveinal chlorosis. Here is the frustrating part: iron deficiency in bamboo is almost never about a lack of iron in the soil. It is almost always about pH.

    When soil pH climbs above about 6.5 to 7.0, iron molecules bond with other compounds and become chemically unavailable to plant roots. The iron is right there in the ground, locked away like money in a safe you cannot open. Bamboo — like azaleas, blueberries, and gardeninas — prefers slightly acidic soil in the 5.5 to 6.5 range. When that pH drifts upward, iron chlorosis follows. My soil test (which I really should have done in week one, lesson learned) came back at 7.4. That explained everything.

    A few things can push soil pH up over time: heavy watering with alkaline tap water, lime leaching from a nearby concrete foundation or pathway, or simply the natural mineral composition of your native soil. My bamboo was planted right alongside a concrete retaining wall. There was my culprit.

    The Two-Part Fix: Chelated Iron and Soil Acidification

    Once I understood what was actually wrong, the solution became clear — and it has two parts that work together. First, you give the plant a fast-acting dose of chelated iron to start recovering the foliage. Second, you bring the soil pH down so the problem does not come right back in a few months.

    Step One: Apply Chelated Liquid Iron

    Chelated iron is iron that has been chemically bonded to an organic molecule, which keeps it available to plant roots even in higher-pH conditions. It is the fast lane for getting iron into a struggling plant. You can apply it as a soil drench, or for even quicker results, spray it directly on the foliage — the leaves absorb it within hours. Within a week or two of my first application, I started seeing new growth come in with actual green color, and that was the first moment I exhaled in two months.

    Step Two: Acidify the Soil

    Chelated iron is a treatment, but acidifying the soil is the cure. Sulfur-based soil acidifiers lower pH gradually over several weeks, making the native iron in your soil permanently more available. You have to be patient — this is not an overnight process — but the results last. I applied a soil acidifier in early spring and tested the pH again eight weeks later. I had dropped from 7.4 down to 6.6. Not perfect, but well within the range where iron becomes available again. Combined with the chelated iron treatments, that grove came all the way back.

    Products That Genuinely Helped Me

    I went through a fair amount of trial and error before landing on products that actually worked. Here is what I ended up using and recommending to anyone dealing with the same problem.

    For Quick Iron Supplementation

    For Correcting Soil pH

    • Fertilome Soil Acidifier Plus Iron (1 Gallon) — My personal favorite for this job because it does double duty: it lowers pH with sulfur while simultaneously delivering iron. One product, two problems addressed. The gallon size is what I use for maintaining the entire grove.
    • Fertilome Soil Acidifier Plus Iron (32 oz) — Same excellent formula in a smaller size, which is perfect for spot-treating a single bamboo plant or trying it out before scaling up to the full gallon.

    My practical advice: start with a chel

  • Bamboo Leaf Scorch: My Very Public Confession About Over-Fertilizing

    Bamboo Leaf Scorch: My Very Public Confession About Over-Fertilizing

    I want to tell you about the day I stood in my backyard, coffee in hand, staring at my beloved golden bamboo grove and genuinely wondering if I had killed it. The leaves were curling, scorched brown at the tips like someone had run a lighter along each one, and I had absolutely no one to blame but myself. If you’ve ever Googled “bamboo leaf scorch fertilizer burn” in a mild panic at seven in the morning, welcome. You are among friends here.

    This post contains affiliate links. As an Amazon Associate, I earn from qualifying purchases.

    This is my very public confession about the time I decided that if a little fertilizer was good, a lot of fertilizer was obviously going to be absolutely spectacular. Reader, it was not spectacular. But the story does have a happy ending, and more importantly, I learned enough along the way to make sure you never have to recreate my particular brand of gardening chaos.

    How I Managed to Scorch an Entire Bamboo Grove

    It started with good intentions, as most gardening disasters do. My golden bamboo had been looking a little lackluster after a long winter, and I was eager to give it a boost heading into spring. I had just ordered a big bag of granular fertilizer, and when it arrived I did what any reasonable person does: I ignored the instructions entirely and applied roughly three times the recommended amount because, in my head, I was essentially giving my bamboo a spa treatment instead of a meal.

    I raked it in, watered it generously, and then stood back with the satisfied smugness of someone who has absolutely no idea what they’ve just done. Two weeks later, the tips of nearly every leaf in the grove had turned a crispy, unmistakable brown. The culms still looked okay, but the foliage looked like it had been through something deeply traumatic. Which, to be fair, it had. I had happened to it.

    What Bamboo Leaf Scorch From Fertilizer Burn Actually Looks Like

    Before we get to the fix, let’s make sure we’re talking about the same thing. Bamboo leaf scorch from fertilizer burn has a pretty recognizable signature, and it’s worth distinguishing from other issues like drought stress, wind burn, or fungal disease.

    • Browning starts at the leaf tips and edges, not in the center or as random spots
    • Leaves may curl or feel dry and papery at the affected areas
    • The damage is widespread across the plant, not isolated to one section
    • Symptoms appear relatively quickly after fertilizing, usually within one to three weeks
    • The soil may smell slightly acrid if you’ve really overdone it, or you may notice a white crusty residue near the root zone

    What’s happening underneath is a process called salt burn. Excess fertilizer salts in the soil draw moisture out of the roots through osmosis, essentially dehydrating the plant from the inside out even if the soil itself is wet. Your bamboo is thirsty despite being surrounded by water it can no longer properly absorb. It’s a cruel little irony.

    How to Treat and Recover From Bamboo Leaf Scorch Fertilizer Burn

    Here’s the good news: bamboo is incredibly resilient, and if you catch this early, recovery is very achievable. Here’s what I did, and what you should do too.

    Step 1: Flush the Soil Deeply

    The goal is to dilute and push those excess fertilizer salts down and out of the root zone. Water your bamboo deeply and slowly for several days in a row. We’re not talking a quick sprinkle — we’re talking a slow, steady soak that moves water all the way through the soil profile. If you applied granular fertilizer, try to physically remove any you can still see on the surface before flushing.

    Step 2: Check Your Soil Moisture Carefully

    One of my biggest mistakes during the recovery process was guessing at soil moisture and overwatering in my panic, which created a whole different set of problems. A good soil meter is genuinely one of the most useful tools you can have for bamboo care. I now use one religiously before I water or amend anything.

    Step 3: Be Patient With the Foliage

    The scorched leaves are not going to turn green again — that damage is done. But once the root zone recovers, your bamboo will push fresh new growth. Don’t strip the damaged leaves off in a frenzy. Let the plant drop them naturally, and focus your energy on soil recovery rather than cosmetic tidying.

    Step 4: Wait Before Fertilizing Again

    Give your bamboo at least six to eight weeks before you even think about feeding it again. When you do return to fertilizing, choose a slow-release or controlled-release formula that delivers nutrients gradually rather than all at once. Your bamboo will thank you quietly by simply not dying.

    Tools and Products I Actually Use Now

    After my fertilizer fiasco, I got serious about having the right tools on hand. Here’s what I recommend based on real, embarrassing, hard-won experience.

    For Monitoring Soil Conditions

    The YAMRON 4-in-1 Soil Moisture Meter is fantastic for bamboo growers because it measures soil moisture, pH, temperature, and sunlight intensity all in one device. Having that pH reading is especially useful after a fertilizer burn incident, since salt buildup can throw off your soil chemistry. The backlit LCD display makes it easy to read even in shaded grove conditions.

    If you have large container bamboo or deeper planting beds, the XLUX Long Probe Deep Use Soil Moisture Meter is a brilliant option. The extended probe reaches down into the root zone where it matters most, rather than just reading surface moisture that can be wildly misleading.

    Another solid all-rounder is this 4-in-1 Soil Moisture and pH Meter, which covers the same bases as the YAMRON at a slightly different price point. Great for those who want a backup meter or are equipping a larger garden.

    For Feeding Your Bamboo the Right Way

    Once you’re ready to fertilize again, do yourself a favor and use something formulated specifically for bamboo. The March 29, 2026

  • Root Rot Killed My 5-Year-Old Bamboo: The Overwatering Story I’m Ashamed Of

    Root Rot Killed My 5-Year-Old Bamboo: The Overwatering Story I’m Ashamed Of

    I stood in my backyard staring at a bamboo grove that had taken me five years to grow, and I knew something was terribly wrong. The culms had gone from vibrant green to a sickly yellow almost overnight, and when I finally dug down to investigate, the smell hit me first — that unmistakable, earthy rot that told me I was too late. Bamboo root rot had quietly destroyed everything I’d spent half a decade building, and the worst part? I did it to myself.

    This post contains affiliate links. As an Amazon Associate, I earn from qualifying purchases.

    I’m sharing this story because I’ve seen dozens of posts about pests and diseases written from a clinical distance. But this one is personal, a little embarrassing, and I hope it saves at least one of you from making the same expensive, heartbreaking mistake I did.

    How a Good Intention Turned Into a Garden Disaster

    It started the summer we had an unusual dry stretch. I panicked. My bamboo — a beautiful stand of Phyllostachys aureosulcata I’d been nurturing since the kids were in elementary school — looked a little droopy one afternoon, and I convinced myself it was desperate for water. So I watered it. Then I watered it again the next day. And the day after that. I even set up a soaker hose on a timer because I didn’t want to “forget.”

    What I didn’t realize was that the drooping was a temporary midday wilt — something bamboo does completely normally in high heat. It wasn’t a cry for water. It was just… Tuesday. By the time I noticed the yellowing leaves and mushy rhizomes, the roots had been sitting in waterlogged soil for nearly three weeks. My beautifully established grove was in serious trouble, and I had no one to blame but myself.

    My spouse didn’t say “I told you so,” but the look said everything. We had talked about redoing the back fence using that corner of the yard, and I’d insisted on keeping the bamboo. That conversation stung a lot more now.

    Understanding Bamboo Root Rot: What’s Actually Happening Underground

    Bamboo root rot is almost always caused by one of a handful of water mold pathogens — most commonly Phytophthora or Pythium species — that thrive in poorly drained, consistently wet soil. These aren’t true fungi, but they behave like them, colonizing the root system and cutting off the plant’s ability to take up nutrients and water. Ironically, the plant then shows symptoms that look like drought stress — yellowing, wilting, and leaf drop — which can trick an already worried gardener into watering even more.

    Here’s what made my situation worse: bamboo rhizomes spread horizontally, and once rot sets into the rhizome network, it can travel. By the time above-ground symptoms appear, significant underground damage has usually already occurred. Bamboo is remarkably resilient, but it is not immune to sustained waterlogged conditions.

    The warning signs I should have caught earlier:

    • Yellowing leaves that weren’t explained by seasonal shedding
    • Culms that felt soft or hollow near the base
    • A faint sour or musty smell near the soil line
    • Stunted or absent new shoot production during the growing season
    • Soil that stayed wet for days after watering or rain

    What I Did to Try to Save It (And What Actually Worked)

    Once I understood what I was dealing with, I went into recovery mode. I removed the most damaged culms first, cutting them at the base. Then I carefully excavated around the rhizome zone, removing visibly blackened and mushy sections. I let the soil dry out — really dry out — for over a week before doing anything else.

    One of the first things I did to the remaining root zone was treat it with a diluted hydrogen peroxide solution. Hydrogen peroxide introduces oxygen into the soil, which helps kill anaerobic pathogens like the ones responsible for root rot while being gentle enough not to destroy everything beneficial in the soil. I used a 3% solution sprayed directly onto the exposed root area and into the soil around the rhizomes.

    Tools I Used During Recovery

    For the hydrogen peroxide treatments, I kept a couple of options on hand depending on the scale of the application:

    Beyond the hydrogen peroxide, I also applied a phosphonate-based fungicide to the root zone. Phosphonates work differently from most fungicides — they’re taken up by the plant and actually help it fight off Phytophthora and Pythium from the inside. This was genuinely a game changer for what remained of my grove.

    Beyond the treatments, I also improved drainage in the area by working in coarse grit and compost, and I removed the soaker hose timer entirely. Manual watering only from that point forward.

  • Why Bamboo Leaves Turn Yellow: 6 Causes I Discovered the Embarrassing Way

    Why Bamboo Leaves Turn Yellow: 6 Causes I Discovered the Embarrassing Way

  • Bamboo Spider Mites: How Tiny Invisible Pests Nearly Destroyed My Entire Grove

    Bamboo Spider Mites: How Tiny Invisible Pests Nearly Destroyed My Entire Grove

    • Deep watered every 3–4 days instead of light daily watering, encouraging roots to reach deeper moisture
    • I still remember the morning I walked out to my bamboo grove and noticed something was terribly wrong. The leaves that had always been a deep, glossy green were pale, stippled, and lifeless — like someone had dusted them with ash overnight. I had no idea then that I was looking at a bamboo spider mites infestation, and I certainly had no idea how bad things were about to get. If you’re here searching for bamboo spider mites treatment options, I want you to know: I’ve been exactly where you are, and there is a way through this.

      This post contains affiliate links. As an Amazon Associate, I earn from qualifying purchases. This means I may earn a small commission if you click through and make a purchase — at no extra cost to you. I only recommend products I’ve personally used or would confidently use in my own garden.

      How a “Little Yellowing” Turned Into a Full-Blown Crisis

      It started in late July during one of the hottest, driest summers our area had seen in years. I noticed a few yellow leaves on my Phyllostachys aurea — my beautiful golden bamboo that I’d been growing for nearly six years. I chalked it up to heat stress and made a mental note to water more. That was my first mistake.

      Two weeks later, the yellowing had spread to nearly a third of the canes. Leaves were curling, dropping, and that strange pale stippling had moved across the entire eastern edge of my grove. My neighbor — a retired horticulturalist — came over, took one look, and said quietly, “You’ve got mites. Bad ones.” He handed me a magnifying glass and told me to look at the underside of a leaf. I did, and what I saw made my stomach drop. Tiny, almost invisible creatures were moving across a fine web of silk. Spider mites. Hundreds of them on a single leaf.

      I spent that night reading everything I could find. What I learned scared me. Spider mites — particularly the two-spotted spider mite (Tetranychus urticae) — thrive in hot, dry conditions, reproduce at an explosive rate, and can devastate a bamboo grove in a matter of weeks if left unchecked. And I had left them unchecked for nearly a month.

      Understanding Bamboo Spider Mites: What You’re Actually Dealing With

      Spider mites aren’t insects — they’re arachnids, which is part of why many common insecticides do nothing to stop them. They pierce leaf tissue and suck out the contents of individual cells, which causes that telltale bronze or silver stippling pattern. As the damage accumulates, leaves yellow, dry out, and fall. In severe infestations, you’ll see fine webbing on the undersides of leaves and between stems.

      Bamboo is particularly vulnerable during periods of drought stress. When a plant is already struggling to maintain moisture, its natural defenses are weakened, and spider mites move in fast. A few key things that make infestations worse:

      • Hot, dry, dusty conditions — mites hate humidity
      • Overuse of nitrogen-heavy fertilizers, which creates lush, tender growth mites love
      • Killing off beneficial predatory insects with broad-spectrum pesticides
      • Crowded plantings with poor air circulation
      • Ignoring early warning signs like minor leaf stippling or faint webbing

      I had checked nearly every box on that list. The summer heat, a recent fertilizer application, and my own delayed response had created perfect conditions for the mites to explode.

      Bamboo Spider Mites Treatment: What Actually Worked for Me

      Once I understood what I was dealing with, I attacked the problem from multiple angles. Here’s the honest, step-by-step approach that saved my grove.

      Step 1: Water Blast First

      Before reaching for any product, I used a strong jet of water from my garden hose to blast the undersides of as many leaves as I could reach. This physically dislodges mites and disrupts their colonies. It won’t eliminate them, but it knocks the population back immediately and makes your treatments more effective. I did this every other day throughout the treatment period.

      Step 2: Neem Oil — My First Line of Chemical Defense

      Neem oil is the gold standard for organic mite control, and for good reason. It disrupts the mites’ hormonal systems, suffocates eggs and adults on contact, and leaves minimal chemical residue. I used Bonide Captain Jack’s Neem Oil Ready-to-Use Spray because I needed something I could grab and deploy immediately across a large area. It’s also approved for organic gardening, which matters to me since my grove is close to a vegetable bed.

      I alternated it with BioAdvanced Organics Neem Oil Ready-to-Use to prevent the mites from building resistance to any single formulation. I applied both products in the early morning or evening — never in direct midday sun, which can cause leaf burn — and made sure to coat the undersides of leaves thoroughly. That’s where the mites live and breed.

      Step 3: Systemic Protection for Heavy Infestations

      Because my infestation had gone so far, I also added Bonide Systemic Houseplant Insect Control Granules to the soil around the base of my most affected canes. Systemic products are absorbed through the roots and distributed throughout the plant tissue, providing longer-lasting protection from within. This is especially helpful when you can’t reach every leaf with a spray bottle. I used this as a complement to, not a replacement for, my surface treatments.

      Step 4: Broad-Spectrum Backup When Things Were at Their Worst

      At the peak of my infestation, I brought in BioAdvanced 3-in-1 Insecticide and Fungicide Ready-to-Spray. This product combines insect, mite, and disease control in a single application — which was useful because a secondary fungal issue had developed on some of the weakened canes. I used this sparingly and only on the most heavily affected sections of the grove.

      Step 5: Environmental Changes to Stop the Cycle

      Chemical treatment alone won’t work if you don’t address the conditions that allowed mites to thrive in the first place. I made these changes alongside my spray schedule:

      • Deep watered every 3–4 days instead of light daily watering, encouraging roots to reach deeper moisture