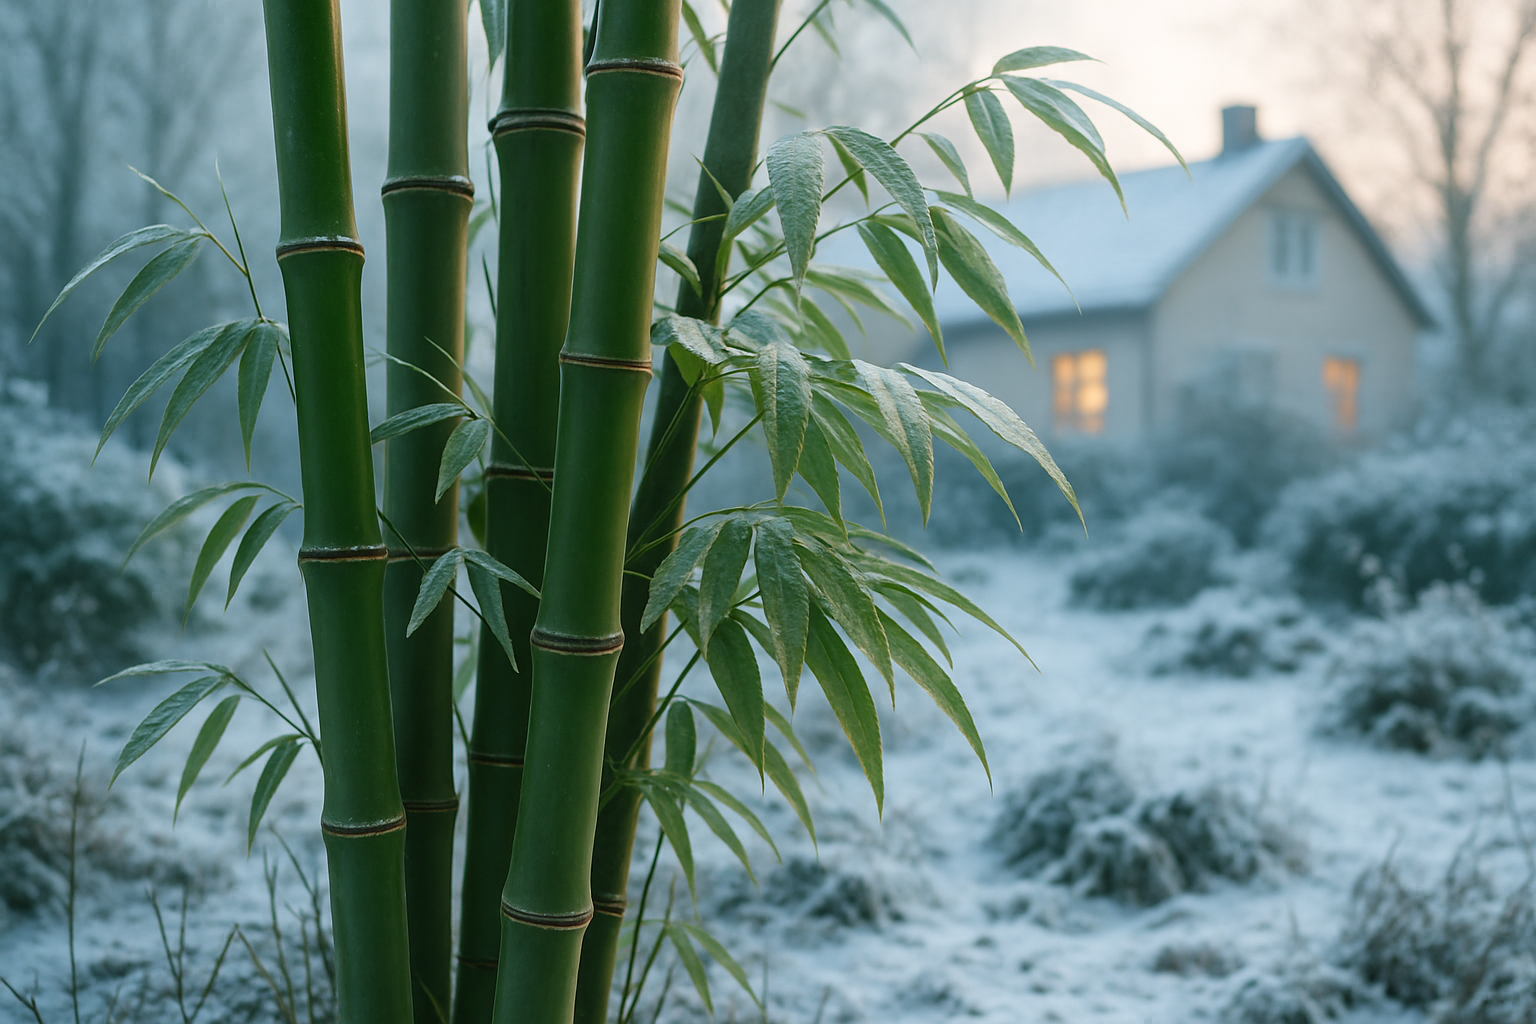
- Bambusa Metake Korean/Japanese Arrow Bamboo — My anchor
I want to tell you about the day I accidentally ordered what I thought was a small decorative bamboo plant and instead received something that looked like it could house a family of pandas. It arrived on my doorstep in a box so tall my mail carrier left a passive-aggressive note. My neighbor watched me wrestle it up my driveway and simply said, “Good luck with that.” She was not wrong. But here’s the thing — that ridiculous, oversized, completely-wrong-for-my-porch bamboo plant became the starting point for the most beautiful bamboo Japanese garden I never planned to build.
This post contains affiliate links. As an Amazon Associate, I earn from qualifying purchases. If you click a link and make a purchase, I may earn a small commission at no extra cost to you. I only recommend products I genuinely love or would use myself.
Before that chaotic delivery, my backyard was a sad stretch of patchy grass and a cracked concrete border that I kept telling myself I’d fix “next weekend” for approximately three years. I had zero garden experience, a modest budget, and a slightly unhinged optimism that I could turn it into something serene and intentional. Spoiler: I did. For under $300. And you absolutely can too.
Why Bamboo Is the Soul of a Japanese Garden
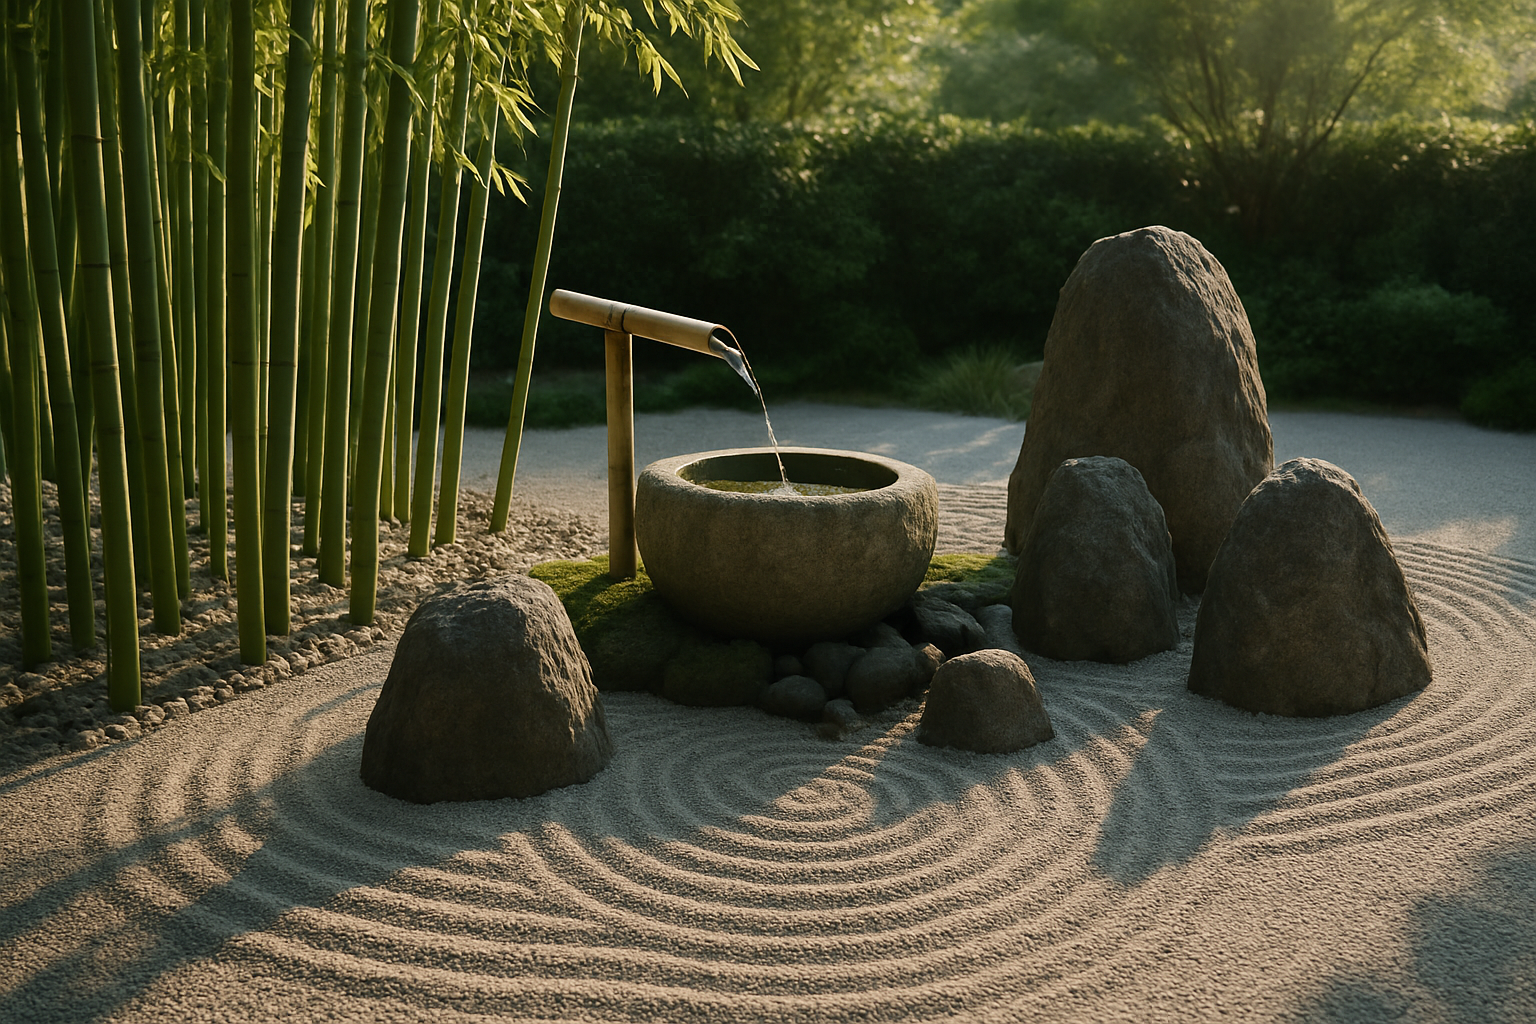
Japanese garden design is rooted in a philosophy called wabi-sabi — finding beauty in simplicity, imperfection, and the natural world. Bamboo fits that philosophy so perfectly it almost feels like cheating. It sways in the wind. It rustles. It casts gorgeous dappled shadows. It’s evergreen, so your garden looks intentional even in January when everything else looks like it gave up.
Bamboo also brings something few plants can offer: movement and sound. A Japanese garden isn’t meant to be looked at like a painting. It’s meant to be experienced. The gentle clatter of bamboo canes in a breeze does more for your nervous system than a spa day. Trust me, I’ve tested both.
The key design principle to understand before you plant anything is restraint. Japanese gardens use fewer plant varieties than Western gardens, placed with more intention. You’re not filling space �� you’re shaping negative space. Bamboo, river rocks, a gravel path, and a focal point or two. That’s genuinely all you need.
Choosing the Right Bamboo for a Japanese Garden
Not all bamboo belongs in a Japanese-style garden. You want varieties that are elegant, upright, and relatively well-behaved. Here’s where I need to revisit my delivery disaster for a moment.
What I had originally ordered was supposed to be a container-friendly ornamental variety. What showed up was something entirely different — a gorgeous but humbling lesson in always reading the plant description twice. After a lot of frantic Googling and one very educational phone call to a local nursery, I realized I needed to rethink my entire approach. And honestly? It was the best mistake I ever made, because it sent me down a rabbit hole of bamboo research that completely transformed my backyard.
For a traditional Japanese aesthetic, I recommend starting with arrow bamboo. The Bambusa Metake Korean/Japanese Arrow Bamboo #1 Size Live Plant is one of my top picks. It’s a clumping-style bamboo that stays manageable, reaches a graceful medium height, and has that classic slender silhouette you see in Japanese woodblock prints. It’s cold-hardy, shade-tolerant, and plays beautifully alongside stone and gravel. This is the variety I eventually settled on, and it anchors my entire garden.
If you’re working with a smaller space — a patio, balcony, or container garden — consider starting from seed with something like these Japanese Bamboo Bonsai Forest Seeds. Growing bamboo bonsai is a genuinely meditative process and fits the Japanese garden aesthetic on even the tiniest terrace. It’s also a wonderful project if you want to involve kids or just want something you can watch grow incrementally from your kitchen window.
Building Your Bamboo Japanese Garden: A Practical Layout Guide
Here’s the step-by-step approach I used to put the whole thing together without losing my mind or my budget.
Step 1: Define Your Space
Start by marking out your garden boundary with a garden hose or spray paint. In Japanese design, curves are preferred over hard angles — they feel more natural and less confrontational. Even if you’re working with a rectangular bed, soften the edges where you can.
Step 2: Lay Your Ground Cover
Remove your grass, lay down landscape fabric, and top it with gravel or decorative stones. This is where you can have a lot of fun. I used a combination of Virekm River Rocks for the main ground surface — they’re smooth, natural-looking, and come in a great neutral palette that complements bamboo beautifully. For the stepping stone path that winds through the garden, I did something a little unexpected and added a border of UNIME Glow in the Dark Garden Pebbles. My kids think it’s the coolest thing in the neighborhood. My neighbors agree, although some of them are seven years old.
Step 3: Plant Your Bamboo Thoughtfully
Place your bamboo in odd-numbered groupings — threes and fives look more natural than pairs or even rows. Plant the tallest varieties at the back or corners to create a natural privacy screen, and use lower-growing varieties or bonsai specimens toward the front for layering and depth.
If you want to add something a little unexpected and sculptural near the front of your garden, I love the look of the Beta Bucks John Bamboo Willow Bonsai Forest Kit. The weeping willow form pairs surprisingly well with upright bamboo — the contrast in texture and shape adds visual interest without breaking the zen mood. It’s also beginner-friendly, which, as we’ve established, is important for some of us.
Step 4: Add Focal Points
A Japanese garden needs at least one focal point to draw the eye. This could be a stone lantern, a simple water feature, a large specimen rock, or even a carefully placed piece of driftwood. Keep it minimal. One or two focal points maximum. Restraint, remember?
Tools I Use and Recommend
- Bambusa Metake Korean/Japanese Arrow Bamboo — My anchor
Category: Planting Options
-
Bamboo for a Japanese Garden: How I Created Zen Serenity for Under $300
-
The Best Bamboo for Hot, Dry Climates: A Desert Gardener’s Unlikely Success Story
I still remember standing in my backyard in Phoenix, staring at a pile of dead plants and a credit card bill I didn’t want to open. I had spent nearly $400 on ornamental grasses, tropical shrubs, and yes — bamboo — that a well-meaning nursery employee swore would “do great out here.” Three months later, the Arizona summer had turned every single one of them into crispy, brown ghosts of their former selves. My husband didn’t say “I told you so,” but I could feel it hanging in the air between us every time we walked past that sad corner of the yard.
That disaster was the beginning of what turned into a genuine obsession with finding bamboo that could actually survive — and even thrive — in a bamboo hot dry climate situation. And spoiler alert: I eventually found it. But first, let me save you from making the same expensive mistakes I did.
This post contains affiliate links. As an Amazon Associate, I earn from qualifying purchases. This means if you click a link and make a purchase, I may earn a small commission at no extra cost to you. I only recommend products I genuinely find useful.
Why Most Bamboo Fails in Hot, Dry Climates
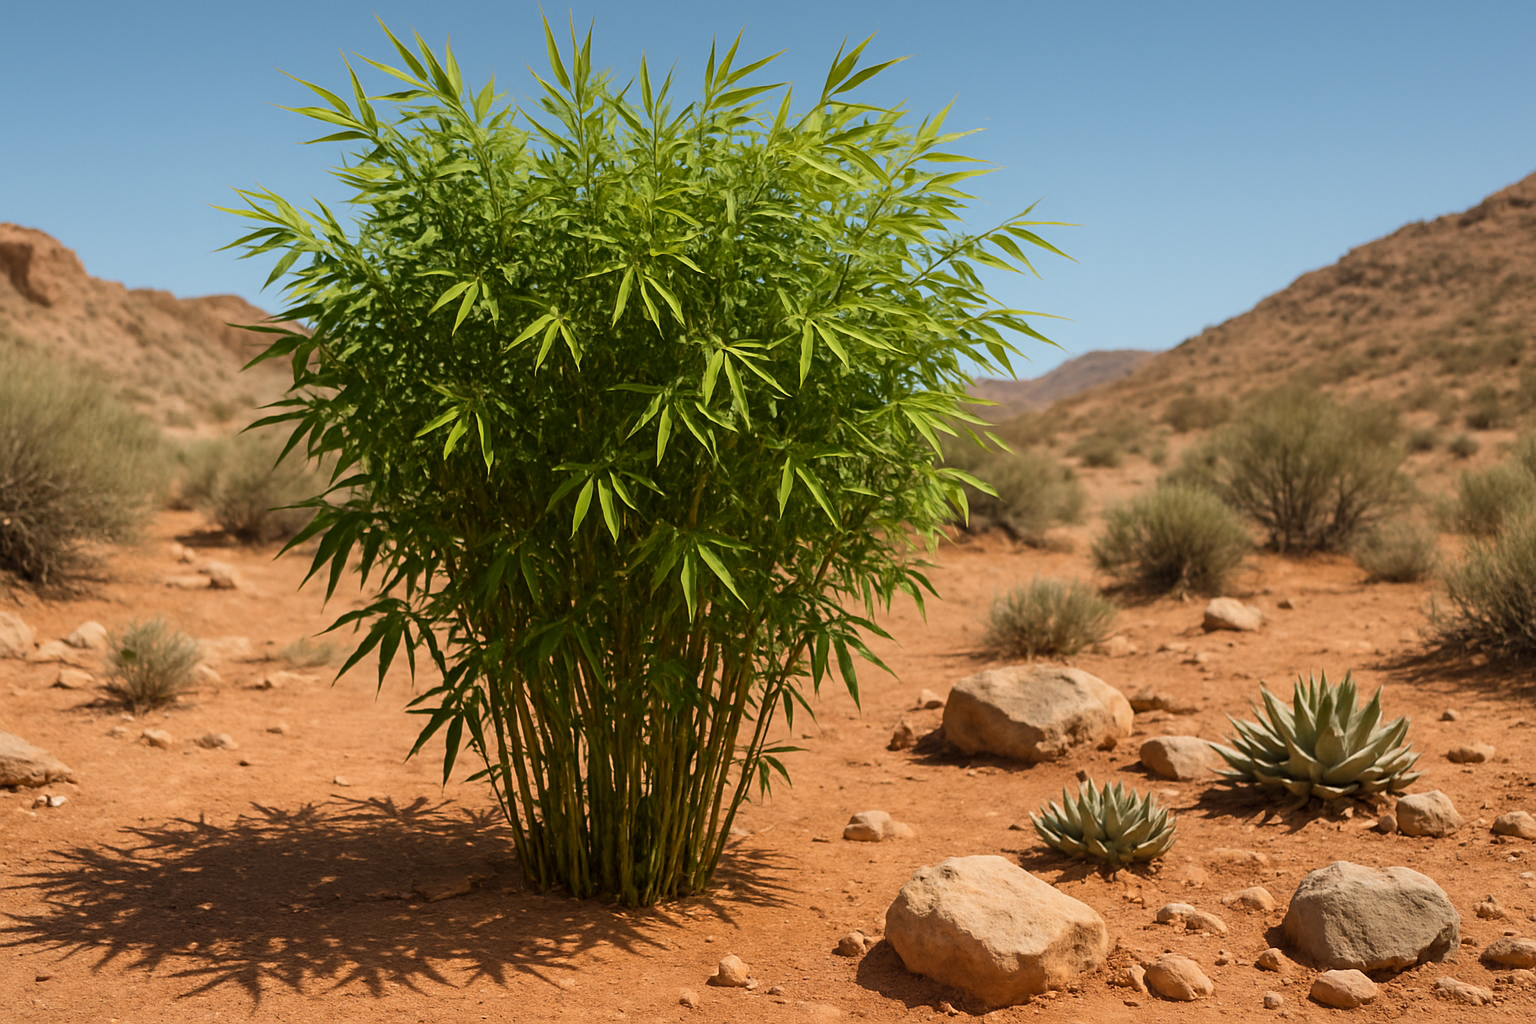
Here’s the hard truth nobody told me at that nursery: most bamboo sold in big-box garden centers is bred for humidity and mild temperatures. When you’re dealing with triple-digit heat, low rainfall, and low humidity — the trifecta of desert gardening misery — the wrong bamboo variety doesn’t just struggle. It dies fast and takes your money with it.
Bamboo is a grass at its core, and like all grasses, it comes in an enormous range of climate tolerances. The key factors that will make or break bamboo in hot, dry climates are:
- Heat tolerance: Some varieties handle sustained heat above 100°F; many absolutely do not.
- Drought resistance: True drought-tolerant bamboo can go longer between watering once established, but they still need help getting there.
- Soil adaptability: Desert soils are often alkaline and sandy. You need varieties that won’t throw a tantrum over pH.
- Root establishment time: Bamboo needs extra support during its first year in harsh conditions. This is where most desert gardeners lose the battle.
After my $400 disaster, I did what any stubborn desert gardener does: I went deep into research mode. Forums, university extension publications, bamboo society newsletters. I was going to crack this.
The Best Bamboo Varieties for Hot Dry Climate Gardening
Not all hope is lost for bamboo lovers in the desert Southwest, Southern California, or other hot, arid regions. These varieties have proven track records in difficult conditions.
Bambusa oldhamii (Giant Timber Bamboo)
This clumping bamboo is a desert gardener’s best friend. It tolerates heat extremely well, can handle brief drought periods once established, and grows impressively fast. It’s one of the most widely successful bamboos in Southern California and Arizona. Clumping types are also a safer choice in general because they won’t send runners racing under your fence into your neighbor’s yard — something I learned about the hard way with my first failed attempt.
Bambusa multiplex (Hedge Bamboo)
Another clumping variety that handles heat and some drought with grace. It stays more compact than Oldhamii, making it perfect for privacy screens or container growing on a covered patio. This one is particularly forgiving during the establishment phase, which makes it great for beginners trying bamboo in a challenging climate for the first time.
Black Bamboo (Phyllostachys nigra)
Black bamboo is the one that made me fall in love all over again after my disaster. Those dramatic dark culms are absolutely stunning against a desert landscape with terracotta walls or gravel paths. It is technically a running bamboo, so you’ll want to use root barriers, but it handles heat better than most running varieties and has a surprisingly good drought tolerance once established. If you want to try growing it from seed, these Black Bamboo Seeds are a fun project — just know that growing from seed takes patience and a good germination setup.
Consider a Bamboo Alternative: Nandina (Heavenly Bamboo)
Okay, this one isn’t technically bamboo — it’s actually a shrub — but hear me out. Nandina domestica, commonly called Heavenly Bamboo, gives you that airy, bamboo-like aesthetic with incredible drought tolerance and year-round color. For spots where even the toughest bamboo struggles, Nandina Gulf Stream is a gorgeous, low-maintenance option that holds its own beautifully in hot, dry gardens. I planted two of these flanking my back gate and they have been absolutely effortless.
How I Finally Made Bamboo Work in the Arizona Desert
After my initial failure, I changed my entire strategy. The plants weren’t the only problem — my planting and watering methods were all wrong for the desert environment. Here’s what actually worked.
Deep Root Watering Changed Everything
Surface watering in extreme heat is almost pointless. The moisture evaporates before it reaches the roots, and it encourages shallow root systems that can’t handle the dry spells between waterings. The single biggest game-changer for me was switching to deep root irrigation stakes. I use these 24-inch Deep Drip Watering Stakes around all of my bamboo, and if you prefer a tan color that blends with natural mulch, this tan version works just as well. They push water straight down to the root zone, which is exactly where bamboo needs it most during establishment and heat stress.
Mulch Like You Mean It
A thick layer of mulch — we’re talking four to six inches — around the base of your bamboo is non-negotiable in desert climates. It insulates the soil, retains moisture, and keeps the root zone temperature from spiking to levels that stress the plant. Organic mulch also slowly improves your soil structure over time, which is a bonus when you’re working with compacted, alkaline desert dirt.
Plant in Fall, Not Spring
This was the advice that finally turned things around for me. Planting bamboo in the fall gives it the cooler months to establish its root system before facing its first brutal summer. Spring planting in the desert throws a brand-new plant
-
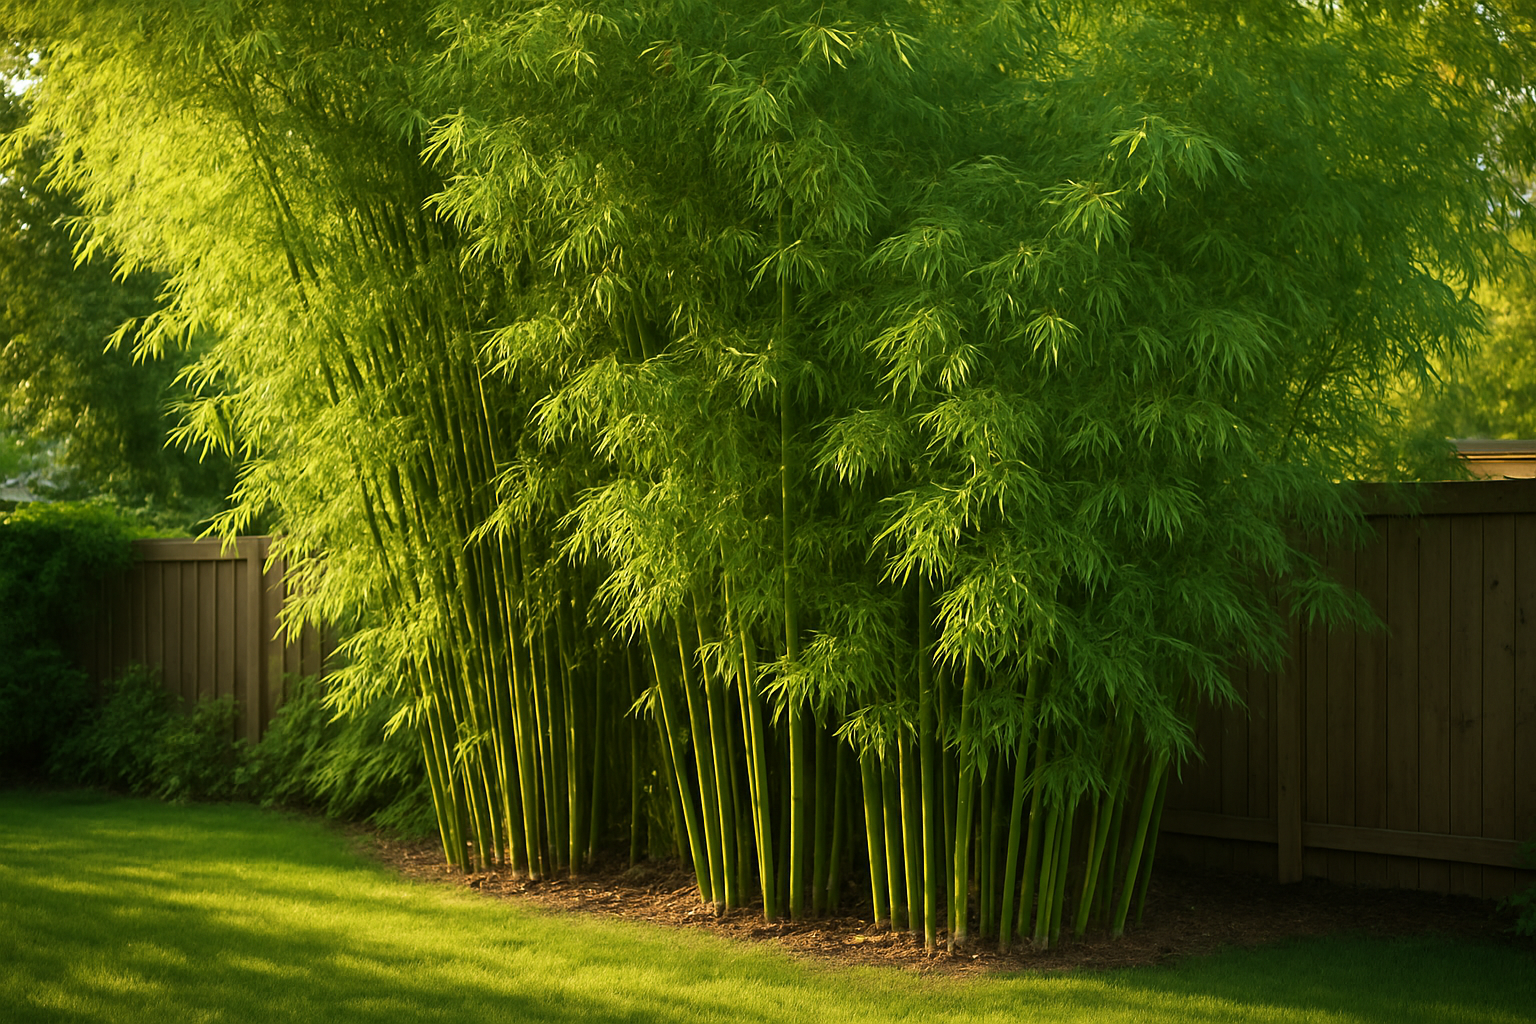
Bamboo as a Windbreak: How My Grove Finally Silenced the Neighborhood Noise
- Start seeds indoors: Germinate bamboo seeds in trays with a quality seed-starting mix, keeping them warm and consistently moist. Many varieties germinate within one to three weeks under the right conditions.
- Transplant carefully: Bamboo seedlings don’t love having their roots disturbed. Move them to individual pots once they’re a few inches tall, then let them establish before transplanting outdoors.
- Plant in a line: For a windbreak, space your bamboo plants three to five feet apart along your intended barrier line. They’ll fill in over time.
- Cold hardiness matters: Some bamboo varieties are hardy down to 0°F or below, while others are strictly tropical. Know your USDA hardiness zone before ordering seeds or plants.
- Height goals: For a serious windbreak, you want varieties that will realistically reach 15 to 40+ feet. Giant bamboo species are well-suited to this purpose.
- Running vs. clumping: Running bamboo spreads aggressively and needs a rhizome barrier. Clumping bamboo stays tidy and is generally better for smaller yards.
- Dense canopy: Look for varieties with dense foliage that will actually intercept wind and sound, not just look tall and sparse.
- Growth rate: One of bamboo’s greatest assets is how fast it grows. Many giant varieties will reach significant height within just a few seasons from established plants.
- Start seeds indoors: Germinate bamboo seeds in trays with a quality seed-starting mix, keeping them warm and consistently moist. Many varieties germinate within one to three weeks under the right conditions.
- Transplant carefully: Bamboo seedlings don’t love having their roots disturbed. Move them to individual pots once they’re a few inches tall, then let them establish before transplanting outdoors.
- Plant in a line: For a windbreak, space your bamboo plants three to five feet apart along your intended barrier line. They’ll fill in over time.
I want to tell you about the day I accidentally ordered what I can only describe as “an alarming quantity of bamboo seeds” while half-asleep at 11 p.m., convinced I was being practical. My neighbor Larry — bless his heart — runs a leaf blower every Saturday morning at 7 a.m. like he’s personally declared war on silence. I’d read one article about using a bamboo windbreak to block noise and wind, typed something into Amazon with the confidence of a man who absolutely knows what he’s doing, and woke up the next morning to a confirmation email for not one, not two, but three separate seed orders totaling over 800 seeds. For a backyard that is, generously, a quarter acre.
This post contains affiliate links. As an Amazon Associate, I earn from qualifying purchases.
My wife looked at the email over my shoulder, looked at me, looked back at the email, and said nothing. That silence was somehow louder than Larry’s leaf blower. But here’s the thing — a year and a half later, I have a thriving bamboo grove along my back fence, I can barely hear Larry anymore, and I genuinely consider it one of the best gardening decisions I’ve ever stumbled into. Let me tell you what I learned so you can skip the “800 seeds” phase and go straight to the peaceful backyard part.
Why Bamboo Makes Such an Effective Windbreak
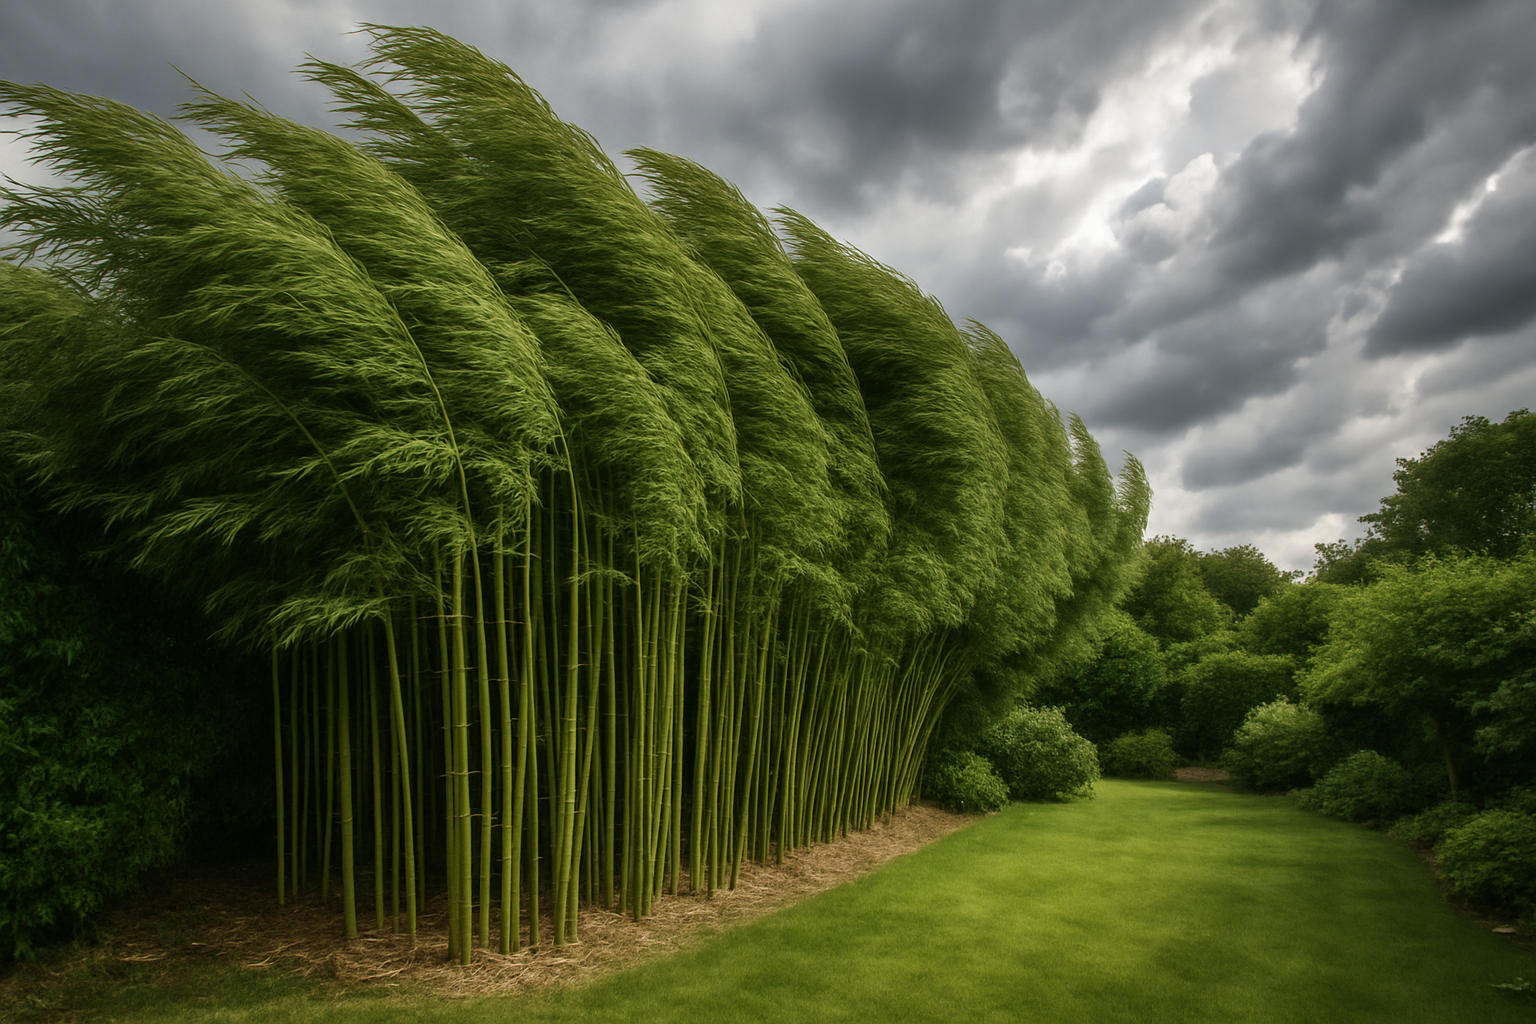
A bamboo windbreak works differently than a solid fence or a brick wall, and that’s actually what makes it so effective. Hard surfaces deflect wind sharply, which can create turbulence and noise on the other side. A dense bamboo grove, on the other hand, acts more like a filter — the canes and leaves absorb and redirect wind energy rather than bouncing it around. The result is a significantly calmer microclimate on the protected side, which also means noticeably reduced noise transmission.
For maximum effectiveness, you’ll want a windbreak that’s at least 1.5 to 2 times taller than whatever you’re trying to protect. Running bamboo varieties (which spread via underground rhizomes) can get extremely tall very quickly, but they require a rhizome barrier to keep them from taking over your lawn — and your neighbor’s lawn, and possibly the street. Clumping bamboo varieties grow in contained, expanding clumps and are much easier to manage for most home gardeners. Both can serve beautifully as a windbreak depending on your goals, space, and patience level.
Bamboo also provides a visual privacy screen, a habitat for birds, and an aesthetic that turns a plain fence line into something genuinely beautiful. It’s one of the most hardworking plants you can put in the ground.
Choosing the Right Bamboo for Your Windbreak
Not all bamboo is created equal when it comes to windbreaks, and your climate will play a big role in your decision. Here are some general guidelines to help you pick the right variety:
Growing from seed takes patience — it’s slower than planting divisions or nursery plants — but it’s also more affordable and honestly more rewarding. There’s something deeply satisfying about watching a plant you germinated from a tiny seed eventually tower over your fence line.
Tools I Use and Recommend
Whether you’re starting from seed or supporting young canes as they establish, a few good tools will make the process a lot smoother. Here’s what I actually use and what I recommend for anyone building a bamboo windbreak from the ground up.
Bamboo Seeds
For giant varieties with dramatic visual impact, I love the 420 Giant Bamboo Seeds for Planting — these are marketed specifically as a privacy screen and windbreak option, and the striking dark stems give your grove a really distinctive look. If you want something with a lush, tropical aesthetic and rapid height gain, the 300+ Giant Bamboo Seeds for Planting are another excellent fast-growing option for creating a serious windbreak or privacy screen. And for something genuinely eye-catching, the 100+ Black Bamboo Seeds for Planting are a rare and exotic variety that produces those gorgeous dark canes — stunning along a fence line.
Plant Stakes for Young Canes
Young bamboo canes can be a little wobbly in their first season, especially if you’re in a windy area (which, if you’re planting a windbreak, you probably are). I use these Mininfa Natural Bamboo Stakes — a 25-pack of eco-friendly three-foot stakes that are perfect for supporting young plants as they establish. There’s also something poetic about using bamboo stakes to support your bamboo. For heavier or taller young canes that need more serious anchoring, these Metal Bamboo Stakes are a sturdy four-pack option that can anchor into the ground securely even in windy conditions.
Tips for Planting Your Bamboo Windbreak Successfully
Here’s what I wish I’d known before I panic-ordered 800 seeds into the void of a Tuesday night:
-
How to Transplant Bamboo Successfully: I Learned by Killing My First One
- Miracle-Gro Quick Start Planting and Transplant Starting Solution — This liquid fertilizer mixes right into your watering can and delivers nutrients directly to stressed roots. I use it for the first few waterings after transplanting.
- Dr. Earth Organic Starter and Transplant
I watched fifty dollars worth of bamboo turn yellow, then brown, then completely dead — and I had no one to blame but myself. I thought transplanting bamboo was just like moving any other plant: dig it up, plop it in a new hole, water it, done. I was spectacularly wrong. That failure sent me down a rabbit hole of research, trial, and eventually real success. Now I want to save you from making the same expensive, heartbreaking mistakes I did. If you’re trying to figure out how to transplant bamboo the right way, you’re in exactly the right place.
This post contains affiliate links. As an Amazon Associate, I earn from qualifying purchases.
The Mistake That Started It All
My neighbor was dividing her massive golden bamboo clump a few summers ago and offered me a chunk of it for free. I was thrilled. I’d been wanting a privacy screen along my back fence for years, and this seemed like a gift from the gardening gods. She handed me a hacked-off section of rhizomes with a few culms still attached, and I drove home grinning.
I dug a hole, dropped it in, gave it a good splash of water from the hose, and walked away feeling like a genius. Within two weeks, every single cane had gone yellow. Within a month, the whole thing was a crispy brown ghost of itself. My neighbor felt terrible. My husband reminded me — gently, but still — that we could have just bought privacy fencing for that amount of stress. The bamboo was dead. Our relationship survived, but just barely.
Here’s what I didn’t know then: bamboo is incredibly sensitive during transplanting, and the roots need serious care from the moment they leave the ground. Skip the right steps and you’re basically just planting a stick.
How to Transplant Bamboo: The Right Way to Do It
After my disaster, I spent weeks reading everything I could find. I talked to a local bamboo nursery owner and joined a few online gardening groups. What I learned completely changed how I approach this process, and my next transplant not only survived — it thrived. Here’s the method that actually works.
Timing Is Everything
The best time to transplant bamboo is early spring, just before new shoots begin to emerge. The plant is waking up and ready to push energy into new growth, which means it can recover from root disturbance much more quickly. Early fall is a decent second option in mild climates. Avoid transplanting in summer heat or the dead of winter — both extremes put enormous stress on an already vulnerable root system.
Dig Wide, Not Deep
Bamboo rhizomes spread horizontally, so you need to dig out a wide circle around the clump — at least 12 inches out from the outermost culms for smaller varieties, more for larger ones. Don’t rush this step. The more of the root system you preserve, the better your chances of success. Use a sharp tool to cut through tough rhizomes cleanly rather than tearing them. A clean cut heals faster and reduces the risk of rot or disease.
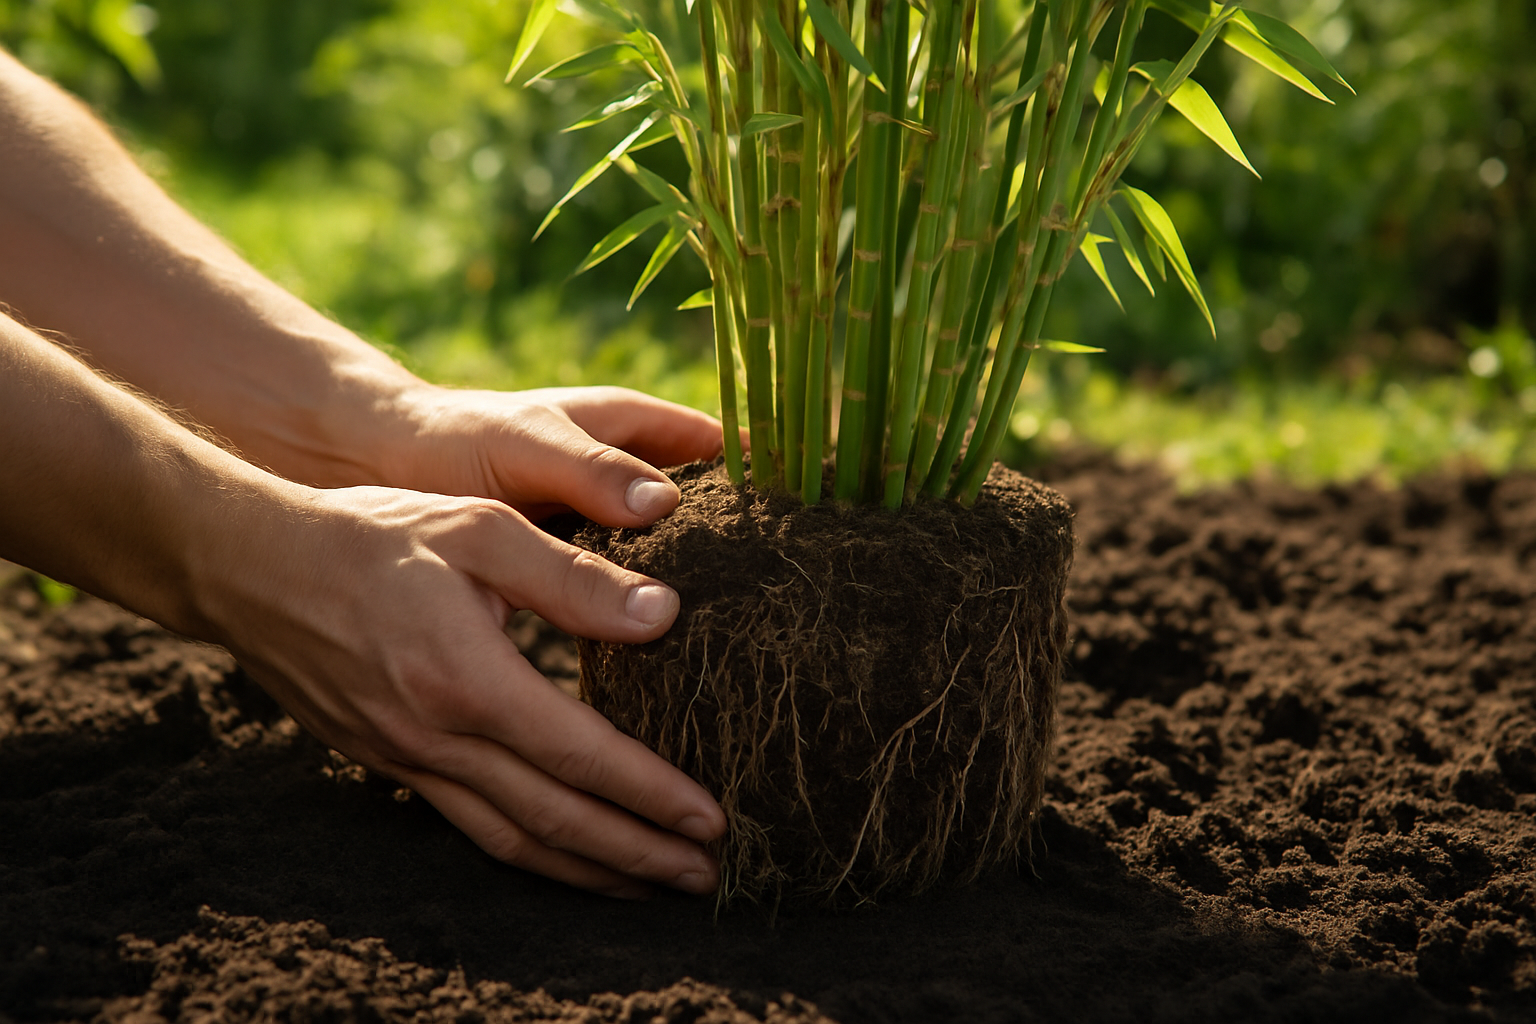
Keep the Roots Moist at All Times
This is the step I completely skipped the first time, and it probably killed my plant faster than anything else. Once the roots are exposed to air, they start drying out immediately. Wrap the root ball in burlap or wet newspaper if you can’t replant right away. Even 30 minutes of dry air exposure on a warm day can damage bamboo roots significantly. Get that root ball into the ground as fast as humanly possible.
Prepare the New Hole First
Dig your new planting hole before you even touch the bamboo you’re moving. The hole should be about twice as wide as the root ball and roughly the same depth. Amend the soil with compost to give the roots a nutrient-rich environment to grow into. When you set the plant in, the top of the root ball should sit at or just slightly above the surrounding soil level. Backfill gently, tamping down to eliminate air pockets without compacting the soil too hard.
Water Deeply and Give It a Transplant Boost
After planting, water the area slowly and thoroughly so moisture reaches all the way down through the root zone. Then keep the soil consistently moist — not waterlogged, but never dry — for the first several weeks. Mulching heavily around the base helps retain moisture and regulates soil temperature, both of which are critical during this recovery period.
Tools and Products That Made a Real Difference
Once I committed to doing this properly, I invested in a few tools and products that genuinely changed my results. If you’re serious about giving your bamboo the best possible start, these are worth having on hand.
Root Cutting Saws
Bamboo rhizomes are tough, and a dull shovel edge tearing through them causes unnecessary damage. A dedicated root saw makes clean, precise cuts that heal faster. I’ve tried a few options and these are my favorites:
- Zenport S148 Root System Pruner Saw — The 5.9-inch blade is compact but incredibly effective for cutting through dense rhizomes in tight spaces. This is the one I reach for most often.
- Kings County Tools Japanese Hand Saw — The 30-degree cutting angle and serrated stainless steel blade make this a dream for cleaner cuts on larger root sections. It feels substantial and well-made in your hand.
- GROWIT Folding Pruning Saw — If you want one versatile tool that folds safely for easy transport and storage, this 11-inch saw with razor-sharp SK5 blade handles bamboo roots like a champ. Great for gardeners who don’t want to haul a lot of gear.
Transplant Fertilizers
Giving transplanted bamboo a nutritional boost at planting time encourages faster root establishment and helps the plant push through the stress of being moved. These are two products I’ve used with great results:
- Miracle-Gro Quick Start Planting and Transplant Starting Solution — This liquid fertilizer mixes right into your watering can and delivers nutrients directly to stressed roots. I use it for the first few waterings after transplanting.
- Dr. Earth Organic Starter and Transplant
-
Golden Bamboo vs Black Bamboo: Choosing the Right Variety After My Colorful Mistake
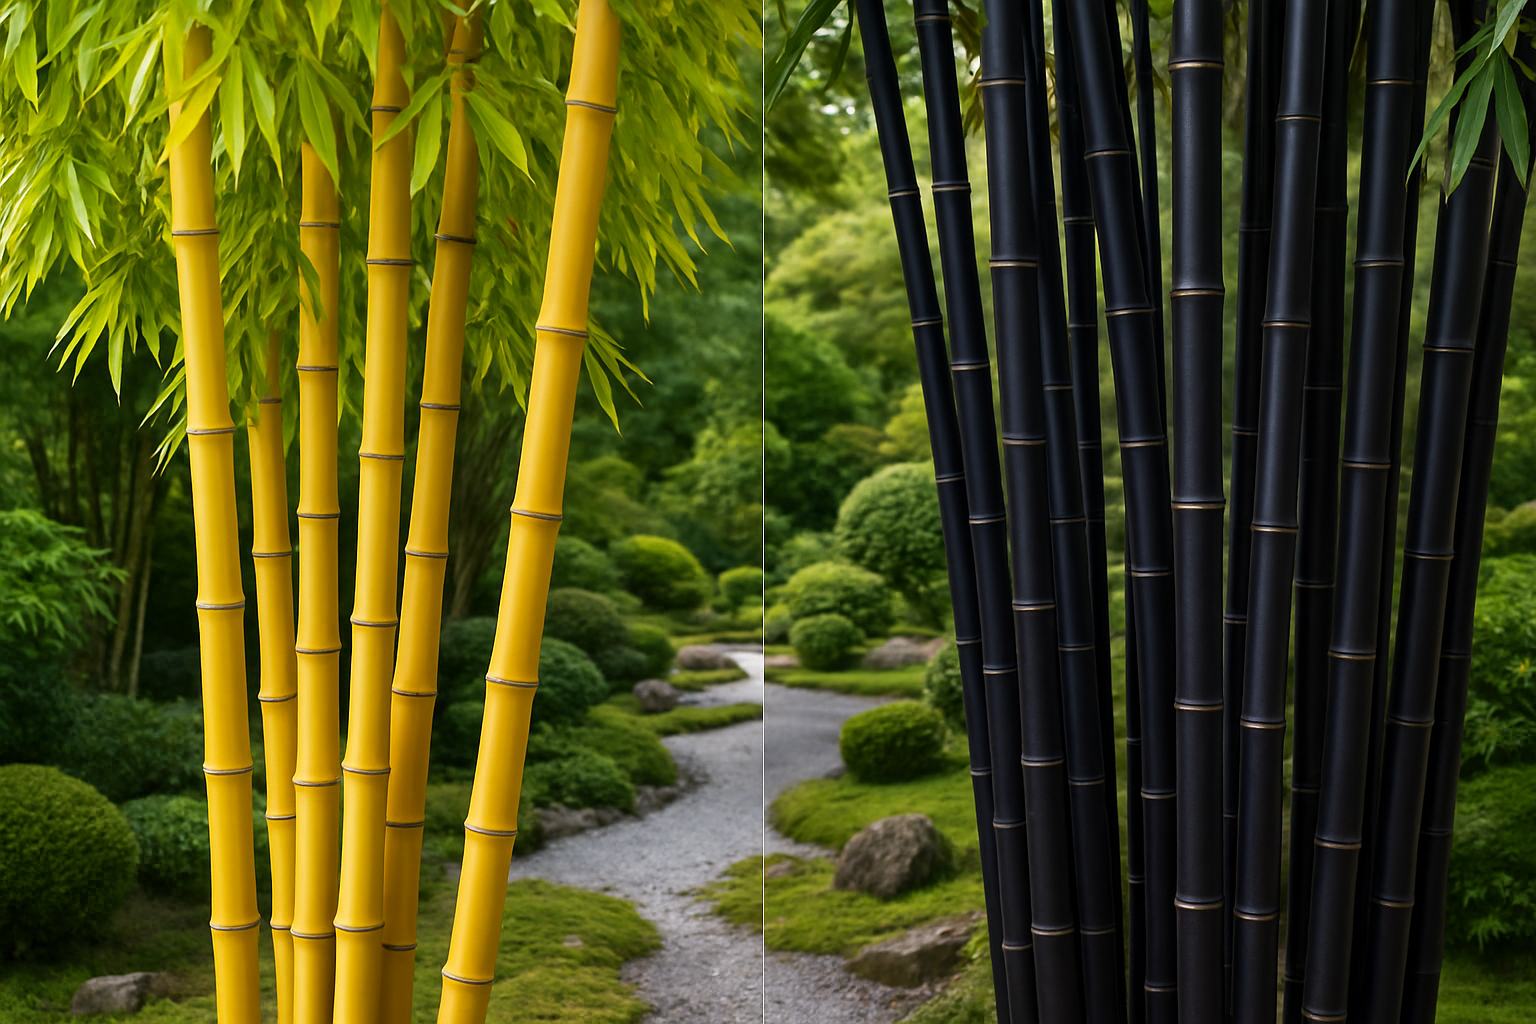
I once spent an entire Saturday smugly planting what I was convinced was black bamboo along my back fence — only to watch it slowly, mockingly, turn a warm shade of golden yellow over the following weeks. Turns out, the debate between golden bamboo vs black bamboo is a lot more important than I gave it credit for, and my eyes were apparently not the reliable plant identification tools I believed them to be.
This post contains affiliate links. As an Amazon Associate, I earn from qualifying purchases.
Let me back up. I had a vision. A sleek, modern garden with dramatic dark culms rising behind my weathered wooden fence — very zen, very intentional. My neighbor Dave kept asking what I was planting, and I kept saying, with embarrassing confidence, “Black bamboo. Very sophisticated.” Dave nodded like he believed me. He did not believe me. But we’ll get to that.
Golden Bamboo vs Black Bamboo: What Actually Makes Them Different
Before we laugh at my mistake any further, let’s talk about what actually separates these two popular varieties — because they genuinely couldn’t be more different, despite both being bamboo.
Golden Bamboo (Phyllostachys aurea)
Golden bamboo is one of the most widely planted bamboos in North America, and honestly, it deserves its popularity — even if I didn’t exactly choose it on purpose. Here’s what you need to know:
- Color: Starts green when young, matures to a warm golden-yellow in full sun
- Height: Typically reaches 20–35 feet under ideal conditions
- Cold hardiness: Hardy down to about 0°F (Zone 6)
- Growth habit: Running bamboo — it will spread aggressively without a rhizome barrier
- Best for: Privacy screens, windbreaks, and bright, sunny spots where you want that cheerful golden glow
Golden bamboo is tough, fast-growing, and forgiving of neglect. If you want a live plant to get started, this Golden Bamboo (Phyllostachys aureosulcata) Live Plant Cutting is a great way to begin — it arrives already rooted and ready to establish in your garden.
Black Bamboo (Phyllostachys nigra)
Ah, the one I actually wanted. Black bamboo is the brooding, dramatic cousin in the bamboo family, and it earns every bit of the aesthetic attention it receives.
- Color: Culms start green and gradually turn jet black in their second or third year — this is key information I wish I had internalized
- Height: Usually 20–30 feet, sometimes taller in warm climates
- Cold hardiness: Hardy to about 0–5°F (Zone 6–7), slightly more sensitive than golden
- Growth habit: Also a running bamboo, but somewhat less aggressive than golden bamboo
- Best for: Statement gardens, Japanese-style landscaping, containers, and anywhere you want serious visual drama
The crucial detail — the one that would have saved me from my Saturday of misplaced confidence — is that black bamboo does NOT emerge from the ground looking black. Young culms are green. The darkening happens with sunlight exposure and age. So if someone sells you a small green cutting and tells you it’s black bamboo, they’re not lying. The color comes later.
Which One Should You Actually Plant?
This is where the golden bamboo vs black bamboo decision really comes down to your specific goals, and I wish someone had made me answer these questions before I marched off to the nursery with my wallet open.
Choose Golden Bamboo If…
- You want fast, dense privacy coverage — golden bamboo is a speed demon
- You’re in a colder climate and need maximum hardiness
- You love that warm, sunny, cottage-garden feel
- You have a large space and don’t mind managing a runner (with barriers!)
Choose Black Bamboo If…
- Aesthetics are your top priority and you want a conversation-starting focal point
- You’re planting in containers and want something stunning on a patio or deck
- You have a modern, minimalist, or Japanese-inspired garden design
- You’re patient — the payoff color takes a couple of years, but oh, is it worth it
One tip for both varieties: always, always install a rhizome barrier if you’re planting running bamboo in the ground. Both golden and black bamboo can spread into places you absolutely did not invite them. A buried HDPE barrier at least 24–30 inches deep will save your sanity and your neighbor’s lawn.
Tools and Products I Actually Use and Recommend
Whether you’re growing bamboo in the ground or experimenting with containers first, here are some products I’ve found genuinely useful along the way.
If you want to test your green thumb before committing to a full outdoor planting, starting with a smaller container setup is surprisingly satisfying. These SHECIPIN Matte Black Mini Ceramic Planter Pots with Bamboo Trays are adorable for propagating cuttings or displaying small bamboo starts on a windowsill — and the bamboo tray detail is a nice touch for obvious reasons.
For anything moving outdoors or graduating to a bigger pot, I really like these D’vine Dev 8-Inch Plastic Planter Pots with Drainage Holes and Saucers. Proper drainage is non-negotiable with bamboo — waterlogged roots are one of the fastest ways to kill an otherwise bulletproof plant.
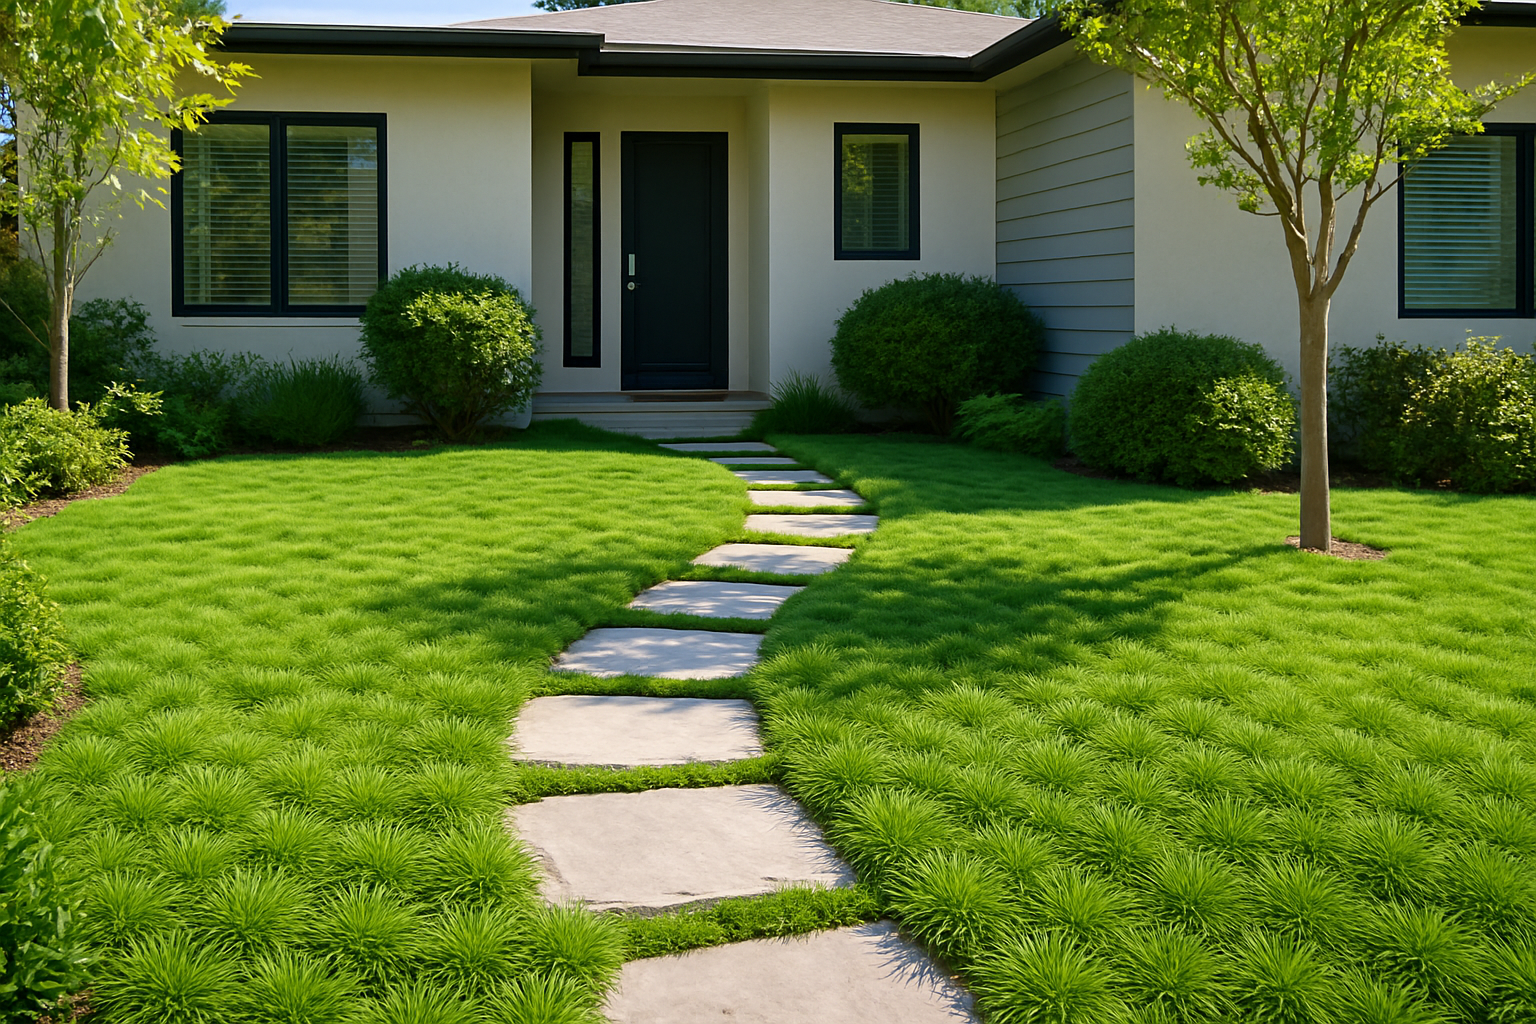
Replacing My Lawn With Dwarf Bamboo: The Best Decision I Almost Didn’t Make
- Mowing or trimming: Once or twice a year in early spring, cut the entire planting back to about three inches. This encourages dense, fresh growth and keeps the height uniform. A simple string trimmer works perfectly.
- Watering: Water regularly during the first year while roots establish. After that, most dwarf varieties are surprisingly drought-tolerant and only need supplemental watering during extended dry spells.
- Fertilizing: A balanced slow-release fertilizer in spring gives your bamboo a nice boost. Nitrogen-rich formulas are especially helpful for lush, green foliage.
- Barrier checks: Once a year, walk the perimeter and check that no rhizomes are escaping under or over your barrier. Clip any escapees right away — they’re easy to manage when caught early.
- Staking young starts: If you’re growing taller accent clumps nearby, these
Why I Finally Gave Up on Grass (And Why You Should Too)
My lawn and I had a complicated relationship. I fed it, I watered it, I rented equipment I didn’t know how to operate. One summer I accidentally scalped an entire section trying to use a dethatching machine I’d watched exactly one YouTube video about. The bald patch lasted two full years. My neighbor Dave would glance at it every time he walked his dog, and I swear that man aged me five years with his sympathetic looks.
When I started researching alternatives, dwarf bamboo kept coming up. And I kept dismissing it, because I had the very common but very wrong assumption that all bamboo is the invasive, take-over-your-yard, break-through-your-foundation kind. Spoiler: it’s not. Dwarf bamboo varieties — particularly clumping types and low-growing running types managed with barriers — are genuinely excellent, well-behaved ground covers that most homeowners can handle with confidence.
Here’s what finally sold me: dwarf bamboo is evergreen in many climates, grows dense enough to choke out weeds on its own, requires almost no mowing once established, and gives your yard a lush, textured look that plain grass simply can’t match. It handles foot traffic reasonably well, tolerates both sun and partial shade, and once it’s settled in, it’s remarkably drought-tolerant compared to turf grass.
Choosing and Planting Your Dwarf Bamboo Ground Cover
Before you start, a little planning goes a long way. Trust me — I skipped the planning phase and ended up with a butter knife situation. Learn from my mistakes.
Pick the Right Variety for Your Space
For true ground cover use, you want varieties that stay under two feet tall. Pleioblastus pygmaeus (pygmy bamboo) and Sasa veitchii are popular choices. If you’re starting from seed and want to experiment, these two seed packs are great options to have on hand:
- Mixrug Dwarf Green Bamboo Seeds for Planting, 490+ pcs — A generous pack of non-GMO heirloom dwarf bamboo seeds, great for both indoor starts and direct outdoor sowing.
- Bamboo Seeds for Planting, 500+ Dwarf Rare Bamboo Seeds — Another solid option if you want to start a larger coverage area or try a slightly different variety mix.
Keep in mind that growing bamboo from seed is a slower process than planting divisions or rhizome starts, but it’s deeply satisfying and much more affordable for larger areas. Start seeds indoors about 8–10 weeks before your last frost, keep them consistently moist, and be patient — germination can take two to four weeks.
Prepare the Ground Properly (Please, Not With a Butter Knife)
After my initial, embarrassing attempt at sod removal, I rented a proper sod cutter. It took about 90 minutes to do what I had spent an entire afternoon failing at with cutlery. Remove the existing grass, loosen the soil to about six inches, and amend with compost if your soil is compacted or nutrient-poor. Dwarf bamboo isn’t fussy, but it establishes much faster in well-draining, slightly acidic soil.
If you’re planting a running variety — which spreads via underground rhizomes — install a rhizome barrier before you plant. This is non-negotiable. A 24–30 inch deep HDPE barrier around the perimeter of your planting zone will keep things exactly where you want them.
Define Your Borders and Mix In Companion Plantings
One thing I wish I had done from day one is define my lawn edges cleanly. Natural wood edging gives a finished, intentional look that makes the whole project feel designed rather than accidental. These Forever Bamboo Natural Eucalyptus Log Borders are beautiful and eco-friendly — I used them along my front walkway and they’ve held up incredibly well through two winters.
For areas near stepping stones or pathways where bamboo might be too aggressive, consider mixing in a low ground cover like Irish moss. These Outsidepride Irish Moss Ground Cover Seeds are perfect for filling gaps between pavers, and the soft green texture plays really nicely alongside dwarf bamboo’s slender leaves.
Tools, Tips, and Keeping Things Tidy
Once your dwarf bamboo is established — usually by the end of its second growing season — maintenance drops dramatically. Here’s what ongoing care actually looks like:
- Mowing or trimming: Once or twice a year in early spring, cut the entire planting back to about three inches. This encourages dense, fresh growth and keeps the height uniform. A simple string trimmer works perfectly.
- Watering: Water regularly during the first year while roots establish. After that, most dwarf varieties are surprisingly drought-tolerant and only need supplemental watering during extended dry spells.
- Fertilizing: A balanced slow-release fertilizer in spring gives your bamboo a nice boost. Nitrogen-rich formulas are especially helpful for lush, green foliage.
- Barrier checks: Once a year, walk the perimeter and check that no rhizomes are escaping under or over your barrier. Clip any escapees right away — they’re easy to manage when caught early.
- Staking young starts: If you’re growing taller accent clumps nearby, these
Companion Planting With Bamboo: My Accidental Discovery Led to My Best Garden Ever
- Set 5 Lady Ferns Bare Roots — These are a fantastic starter if you want to fill in a shady bamboo understory quickly. Hardy and easy to establish.
- American Plant Exchange Live Autumn Fern – 6-Inch Pot — If you want a little extra color and drama, the copper-toned new growth on these is absolutely gorgeous against bamboo canes.
- Fiddlehead Fern Plant Rootstock — For that dramatic, architectural look in a woodland-style bamboo garden, fiddleheads are hard to beat.
- Back to the Roots 100% Organic Mulch – Coconut
I want to tell you about the day I accidentally created the most beautiful corner of my garden — right after I made what I was absolutely certain was a catastrophic mistake. There I was, on my knees in the dirt, surrounded by plants I had ordered in a panic from three different websites, muttering to myself that I had officially lost my mind. What started as a classic case of “I’ll just figure it out as I go” turned into the most rewarding experiment in bamboo companion planting I’ve ever stumbled into. And I mean stumbled — with full dramatic effect.
This post contains affiliate links. As an Amazon Associate, I earn from qualifying purchases.
Here’s the embarrassing part: I had ordered way too many plants. Not a little too many. An absolutely unhinged amount. I had gotten so excited reading about bamboo screening ideas that I went on a late-night shopping spree and ended up with two large bamboo specimens, several flats of ground cover, and approximately forty ferns that I had zero plan for. My husband walked outside, looked at the pile of boxes on the porch, and simply went back inside without saying a word. That silence said everything.
Why Bamboo Companion Planting Actually Makes a Lot of Sense
Before I tell you how the chaos resolved itself beautifully, let me back up and explain why bamboo companion planting is worth thinking about intentionally — even if your method is less “intentional” and more “desperate.” Bamboo is a powerhouse plant, but it creates a very specific microenvironment around it. The tall canes filter light, the roots are vigorous, and the soil underneath tends to stay consistently moist and slightly acidic from all that leaf litter and organic matter. That sounds like a challenge, but it’s actually an opportunity.
The right companion plants will thrive in that shady, moist understory — and in return, they help suppress weeds, protect the soil from erosion, and give your bamboo planting a lush, layered look that feels more like a curated woodland garden than a single-species screen. The key is choosing plants that genuinely enjoy shade and moisture rather than fighting the conditions bamboo creates.
The Best Companion Plants for Bamboo
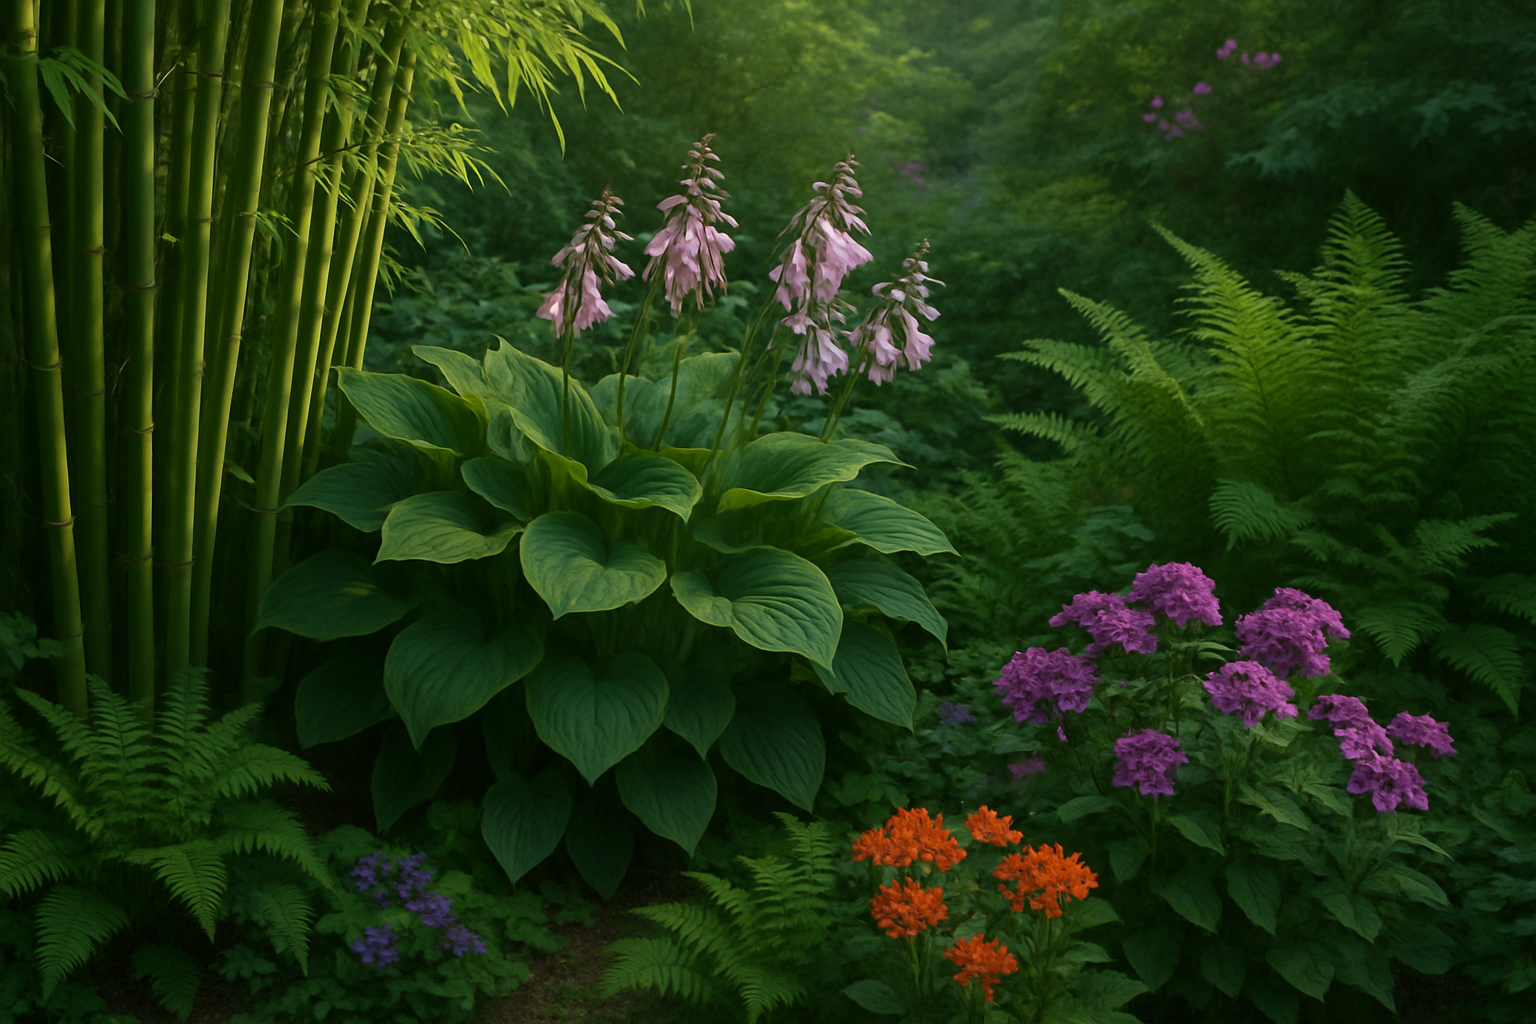
Ferns: The Perfect Bamboo Neighbors
This is where my accidental genius comes in. Those forty ferns I panic-ordered? Turns out ferns and bamboo are practically made for each other. Ferns love the dappled shade that bamboo canopies provide, they tolerate the same moisture-retentive, slightly acidic soil conditions, and their lush, feathery texture creates a stunning visual contrast against bamboo’s tall, vertical canes. I basically stumbled into one of the most classic woodland plant pairings around.
There are several fern varieties that work especially well. Lady ferns are a great starting point — they’re adaptable, hardy across a wide range of climates, and their bright green fronds light up shady spots beautifully. Autumn ferns are another excellent choice, especially if you want a little visual drama; their new growth emerges in stunning copper and bronze tones before maturing to glossy green. And if you’re after something a little more architectural, fiddlehead ferns have that wonderful prehistoric look that makes a bamboo grove feel genuinely magical.
Other Plants That Play Well With Bamboo
- Hostas: Bold, dramatic foliage that thrives in shade and contrasts beautifully with bamboo’s fine-textured leaves.
- Astilbe: Feathery plumes of color that bloom in partial to full shade and love consistent moisture.
- Mondo grass or liriope: Excellent low-growing ground covers that fill in the base of bamboo plantings and handle shade gracefully.
- Hellebores: Shade-tolerant, evergreen, and they bloom in late winter when almost nothing else does.
- Japanese forest grass (Hakonechloa): A graceful, arching ornamental grass that glows golden in partial shade.
Practical Tips for Setting Up Your Bamboo Companion Planting
Get the Soil Ready First
Before you plant anything alongside your bamboo, take a moment to amend and mulch the area well. Bamboo roots can be competitive, so giving your companion plants a healthy, well-prepared bed helps them establish more quickly. A generous layer of mulch does double duty here — it retains moisture, moderates soil temperature, and breaks down over time to feed the soil. I’ve been really happy using organic mulch options that are gentle on both plants and the environment.
Plant in Layers
Think of your bamboo planting in vertical layers. The bamboo itself forms the tall canopy layer. Mid-height companions like ferns, hostas, and astilbe fill in the middle. And low ground covers or mulch handle the base layer closest to the soil. This layered approach not only looks incredible — it also means every inch of space is doing useful work, whether that’s suppressing weeds, preventing erosion, or supporting beneficial insects.
Watch the Moisture
Most bamboo companion plants that love shade also appreciate consistent moisture, which makes them naturally compatible. That said, avoid plants that demand bone-dry conditions or full sun — they’ll struggle in the microclimate bamboo creates. When in doubt, lean toward native woodland plants for your region, since they’re adapted to exactly the kind of dappled, moist conditions a bamboo grove tends to produce.
Tools and Plants I Actually Use
In the spirit of full transparency (and sharing the exact things that turned my fern-ordering frenzy into a success), here’s what I’d genuinely recommend for setting up a beautiful bamboo companion planting:
- Set 5 Lady Ferns Bare Roots — These are a fantastic starter if you want to fill in a shady bamboo understory quickly. Hardy and easy to establish.
- American Plant Exchange Live Autumn Fern – 6-Inch Pot — If you want a little extra color and drama, the copper-toned new growth on these is absolutely gorgeous against bamboo canes.
- Fiddlehead Fern Plant Rootstock — For that dramatic, architectural look in a woodland-style bamboo garden, fiddleheads are hard to beat.
- Back to the Roots 100% Organic Mulch – Coconut
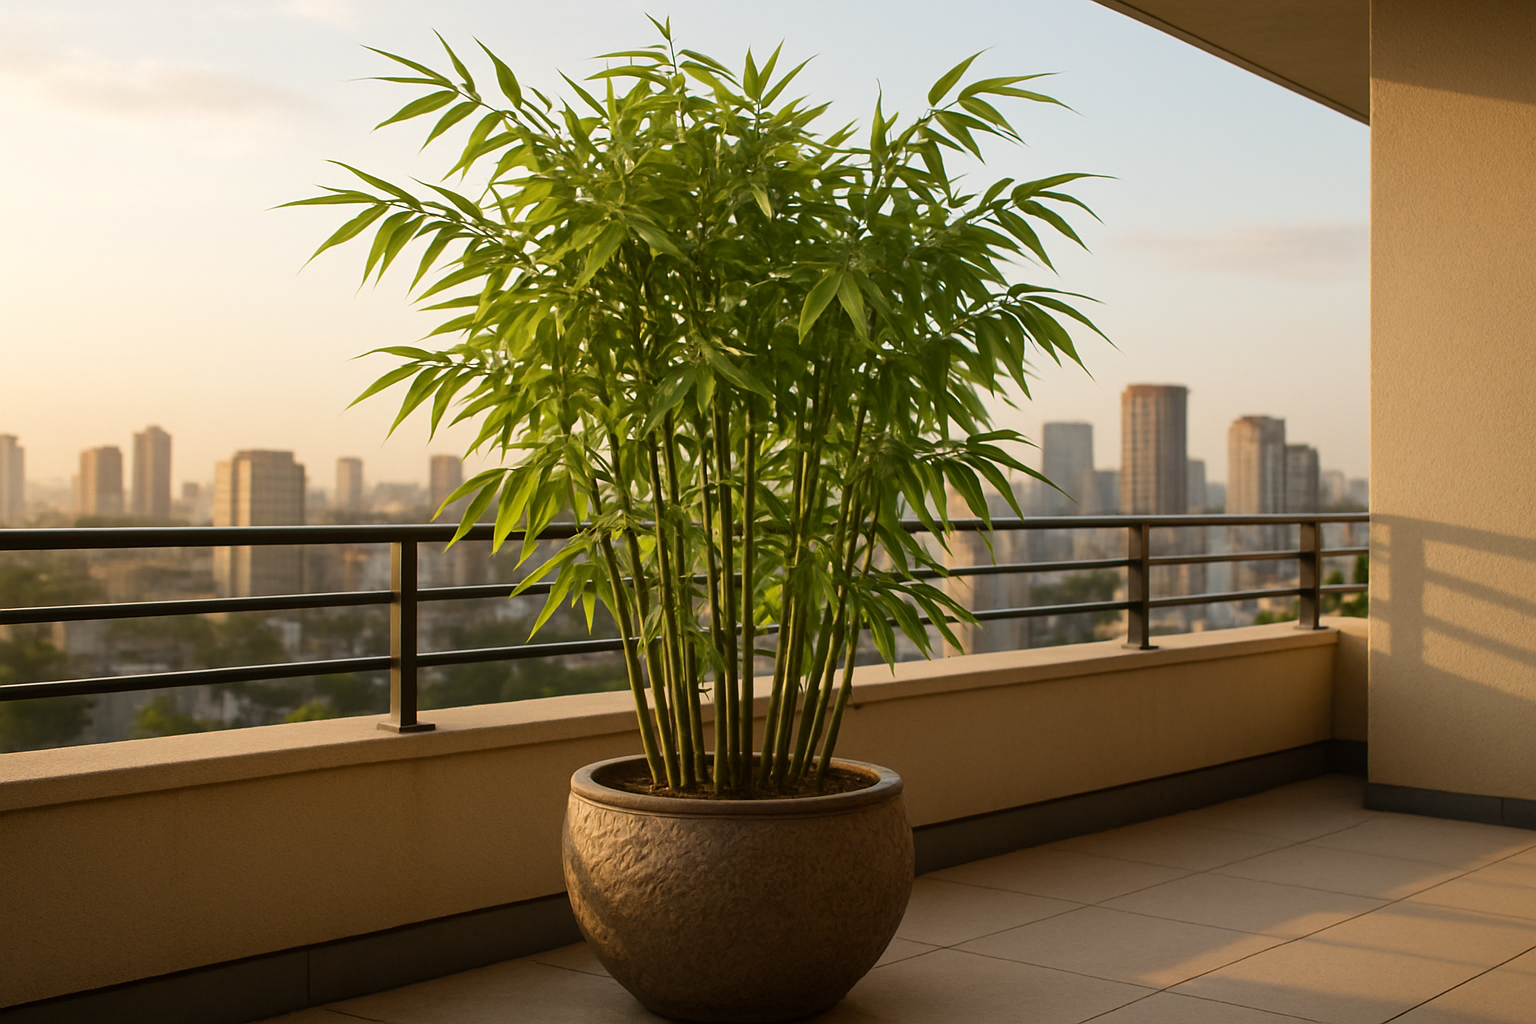
Container Bamboo on My Apartment Balcony: How a 10-Foot Plant Saved My Sanity
I ordered a ten-foot bamboo plant to my third-floor apartment. Without measuring my elevator.
Let that sink in for a moment. I stood in the lobby of my building, staring at a cardboard tube roughly the length of a small kayak, while my neighbor Mrs. Petrovitch watched me from the mailroom with the expression of someone witnessing a slow-motion fender bender. That was eighteen months ago. Today, that same bamboo is thriving in a gorgeous glazed pot on my balcony, I am significantly less stressed, and Mrs. Petrovitch brings me biscotti. If you’ve been curious about container bamboo balcony gardening and whether it’s actually doable in a small urban space, I am living, slightly-embarrassed proof that it absolutely is — and that you don’t have to be a master gardener to pull it off.
This post contains affiliate links. As an Amazon Associate, I earn from qualifying purchases.
Why I Desperately Needed a Plant (Any Plant)
Here’s the backstory. I work from home in a 700-square-foot apartment in a city where the view from my balcony is a parking garage. A beige parking garage. After two years of staring at that concrete monument to joylessness during video calls, I started to feel like I was slowly fossilizing. I needed green. I needed life. I needed something that would make my outdoor space feel like an actual place instead of an accidental ledge.
A friend suggested a few potted ferns. I killed three in one summer. Another friend suggested succulents. I somehow killed those too, which I didn’t even think was biologically possible. Then someone in an online gardening forum mentioned bamboo — specifically, clumping bamboo varieties grown in containers — and described them as “vigorous,” “forgiving,” and “nearly impossible to neglect to death.” Reader, those are my three favorite adjectives in any plant description.
Choosing the Right Bamboo for Container Balcony Growing
Before you run out and buy the first bamboo you see, there’s one crucial distinction you need to understand: clumping versus running bamboo. Running bamboo spreads aggressively through underground rhizomes and, in a container, will eventually become a root-bound disaster that pops your pot like a can of crescent rolls. Clumping bamboo, on the other hand, grows in a tight, well-behaved cluster that expands slowly outward. For a balcony or patio container situation, clumping varieties are almost always the right choice.
Some excellent clumping varieties for containers include:
- Fargesia robusta (Umbrella Bamboo): Cold-hardy down to about -10°F, elegant arching canes, and perfectly scaled for a large container. This is what I ended up with and I adore it.
- Fargesia murielae (Muriel’s Bamboo): A bit more compact and very shade-tolerant, which makes it great for balconies that don’t get full sun all day.
- Bambusa multiplex (Hedge Bamboo): A warmer-climate option for balconies in USDA zones 7 and above, with a dense, lush appearance.
- Otatea acuminata (Mexican Weeping Bamboo): A dramatic, fine-textured beauty that thrives in containers in warmer climates and tolerates wind reasonably well.
Wind is a real consideration on a balcony that it isn’t always on the ground. Upper floors tend to be windier, and sustained wind dries out bamboo quickly and can stress the canes. Varieties with finer, more flexible foliage tend to handle this better than thick-caned tropical types.
Container Bamboo Balcony Setup: Pots, Soil, and Watering
The container itself matters more than most people realize. You want something large — at minimum 15 to 20 gallons for a mature clumping bamboo, and bigger is genuinely better. A larger volume of soil retains moisture longer (critical on exposed balconies) and gives the roots room to develop without getting stressed. Heavy ceramic or glazed pots look stunning and provide ballast against wind. Lightweight fabric grow bags are a practical alternative if your balcony has weight restrictions — worth checking your building’s specs before you go full glazed-terracotta-collection like someone I know.
For soil, avoid standard potting mix on its own. Bamboo needs excellent drainage combined with good moisture retention, which sounds contradictory but isn’t. A blend of quality potting soil, perlite, and a small amount of sand creates that ideal balance. I mix roughly 60% potting soil, 30% perlite, and 10% coarse sand, and my plant has never looked back.
Watering is where most container bamboo balcony growers run into trouble. Containers dry out far faster than in-ground plantings, especially in warm weather or wind. During summer, I water my Fargesia every one to two days and I use a moisture meter to take the guesswork out of it. In winter, I scale back significantly and check the soil before adding water. Yellow leaves are usually the first sign of either overwatering or underwatering — the trick is catching it early and adjusting.
Fertilizing is straightforward: a balanced, slow-release granular fertilizer applied in early spring and midsummer keeps the plant happy. Bamboo is a grass and a hungry one, so don’t skip feeding if you want lush, dense foliage.
Tools I Use for Container Bamboo Care
You don’t need a shed full of equipment to grow bamboo successfully on a balcony, but a few good tools make the whole experience much smoother. Here’s what I’d recommend adding to your setup:
- A quality moisture meter: Takes the guesswork out of watering and has genuinely saved my plant from my own well-intentioned over-watering impulses.
- Slow-release balanced fertilizer (10-10-10 or similar): Easy to apply a couple of times per season and gives bamboo the nitrogen boost it craves.
- A large, durable saucer or drip tray: Essential on a balcony to protect the surface and comply with most building rules about drainage.
- Bypass hand pruners: For removing dead or damaged canes cleanly at the base without tearing the plant.
- A long-reach watering wand: Makes watering a large container much easier without having to lean awkwardly over the pot.
How It All Turned Out (Yes, Including the Elevator)
Back to that lobby. After several minutes of architectural problem-solving and what I can only describe as a group meditation on the nature of commitment, my neighbor’s husband Carlos and I carried that bamboo up three flights of stairs at a diagonal angle that violated at least two laws of physics. We knocked a light fixture. We apologized to a ceiling. We did not, crucially, break the bamboo.
I potted it that same afternoon in a large glazed cobalt blue pot I’d splurged on, dragged it to the corner of my balcony that gets morning sun, and sat down on my little
Growing Bamboo in Zone 5: Three Dead Plants Later, I Finally Succeeded
- HDPE Root Barrier Roll: Look for a 24–30 inch depth barrier rated for bamboo. This is non-negotiable for running varieties. Bamboo root barriers are specifically sold for this purpose and are worth every penny.
- Bamboo-Specific Fertilizer: A high-nitrogen fertilizer formulated for grasses (bamboo is technically a grass) will support strong early growth. Apply in spring when new shoots emerge and again in midsummer.
- Organic Mulch or Wood Chips: Bagged hardwood mulch works perfectly for winter insulation. Apply a thick layer over the root zone each November.
- Long-Handled Pruning Saw or Loppers: For cutting back dead canes in spring and thinning established groves, a quality pruning saw is essential. Bamboo canes are tough, and a cheap tool will frustrate you.
- Soil pH Test Kit: Bamboo prefers slightly acidic soil in the 5.5
The third plant was the one that almost broke me. I’d spent close to $200 on bamboo over two years, watched two clumping varieties turn to mush over winter, argued with my husband about whether I was “just throwing money into a hole,” and then stood in my backyard on a cold March morning staring at yet another pile of brown, papery canes that clearly weren’t coming back. If you’re researching growing bamboo in zone 5, I want you to know: I’ve been exactly where you are, and I’m here to tell you it doesn’t have to end that way.
This post contains affiliate links. As an Amazon Associate, I earn from qualifying purchases.
I live in central Illinois, firmly planted in USDA Hardiness Zone 5, where winter temperatures regularly drop to -10°F and the wind chill makes it feel like the surface of another planet. I wanted bamboo because I dreamed of a living privacy screen along our back fence — something lush, fast-growing, and a little exotic. What I got, for the first two years, was heartbreak and a husband who had officially lost faith in my gardening instincts.
Why Zone 5 Is So Challenging for Bamboo (And Why It’s Not Impossible)
Let’s get honest about the climate reality before we talk solutions. Zone 5 winters are brutal on bamboo because most of the varieties sold at big-box garden centers are clumping bamboos — beautiful, well-behaved, and completely unsuited for temperatures below 0°F. That’s exactly what I bought the first two times. The tags said “cold hardy,” and technically, they were — down to about 10°F. In Illinois, that’s not cold hardy. That’s a death sentence waiting to happen.
The good news is that certain running bamboo species — specifically within the Phyllostachys and Fargesia genera — are genuinely built for zone 5 conditions. The key is knowing which ones, and pairing the right variety with the right planting strategy. I learned this the expensive way so you don’t have to.
The Best Bamboo Varieties for Growing Bamboo in Zone 5
After my third failure, I did something I should have done from the beginning: I spent a full weekend reading, called a specialty bamboo nursery, and joined an online bamboo growers forum. Here’s what I learned about which varieties actually survive — and even thrive — in zone 5 winters.
Phyllostachys aureosulcata (Yellow Groove Bamboo)
This is the one I eventually planted successfully. Yellow Groove bamboo is cold hardy down to -20°F, which means zone 5 winters don’t even make it flinch. It’s a running bamboo, so you’ll want to manage its spread with a root barrier, but it grows quickly, reaches 20–30 feet at maturity, and creates exactly the kind of dense privacy screen I was dreaming about. Mine is now in its third season and absolutely thriving.
Fargesia robusta (Clumping, Non-Invasive)
If the idea of running bamboo spreading through your yard makes you nervous — and it’s a valid concern — Fargesia robusta is your best friend. It’s a clumping bamboo that stays put, handles temperatures down to about -15°F, and grows in part shade, which is rare among bamboo varieties. It won’t get as tall as Phyllostachys, topping out around 12–15 feet, but it’s elegant and completely manageable.
Phyllostachys nuda (Nude Sheath Bamboo)
Another excellent zone 5 performer, Phyllostachys nuda is considered one of the most cold-tolerant of the Phyllostachys family. It handles -15°F reliably and produces beautiful dark green canes. It’s a slightly more compact grower than Yellow Groove, which can be a plus if space is a consideration.
How I Finally Got It Right: Planting Tips That Made the Difference
Choosing the right variety was only half the battle. The other half was everything I did wrong with my first three plants in terms of timing, location, and winter preparation. Here’s the planting strategy that finally worked for me.
- Plant in spring, not fall. My first two plants went in during September. By the time winter arrived, they hadn’t established enough root mass to survive. Give bamboo a full growing season before it faces its first hard freeze.
- Choose a sheltered location. Wind desiccation — not just cold — kills bamboo in zone 5. My successful planting is along a fence that blocks the prevailing northwest wind. That made a noticeable difference in how the canes handled February.
- Mulch heavily in late fall. A 4–6 inch layer of mulch over the root zone helps insulate the rhizomes, which are the real survival engine of the plant. Even if the canes die back above ground, live rhizomes will push up new growth in spring.
- Install a root barrier if using running bamboo. A high-density polyethylene root barrier buried 24–30 inches deep will keep your Phyllostachys from becoming your neighbor’s problem. Don’t skip this step — trust me, it’s much easier to install at planting time than to deal with runaway rhizomes later.
- Water deeply before the ground freezes. A well-hydrated plant going into winter is significantly more cold-tolerant than a dry one. Give your bamboo a long, deep soak in late October or early November before temperatures drop.
- Don’t panic about brown canes in spring. Even cold-hardy bamboo can have cane dieback above the snow line. Wait until late May before making any judgments. If the rhizomes survived, you’ll see fresh shoots pushing up from the ground.
Tools and Supplies I Recommend
Having the right supplies made my successful planting so much smoother than my previous attempts. Here are the general categories of products I’d recommend picking up before you get started — all of which you can find easily on Amazon or at a local garden center.
- HDPE Root Barrier Roll: Look for a 24–30 inch depth barrier rated for bamboo. This is non-negotiable for running varieties. Bamboo root barriers are specifically sold for this purpose and are worth every penny.
- Bamboo-Specific Fertilizer: A high-nitrogen fertilizer formulated for grasses (bamboo is technically a grass) will support strong early growth. Apply in spring when new shoots emerge and again in midsummer.
- Organic Mulch or Wood Chips: Bagged hardwood mulch works perfectly for winter insulation. Apply a thick layer over the root zone each November.
- Long-Handled Pruning Saw or Loppers: For cutting back dead canes in spring and thinning established groves, a quality pruning saw is essential. Bamboo canes are tough, and a cheap tool will frustrate you.
- Soil pH Test Kit: Bamboo prefers slightly acidic soil in the 5.5
The Bamboo Privacy Fence That Almost Ended My Marriage
My husband Dave and I don’t fight often, but the summer I decided to plant a bamboo privacy fence along our back property line, we came closer to a real blowup than we had in fifteen years of marriage. I’m talking slammed doors, silent dinners, and one very tense conversation in the driveway at 10 PM with a flashlight and a root barrier brochure. What started as a simple dream — a lush, green wall of privacy between our yard and our neighbors’ — turned into a months-long saga involving dead plants, unexpected costs, and one very justified “I told you so.” But here’s the thing: it also ended with the most beautiful, functional garden feature we’ve ever created together. Let me tell you the whole messy story.
This post contains affiliate links. As an Amazon Associate, I earn from qualifying purchases. I only recommend products I’ve personally used or genuinely trust for your bamboo gardening projects.
How a Simple Weekend Project Became a Marital Crisis
It started innocently enough. Our neighbors built a deck that looked directly into our backyard, and suddenly our private little sanctuary felt like a fishbowl. I started researching options — wooden fences, vinyl panels, ornamental shrubs — and kept landing on the same answer: bamboo. It grew fast, stayed green year-round in our zone, and looked absolutely stunning in every photo I found. I was sold before Dave even knew I was shopping.
Here’s where I made my first mistake. I bought twelve running bamboo plants from a discount nursery without fully understanding what “running” meant. I figured bamboo was bamboo. I wanted fast growth, and running varieties promised exactly that. What I didn’t realize was that without proper containment, running bamboo spreads aggressively through underground rhizomes — sometimes traveling ten or more feet in a single season. I planted all twelve along our fence line one Saturday afternoon while Dave was watching football, figuring I’d explain later.
By the following spring, shoots were popping up in our vegetable garden, through a crack in the patio, and — most dramatically — in the neighbor’s flower bed on the other side of the fence. Our neighbor Janet was not amused. Dave was even less amused. That was the driveway flashlight conversation. It was not our finest hour.
What I Wish I’d Known Before Installing a Bamboo Privacy Fence
After the Great Rhizome Incident, I did what I should have done from the beginning: actual research. Lots of it. And I want to share everything I learned so you don’t have a driveway flashlight moment of your own.
Running vs. Clumping Bamboo — Know the Difference
This is the single most important decision you’ll make. Running bamboo spreads laterally through rhizomes and can become invasive without barriers. Clumping bamboo grows in a tight, expanding clump and stays much more manageable. For a privacy screen in most residential yards, clumping varieties like Fargesia or Bambusa are far safer choices — especially if you have neighbors or garden beds nearby. Running varieties like Phyllostachys can still work beautifully, but only with proper rhizome barriers installed first.
Root Barriers Are Non-Negotiable for Running Types
If you’re committed to a running variety for faster growth or cold hardiness, install a high-density polyethylene rhizome barrier at least 24–30 inches deep around your planting area. Bury it at a slight outward angle so rhizomes are deflected upward, where you can spot and trim them. Skipping this step is exactly how you end up apologizing to your neighbor Janet.
Spacing and Soil Prep Matter More Than You Think
For a privacy screen, plant clumping varieties 3–5 feet apart. They’ll fill in over two to three seasons and create a dense, beautiful wall. Amend your soil with compost and ensure good drainage — bamboo hates soggy roots. A slow-release fertilizer high in nitrogen will encourage that lush, leafy growth you’re after during the first growing season.
Tools and Supplies I Recommend for the Job
Doing this right the second time around, Dave and I invested in a few quality tools that made the whole process smoother and actually saved us money in the long run. Here’s what I’d recommend having on hand before you start:
- A heavy-duty spade or trenching shovel — Installing root barriers means digging a trench 24–30 inches deep along your entire planting area. A sharp, long-bladed spade is worth every penny.
- High-density polyethylene rhizome barrier (60 mil or thicker) — Don’t cheap out here. Thin barriers can be punctured by aggressive rhizomes. Look for commercial-grade options rated specifically for bamboo.
- A soil pH meter — Bamboo thrives in slightly acidic soil between 6.0 and 6.5. Knowing your starting point helps you amend correctly before planting.
- Slow-release nitrogen fertilizer — A balanced fertilizer with a higher nitrogen content supports vigorous cane and leaf growth in the establishment years.
- A quality garden hose with an adjustable nozzle — Newly planted bamboo needs consistent moisture while it establishes, especially in the first summer. Deep, regular watering beats shallow daily sprinkles every time.
You can find all of these on Amazon — search specifically for “60 mil bamboo rhizome barrier” and read reviews carefully to make sure you’re getting a product rated for aggressive running varieties.
The Redemption Arc (Yes, There Is One)
That fall, after the disaster was cleaned up and the peace treaty with Janet had been signed (in the form of a very nice bottle of wine and a sincere apology), Dave and I started over. Together this time. We spent a weekend researching clumping varieties suited to our climate — we’re in zone 7 — and landed on Fargesia robusta, sometimes called the Campbell bamboo. Cold-hardy, clumping, elegant, and fast enough to give us meaningful privacy within two seasons.
We dug the trench together. We amended the soil together. Dave, who had initially wanted nothing to do with any bamboo ever again, became genuinely invested in getting it right. There was something unexpectedly bonding about doing the hard, dirty work side by side with a shared goal. By the second summer, the canes were reaching six feet and filling in beautifully. By the third, we had the lush green privacy screen I’d originally dreamed of — without a single shoot in the wrong place.
Last July, we had dinner on the back patio — the one the bamboo now screens perfectly from the neighbors’ deck. Dave looked over at the swaying green wall and said, completely unprompted, “Okay. It was worth it.” Fifteen years of marriage and that might be one of my favorite things he’s ever said to me.
If you’re dreaming of your own bamboo privacy fence, please learn from my expensive, marriage-straining mistakes. Choose the right variety for your space, prepare your soil, contain what needs containing, and — if you have a partner — maybe loop them in before you buy twelve plants on a Saturday morning. The result, when you do it right, is genuinely magical. And I promise the journey there is worth every bit of effort.