- Garden fork or broadfork — essential for breaking up compacted post-bamboo soil without destroying the structure further
- Soil test kit — don’t skip this; pH correction before seeding saves weeks of frustration
- Compost amendments — Michigan Peat Compost and Manure Blend for bulk areas, Charlie’s Compost with Biochar for targeted soil rebuilding
- All-in-one grass seed products — Scotts Rapid Grass Tall Fescue for large areas, Scotts PatchMaster for medium patches, Scotts EZ Seed for small stubborn spots
- Consistent watering schedule — new seed needs light, frequent moisture in the first two weeks; don’t let it dry out
- Patience — full recovery takes one to
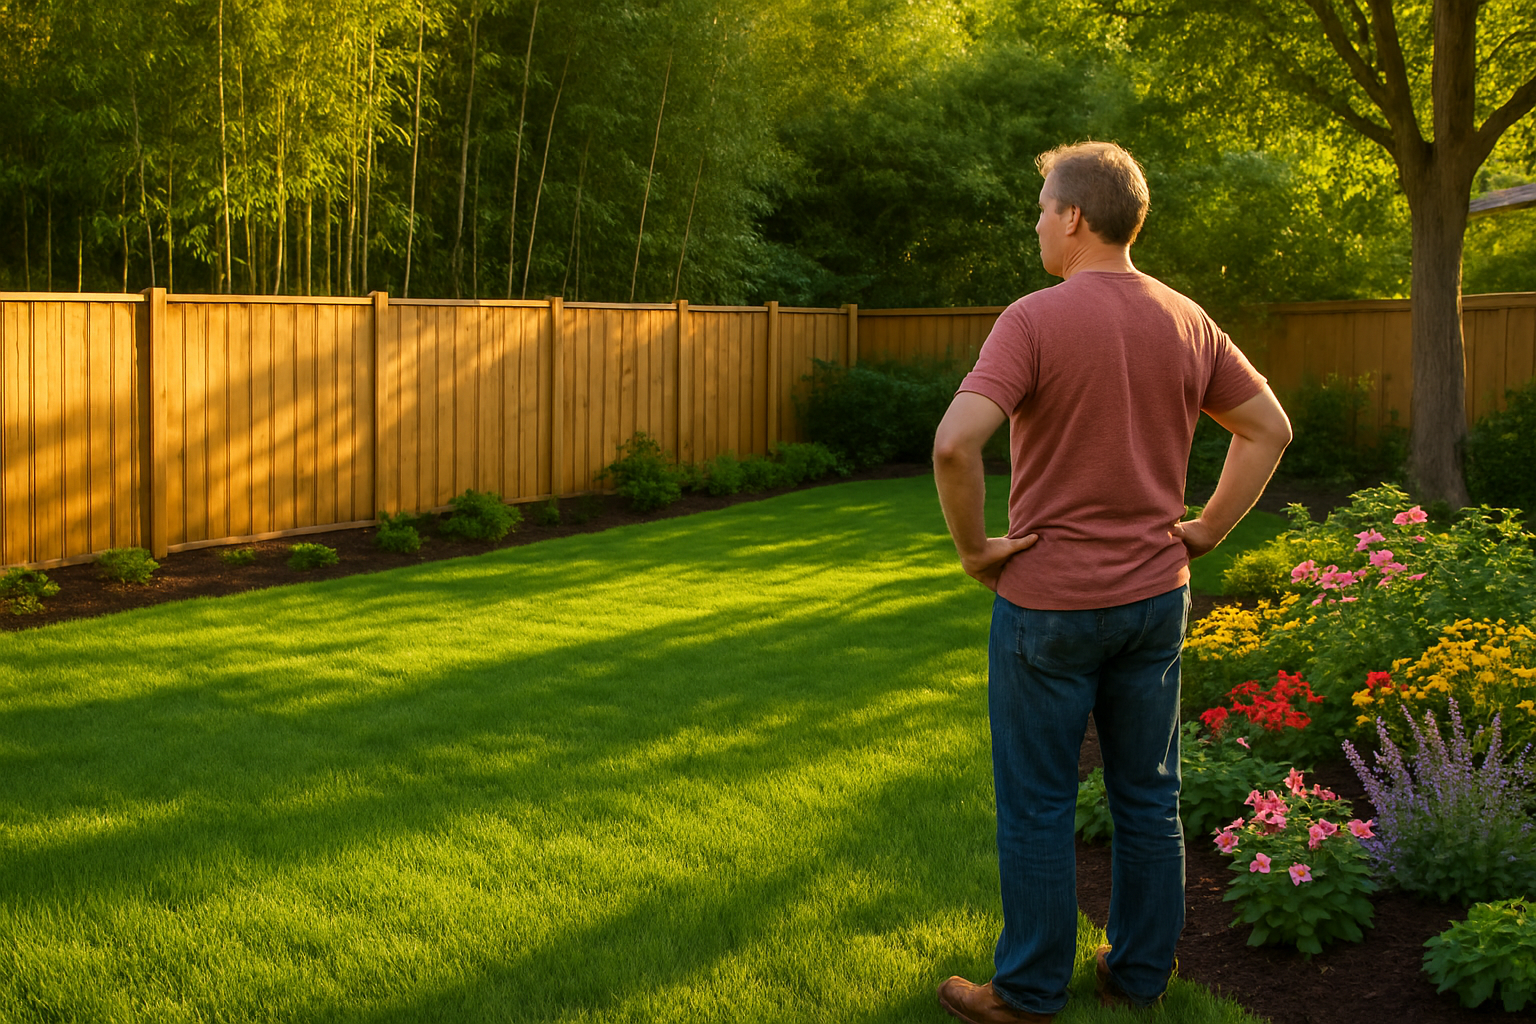
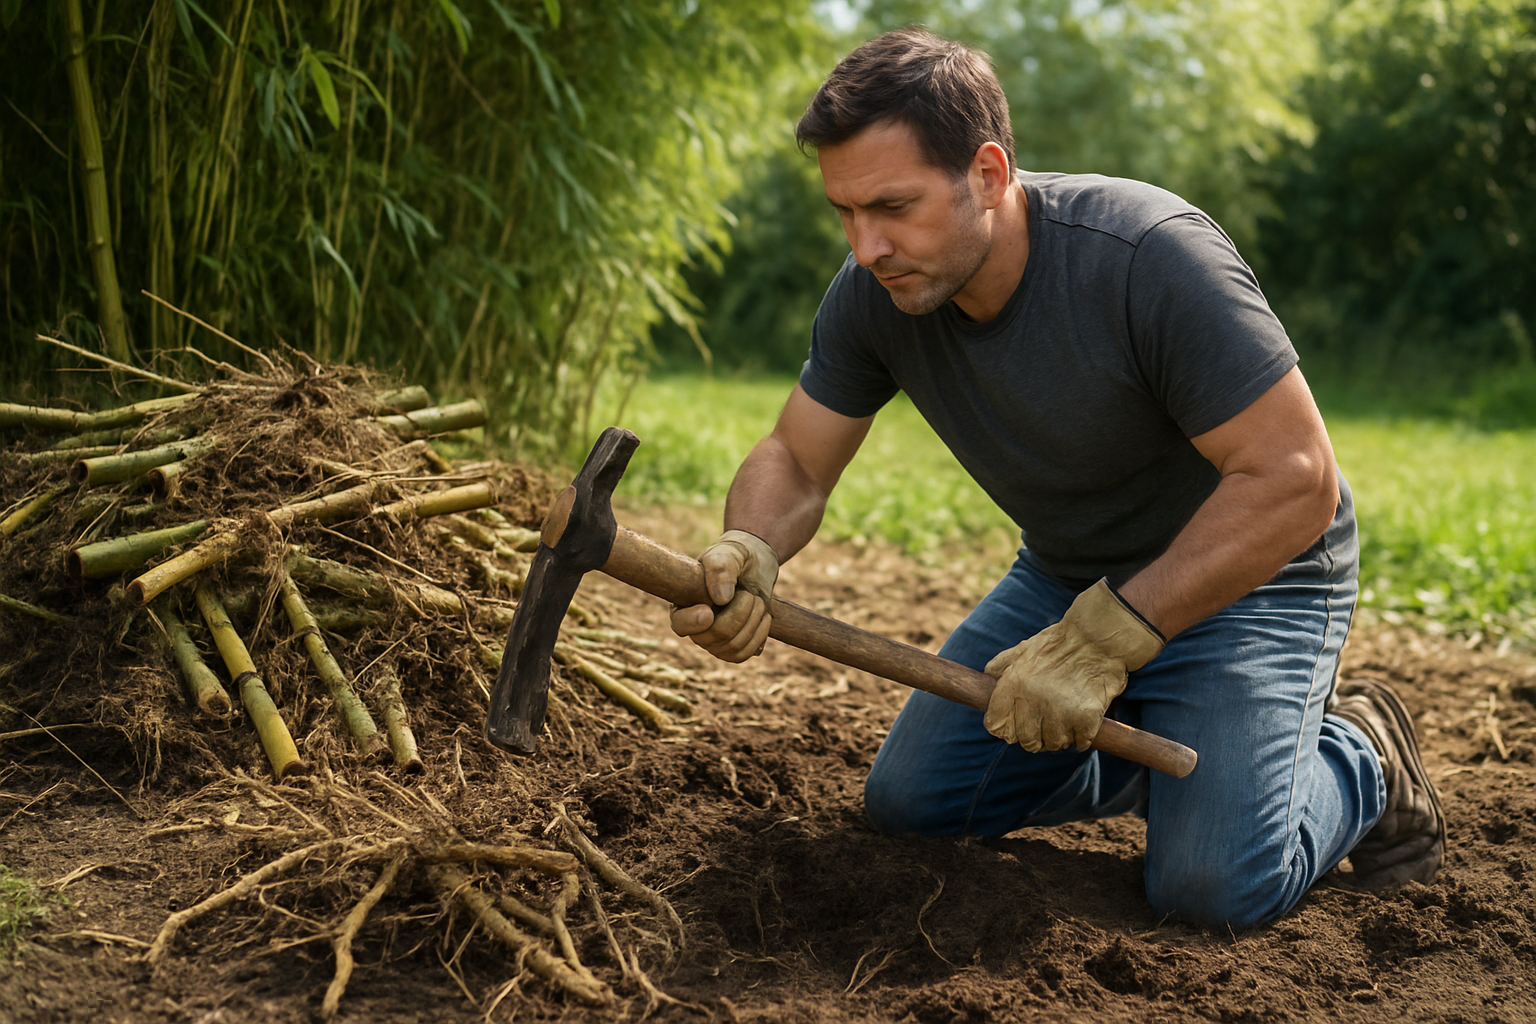
The day the bamboo removal crew finally finished, I stood in my backyard and cried. Not happy tears — at least not yet. I was looking at what used to be a lush corner garden and seeing nothing but a moonscape of churned-up dirt, severed roots, and pale, compacted soil that looked like it hadn’t seen sunlight in years. I’d spent nearly $3,000 having a running bamboo grove removed, and now I had a bigger problem than the bamboo itself: a yard that looked completely destroyed. My partner was not thrilled. Our summer backyard plans were on hold indefinitely, and I had no idea where to start. If you’re standing in a similar spot right now, trying to figure out how to restore your yard after bamboo removal, I want you to know — it gets better. Here’s exactly what I learned the hard way so you don’t have to.
This post contains affiliate links. As an Amazon Associate, I earn from qualifying purchases.
Why Bamboo Leaves Such a Mess Behind
Before we get into the recovery plan, it helps to understand what you’re actually dealing with. Bamboo — especially running varieties like Phyllostachys — spreads through an aggressive underground rhizome network that can extend 15 to 20 feet beyond the visible canes. When those rhizomes are cut, dug up, or treated with herbicide, they leave behind a soil environment that is genuinely depleted. Years of dense bamboo growth create deep shade, which suppresses competing plants and microbes. The soil beneath a mature grove is often compacted, low in organic matter, and missing the beneficial fungi and bacteria that healthy lawn grass depends on. In other words, you’re not just filling in a bare patch — you’re essentially rebuilding a small ecosystem from scratch.
One thing I didn’t expect: bamboo roots also alter soil pH over time. The dense leaf litter that accumulates can make the soil more acidic, which means some grass seed and flowering plants will struggle until you correct the chemistry. Getting a basic soil test before you plant anything is genuinely worth the $15 to $20 it costs. Your local cooperative extension office usually offers them, or you can find DIY kits online.
What I Tried — And What Actually Worked
Step 1: Clear the Debris and Let It Breathe
After the crew left, I spent an entire weekend raking out broken rhizome pieces, picking up leftover root fragments by hand, and loosening the compacted topsoil with a garden fork. This step is not glamorous, but it matters enormously. Any rhizome fragment you leave behind is a potential bamboo resurgence. I found pieces popping back up six weeks later from roots I missed — so stay vigilant through the first growing season and pull any new shoots immediately before they harden off.
Step 2: Amend the Soil Before You Seed
This is the step that made the biggest difference for me. I worked a generous layer of compost into the top four to six inches of soil across the entire affected area. I used Michigan Peat Compost and Manure Blend for the larger sections — it’s nutrient-rich, odor-free, and blends beautifully into compacted clay-heavy soil like mine. For the smaller planting pockets where I wanted to add extra life to the soil, I mixed in Charlie’s Compost Organic Fertilizer with Biochar, which is fantastic for improving soil structure and helping beneficial microbes get re-established. The difference between the sections I amended and the sections I seeded directly into untreated soil was dramatic and humbling.
Step 3: Choose the Right Grass Seed for the Job
Not all grass seed is created equal, and after bamboo removal you’re often dealing with a mix of sun and shade conditions as your yard transitions back to normal. I made the mistake of buying a cheap generic seed blend the first time and ended up with patchy, thin coverage. The second attempt, using better products, changed everything.
For the larger bare sections, I went with Scotts Turf Builder Rapid Grass Tall Fescue Mix. The combination of seed and fertilizer is formulated to establish quickly — I started seeing real coverage in about three weeks, which did wonders for my morale and my relationship. For medium-sized patches, Scotts PatchMaster Lawn Repair Mix Sun + Shade was my go-to. It’s an all-in-one product with seed, fertilizer, and mulch in a single application, which means less work and more consistent moisture retention. And for the stubborn small spots that kept failing — often in areas with tricky drainage or foot traffic — Scotts EZ Seed Patch & Repair finally got them filled in. That product’s mulch component expands when wet and creates almost a protective cocoon around the seed. Highly recommend for problem areas.
Tools I Used and Lessons I Learned
Here’s a quick summary of what actually helped throughout the restoration process:
- Garden fork or broadfork — essential for breaking up compacted post-bamboo soil without destroying the structure further
- Soil test kit — don’t skip this; pH correction before seeding saves weeks of frustration
- Compost amendments — Michigan Peat Compost and Manure Blend for bulk areas, Charlie’s Compost with Biochar for targeted soil rebuilding
- All-in-one grass seed products — Scotts Rapid Grass Tall Fescue for large areas, Scotts PatchMaster for medium patches, Scotts EZ Seed for small stubborn spots
- Consistent watering schedule — new seed needs light, frequent moisture in the first two weeks; don’t let it dry out
- Patience — full recovery takes one to
Tag: bamboo removal
-
Restoring Your Yard After Bamboo Removal: What Thrived and What Didn’t
-

DIY Bamboo Stump Grinding: What I Wish Someone Had Warned Me About
I want to tell you about the afternoon I rented a stump grinder, confidently backed it toward my ex-bamboo grove, and promptly got it so thoroughly stuck in a tangle of rhizomes that I had to call my neighbor Carl — a retired electrician who knows nothing about bamboo — to help me wrestle it free. We spent forty-five minutes in the mud. Carl never let me forget it. If you’re heading into a bamboo stump grinding DIY project, please, please read this first so you don’t end up owing Carl a case of beer and your dignity.
This post contains affiliate links. As an Amazon Associate, I earn from qualifying purchases.
Bamboo removal is one of those projects that looks deceptively straightforward until you’re standing in your backyard staring at what appears to be an underground city of interconnected roots. I’d cut down my clump of running bamboo the previous fall, left the stumps to dry over winter, and figured spring grinding would be a quick Saturday job. Reader, it was not a quick Saturday job.
Why Bamboo Stumps Are a Different Beast Entirely
Before we talk tools and technique, it helps to understand what you’re actually dealing with. Bamboo isn’t a tree. Its root system — especially on running varieties like Phyllostachys — is a dense, fibrous, horizontal network of rhizomes that can spread several feet in every direction. When you grind a bamboo stump, you’re not just chewing through a single taproot. You’re encountering a mat of woody material that can bind up equipment, deflect blades at unexpected angles, and generally make you question your life choices.
Clumping bamboo (Fargesia and similar genera) is somewhat more forgiving — the root mass stays relatively contained. But running bamboo? That’s where the adventure lives. My grove had been established for about eight years, which meant the rhizome network extended well beyond the visible stump cluster. I discovered this when the grinder teeth started catching on roots two feet outside the stump perimeter. That’s when things got exciting. That’s when Carl got involved.
DIY Bamboo Stump Grinding: The Tools That Actually Help
Let me be direct: a standard rental stump grinder will work on bamboo, but your blade teeth will take a beating. Bamboo fiber is incredibly tough, and if your cutting teeth are already worn from previous rentals, you’ll be grinding for twice as long and getting mediocre results. This is why having quality replacement blades or supplemental grinding discs on hand matters more than most tutorials admit.
Recommended Tools for the Job
Here are the tools I’d either use again or wish I’d had from the start:
- Stump Grinder Replacement Blades: If you own a mid-size grinder or are renting one long-term, having fresh blades ready is a game-changer. The Moxweyeni 4 Pcs Stump Grinder Blades (120-1276 replacement) are a solid set to keep on hand — the four-blade configuration handles fibrous material well and these are direct replacements for a common grinder style. Similarly, the 120-1276 Stump Grinder Quadrablades (4-pack) offer the same reliable replacement format if you want a backup set in your kit.
- Angle Grinder Carving Disc: For the smaller lateral rhizomes and surface roots that a big grinder can’t reach cleanly, an angle grinder with a specialty disc is incredibly useful. The Stump Remover Angle Grinder Wood Carving Disc (Arc Blade) is designed exactly for this — six chainsaw-style teeth cut through woody root material aggressively without the disc loading up the way sanding discs do. I wish I’d had this for the outlying rhizomes that were giving Carl and me so much grief.
- Eye Protection — Seriously, Don’t Skip This: Bamboo chips are sharp, they travel fast, and they will absolutely find your eyes if you give them the opportunity. I learned this the unpleasant way during my early cuts. The DEWALT DPG82-11 Concealer Anti-Fog Safety Goggles are the ones I now reach for first — anti-fog dual-mold design means they stay clear even when you’re sweating through a tough job. If you want a more budget-friendly option to keep extras around (or to hand Carl when he shows up to help), the HPYNPES Anti-Fog Safety Goggles 4-Pack gives you wide-vision protection at a price that makes sense for a multi-person crew.
Practical Tips Before You Start Grinding
Beyond having the right equipment, a few preparation steps will save you significant frustration — and potentially save you from the particular humiliation of being rescued by Carl.
Map Your Rhizome Zone First
Walk the perimeter of your bamboo stand and probe the soil with a garden fork or a long screwdriver. You’re trying to feel where the rhizomes extend. For a mature running bamboo, assume they reach at least as far as the bamboo was tall — often farther. Mark those outer edges with flags or spray paint before you bring any machinery into the area.
Cut and Soak Weeks Before You Grind
If timing permits, cut your bamboo down and treat the freshly cut stumps with a concentrated herbicide (glyphosate or imazapyr applied immediately to the cut surface) several weeks before grinding. This begins breaking down the root system and makes the rhizomes significantly less vigorous by the time you’re grinding. Dry stumps also grind more cleanly than green ones.
Clear Debris and Exposed Rhizomes by Hand First
Before the grinder ever touches the stump, spend an hour with a mattock or hoe clearing the top layer of soil, old culm debris, and any exposed rhizomes in the immediate work zone. Hidden rocks and tangled surface roots are the main reasons rental grinders bog down or suffer blade damage. It’s unglamorous prep work, but it makes everything that follows go faster.
Work in Passes, Not All at Once
Lower the grinder wheel only a few inches per pass, working side to side across the stump. Resist the urge to plunge deep immediately. Bamboo stumps often have dense, interlocking layers, and aggressive depth on the first pass is exactly how you bog a machine down in the root mat. Slow, methodical passes get you there faster in the long run.
The Happy Ending (And What It
-
Chemical-Free Bamboo Removal: The Slow but Deeply Satisfying Method
The day I realized my neighbor was no longer speaking to me, it was because of bamboo. Specifically, the massive clump of golden bamboo I had planted along our shared fence line three years earlier — the clump that had quietly, relentlessly sent runners under the fence and was now erupting through her rose garden. I stood there with a sick feeling in my stomach watching her yank up canes from the middle of her prize-winning Grandifloras, her jaw set tight. That was the moment I got serious about chemical free bamboo removal, and I want to share everything I learned on that long, humbling journey back to a healthy yard — and a repaired friendship.
This post contains affiliate links. As an Amazon Associate, I earn from qualifying purchases.
Why I Chose the Chemical-Free Route
My first instinct was to reach for the strongest herbicide I could find. But my neighbor has vegetable beds. Her grandchildren play in that yard. And honestly, our shared soil is interconnected in ways that made me nervous about chemicals migrating where they shouldn’t. Beyond that, I had done some reading and learned that herbicides on established bamboo can be a long, repeated process anyway — often requiring multiple applications over a couple of years. If I was going to commit to a multi-season effort regardless, I wanted to do it in a way I felt good about. Chemical free bamboo removal felt like the right choice for my situation, even knowing it would take patience.
Spoiler: it did take patience. A lot of it. But the results were real, and the process taught me more about this plant than I ever expected to learn.
Understanding What You’re Actually Dealing With
Before you pull on your gloves, it helps to understand bamboo’s survival strategy. Running bamboo — the variety most commonly responsible for neighbor disputes like mine — spreads through underground rhizomes that can travel six feet or more in a single season. The plant stores enormous energy in that rhizome network. When you cut it back at the surface, it simply draws on those reserves and sends up new shoots. This is why a single round of cutting does almost nothing. You have to be systematic and persistent.
There are two main chemical-free strategies that actually work: exhaustion and smothering. Used together, they’re surprisingly effective. Here’s how I approached both.
The Exhaustion Method: Cut, Wait, Cut Again
The exhaustion method works by repeatedly cutting new shoots the moment they emerge from the ground — ideally when they’re still short and soft, under a foot tall. Every time a new shoot gets cut, the plant has to spend stored energy trying again. Do this consistently and you gradually deplete the rhizome’s energy reserves. It sounds simple, and it is. What it requires is commitment. During peak growing season in spring, I was checking my bamboo patch every two to three days. I used a sharp spade and just snapped the new culms off at soil level. After about two full growing seasons of this, the regrowth became noticeably weaker and less frequent.
The Smothering Method: Cut Low, Cover, Wait
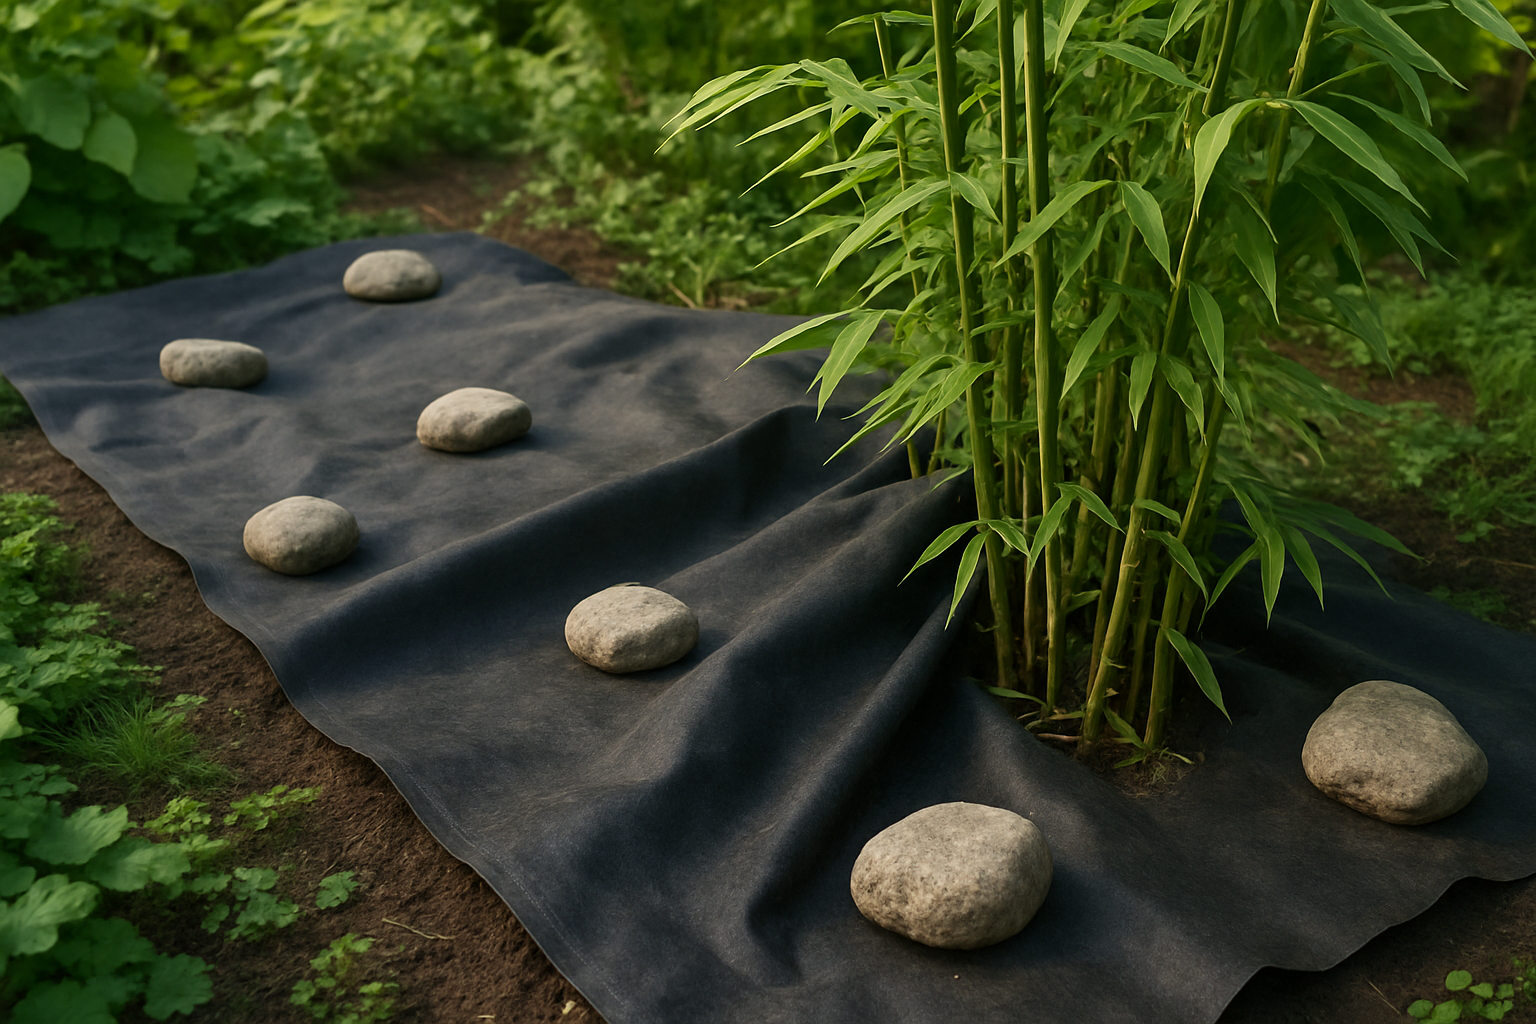
For the area on my side of the fence, I combined the exhaustion method with smothering. After cutting everything as low as possible, I laid down a heavy-duty weed barrier fabric and secured it tightly across the entire footprint of the bamboo patch, including a generous border around the edges where I knew rhizomes had traveled. Blocking sunlight prevents photosynthesis and adds another layer of stress to an already depleted root system. This is where having the right fabric really matters — thin or flimsy material will eventually be punctured by determined bamboo shoots.
Tools I Use for Chemical Free Bamboo Removal
After experimenting with several options, these are the products I genuinely recommend for smothering bamboo without chemicals.
Weed Barrier Landscape Fabric
For large bamboo patches, you need something substantial. I’ve had good results with the Happybuy 6x300ft Premium Weed Barrier Landscape Fabric — it’s a heavy-duty 2.4oz woven fabric that holds up season after season and comes in a generous roll that covers serious ground. If you’re working with a smaller or more defined area, the LAVEVE 4FT x 100FT Weed Barrier Landscape Fabric at 3.2oz is an excellent choice with a bit more heft per square foot. For those who want fabric and fasteners in one purchase, the FEED GARDEN 4FT x 100FT Landscape Fabric with 30 U-Shaped Stakes is a convenient two-pack bundle that comes ready to install.
Landscape Staples to Secure the Fabric
Fabric that shifts or lifts at the edges is worse than no fabric at all — bamboo will find every gap. Pin it down firmly and generously. I use two types of staples depending on the job. The CEWOR 100 Pack 4-Inch Landscape Staples work well for most soil types and are galvanized for durability. For areas with looser soil or where I need extra holding power, the HongWay 240 Pack 6-Inch Landscape Staples are my go-to — 11-gauge galvanized steel with real grip. I place staples every 12 inches along the edges and at any overlapping seams.
Practical Tips to Make the Process Go Smoothly
- Start in early spring. Catching the first flush of new shoots before they harden gives you the biggest energy drain on the rhizome system.
- Dig out what you can first. Before laying fabric, spend a day digging out as much of the visible rhizome network as possible with a mattock or sharp spade. Every chunk you remove is energy the plant can’t use.
- Extend your coverage zone. Lay fabric well beyond the visible edge of the bamboo — rhizomes travel farther underground than the surface canes suggest.
- Overlap seams by at least 12 inches. Bamboo shoots are surprisingly strong and will exploit any gap or seam if given the chance.
- Check the perimeter regularly. Even under heavy fabric, rhizomes can sneak out sideways. Walk the border every few weeks and cut anything poking through at the edges.
- Be patient with the timeline. Plan for two to three growing seasons of active management. If you go into it expecting that, you won’t feel defeated when regrowth appears in year two.
I started my bamboo removal in winter because my neighbor’s dog kept using my yard as a bathroom, and I was convinced — completely, stubbornly convinced — that tearing out the bamboo hedge would somehow solve this. It would not. But what happened next accidentally taught me more about winter bamboo removal than any article I had ever read.
This post contains affiliate links. As an Amazon Associate, I earn from qualifying purchases.
Let me back up. It was January, temperatures were hovering around 28°F, and I had convinced myself that the bamboo running fence-line was the real problem in my life. Not the dog. Not the owner who smiled and waved while their golden retriever did its thing. The bamboo. Naturally, I grabbed a shovel at 7 a.m. on a Saturday and declared war on a plant that had been quietly winning wars since the Cretaceous period.
What I Got Wrong About Bamboo Removal in Winter (At First)
Here is the honest truth about winter bamboo removal: the timing is complicated, and I did not understand any of that on shovel-in-hand Saturday morning.
My first mistake was going in completely blind. I started digging around the base of the culms with a standard garden shovel. Within about four minutes, I had broken the shovel. Not bent it. Broken it. The rhizome system of running bamboo — the kind I had, a Phyllostachys variety — is a dense, interlocking network of woody roots that can extend 15 to 20 feet from the main clump. In winter, that ground was partially frozen, which meant the rhizomes had zero give. I was essentially trying to dig through concrete reinforced with rebar made of wood.
My second mistake was not knowing that bamboo in winter is in a state of reduced metabolic activity. The plant is not dead — it is just quiet. That actually matters a lot when you start thinking about herbicide treatment, which I had not yet considered because I was still in “brute force solves everything” mode.
My third mistake was wearing regular jeans. Bamboo splinters are real. Just trust me on this one.
What Winter Actually Does to Bamboo (And Why It Matters)
Once I had sat down on my back steps with two broken tools, a bruised ego, and bamboo debris in places bamboo debris should not be, I decided to actually research what I was dealing with. Here is what I learned — and what you should know before you start.
Running bamboo rhizomes are shallow but enormous. Most rhizomes sit within the top 12 to 18 inches of soil, but they spread aggressively. In winter, frozen or hardened soil makes physical removal much harder than in fall or early spring when the ground is workable.
Winter is not ideal for herbicide either — but late winter is the sweet spot. Systemic herbicides work by traveling through the plant’s vascular system. When bamboo is fully dormant in deep winter, that system is sluggish. However, as late winter transitions toward early spring — roughly late February into March in most temperate zones — the plant starts waking up. That is when a cut-and-treat method becomes genuinely effective. You cut the culms close to the ground, then immediately apply herbicide to the fresh-cut stumps before the wound seals.
Physical removal in winter does have one advantage. Deciduous plants and other surrounding vegetation are dormant and out of the way, which gives you better visibility and access to the root network. If you are mapping out where the rhizomes have traveled, winter is actually a great time to assess and plan your attack.
The Tools That Actually Work (Learned the Hard Way)
After my Saturday disaster, I ordered better tools and came back the following weekend with a plan. Here is what actually made a difference.
For breaking up compacted soil and prying apart rhizome mats, a heavy steel digging bar is non-negotiable. I started using the Truper Post Hole Digger & Tamping Bar — a 16-pound, 69-inch drop-forged steel bar that laughs in the face of frozen rhizomes. It became my best friend. You drive it down alongside the rhizome network to break the soil’s grip, then lever the roots up. It is hard work, but it is effective work.
For loosening bolts on root barriers or dealing with any equipment that had seized up from cold weather, the Aiourx 1/2″ Drive Breaker Bar came in surprisingly handy. The 250-degree swivel head gives you angles you just cannot get with a straight bar, and the CR-MO steel handles real torque without flexing.
For the chemical side of removal — which I highly recommend combining with physical removal for running varieties — I used Tordon RTU Specialty Herbicide. This is a ready-to-use formula designed for woody plants, and it is one of the most effective options for the cut-stump treatment method. Note: Tordon is not available for use in California or New York, so check your local regulations before purchasing.
One game-changer I did not expect? Spray indicator dye. When you are treating multiple stumps across a large area, it is embarrassingly easy to lose track of which ones you have already hit. The Liquid Harvest Lazer Green Spray Indicator (8 oz) adds a bright green tint to your herbicide mix so you can see exactly where you have sprayed. For larger areas, the 32-oz quart size makes more sense. It fades naturally and will not stain permanently — but in the moment, it tells you exactly what has been treated.
Quick-Reference Tool List
- Truper 16-lb Steel Digging/Tamping Bar — essential for breaking frozen rhizome mats
- Aiourx Breaker Bar with Swivel Head — great for leveraging stubborn root clusters
- Tordon RTU Herbicide — cut-stump treatment for woody bamboo rhizomes (not for CA or NY)
-

Selling Bamboo I Removed From My Yard: How I Turned a Nightmare Into $600
I want to tell you about the day I tried to dig up a small patch of bamboo in my backyard and ended up calling my neighbor at 9 PM covered in mud, holding a shovel I had somehow bent into an L-shape, and crying laughing. What started as a “quick Saturday project” turned into a three-week ordeal — and somehow, impossibly, ended with $600 in my pocket. If you’ve ever Googled “selling removed bamboo” out of desperation while nursing blisters on your blisters, this one’s for you.
This post contains affiliate links. As an Amazon Associate, I earn from qualifying purchases.
How a “Small Bamboo Problem” Made Me Question My Life Choices
When we bought our house, the previous owners had left a gorgeous privacy screen of running bamboo along the back fence. I thought it was charming. My wife thought it was charming. Our realtor diplomatically said nothing. What none of us knew — because none of us had done our homework — was that running bamboo spreads through underground rhizomes that treat your yard like an all-you-can-eat buffet. By our second spring, it had crept under the fence, into the garden beds, and was making suspicious overtures toward the patio.
I decided to remove it. How hard could it be? I grabbed a shovel on a bright Saturday morning, made myself a coffee, put on a podcast, and headed outside with the energy of a man who has never met bamboo before. Four hours later, I had removed approximately one square foot of growth, destroyed one shovel, and pulled a muscle in my back that I didn’t know existed. The bamboo looked completely unbothered.
What I Learned About Bamboo Removal (the Hard Way)
Once I accepted that bamboo was not going to politely leave when asked, I started actually researching what I was dealing with. Here’s the real talk on removing running bamboo:
- Rhizomes run shallow but wide. Most running bamboo rhizomes sit within the top 12 inches of soil, but they can spread horizontally for many feet. You’re not digging deep — you’re digging wide.
- You need to cut the culms first. Chop the stalks down before you start excavating. It makes the root system easier to see and navigate, and you won’t be wrestling with 15-foot poles while also trying to pry up roots.
- A mattock is your best friend. A regular shovel is basically useless against established bamboo rhizomes. A mattock or a sharp spade with some real leverage will save your sanity.
- Expect multiple rounds. You will not get it all in one go. Any rhizome fragment left in the soil can sprout again. Plan to monitor and remove new shoots for at least one to two growing seasons.
- The culms you cut down have real value. This was the part I didn’t know — and the part that changed everything.
It was my neighbor — the one I called at 9 PM — who pointed out that I was literally throwing away money. He wandered over, looked at the pile of culms I’d stacked by the curb, and said, “You know people pay for that, right?” I did not know that. But I was about to find out.
Selling Removed Bamboo: Where to List It and What to Expect
If you’re sitting on a pile of freshly cut bamboo culms and potted divisions, you’re in better shape than you think. There’s a surprisingly active market for this stuff, and here’s where I found success:
Facebook Marketplace
This was my biggest winner. I listed bundles of cut culms for $15–$25 each, depending on length and diameter, and sold out within a week. People use bamboo culms for garden stakes, trellises, craft projects, fishing poles, DIY furniture, and privacy screens. I had no idea the demand was this strong. Take clean, well-lit photos and mention the approximate diameter and length in your listing. That’s it. Done.
Potted Divisions
This is where it gets really interesting. When you’re digging up rhizomes, some of them will have healthy culms attached. Instead of tossing those, you can pot them up and sell them as starter plants. I used simple one-gallon nursery pots — I grabbed a big pack of the HECTOLIFE 50-Pack 1 Gallon Flexible Nursery Pots which were affordable and held up great. I potted about 20 divisions, let them sit for two weeks to show some new growth, and sold them for $12–$20 each. People love buying locally dug bamboo because they know it’s proven hardy in the local climate.
If you want even more pots on hand, the Niiiice 60-Pack 1 Gallon Nursery Pots come with plant labels, which is a nice bonus for keeping your divisions organized when you’re selling multiple varieties or sizes.
Craigslist and Local Garden Groups
Don’t sleep on your local Facebook gardening groups or Nextdoor either. I posted in two neighborhood groups and had people reaching out within an hour. One woman wanted a full truckload of culms for a garden art project. One guy wanted 10 potted plants for a new privacy screen. These weren’t quick-flip buyers — they were genuinely excited and easy to deal with.
Tools That Actually Helped (And Products I Recommend)
Once I committed to doing this properly, I invested in a few things that made the whole process dramatically less miserable.
The game-changer for processing the culms I wanted to sell was a bamboo splitter. If you’re selling to crafters, woodworkers, or people doing DIY projects, split bamboo is often more useful and commands better prices than whole round culms. I got the Bamboo Splitter 8 Cut (Large Size), which is made of steel and splits culms into 8 even pieces in one push. Incredibly satisfying to use, and it made my listings way more appealing to craft buyers. If you want slightly thicker strips — great for baskets or furniture work — the Bamboo Splitter 6 Cut (Large Size) gives you 6 pieces per culm and is equally well-built.
On a completely different note — and I promise this is relevant — once the bamboo was gone and I finally reclaimed my garage space, I went a little organizing-crazy. I picked up a set of
-
I Dug Out Bamboo Roots By Hand: Here’s What Actually Works (Hint: Not That)
I want to tell you about the afternoon I decided to dig out bamboo roots by hand using nothing but a standard garden trowel, a misplaced sense of confidence, and apparently zero understanding of what bamboo roots actually look like underground. Spoiler: the trowel snapped in half. My pride did not survive either.
This post contains affiliate links. As an Amazon Associate, I earn from qualifying purchases.
It started innocently enough. The previous owners of our house had planted a running bamboo along the back fence — the kind that, if given half a chance, will colonize your neighbor’s yard, your neighbor’s neighbor’s yard, and possibly a small country. By the time we moved in, it had spread about eight feet beyond the fence line and was cheerfully sprouting through the lawn. I figured I’d spend a Saturday afternoon sorting it out. One Saturday afternoon. I genuinely believed that.
Why Bamboo Roots Laugh at Your Optimism
Here’s what I didn’t know about bamboo before that fateful Saturday: running bamboo spreads through underground stems called rhizomes, and those things are basically the subway system of the plant world — dense, interconnected, and going in directions you absolutely did not expect. They can run horizontally two to three feet deep, and they branch constantly. When I drove my little trowel into the soil and hit the first woody rhizome, I thought I’d found the main root. Reader, I had found approximately one percent of the main root.
I dug. I pulled. The trowel flexed in a way metal should not flex. Then, with a sound I can only describe as a disappointed crack, the handle snapped clean off and I sat down hard in the dirt. My dog watched me from the porch with an expression that I’m pretty sure was pity.
The good news? That embarrassing afternoon sent me down a research rabbit hole, and I eventually figured out what actually works. Let me save you the broken tools and the wounded dignity.
How to Actually Dig Out Bamboo Roots By Hand (The Real Method)
The key insight that changed everything for me is this: you are not digging up roots so much as you are systematically severing and extracting a network. Think of it less like pulling a weed and more like dismantling plumbing. You need to expose sections, cut them cleanly, and work your way through methodically rather than just yanking at whatever you can grab.
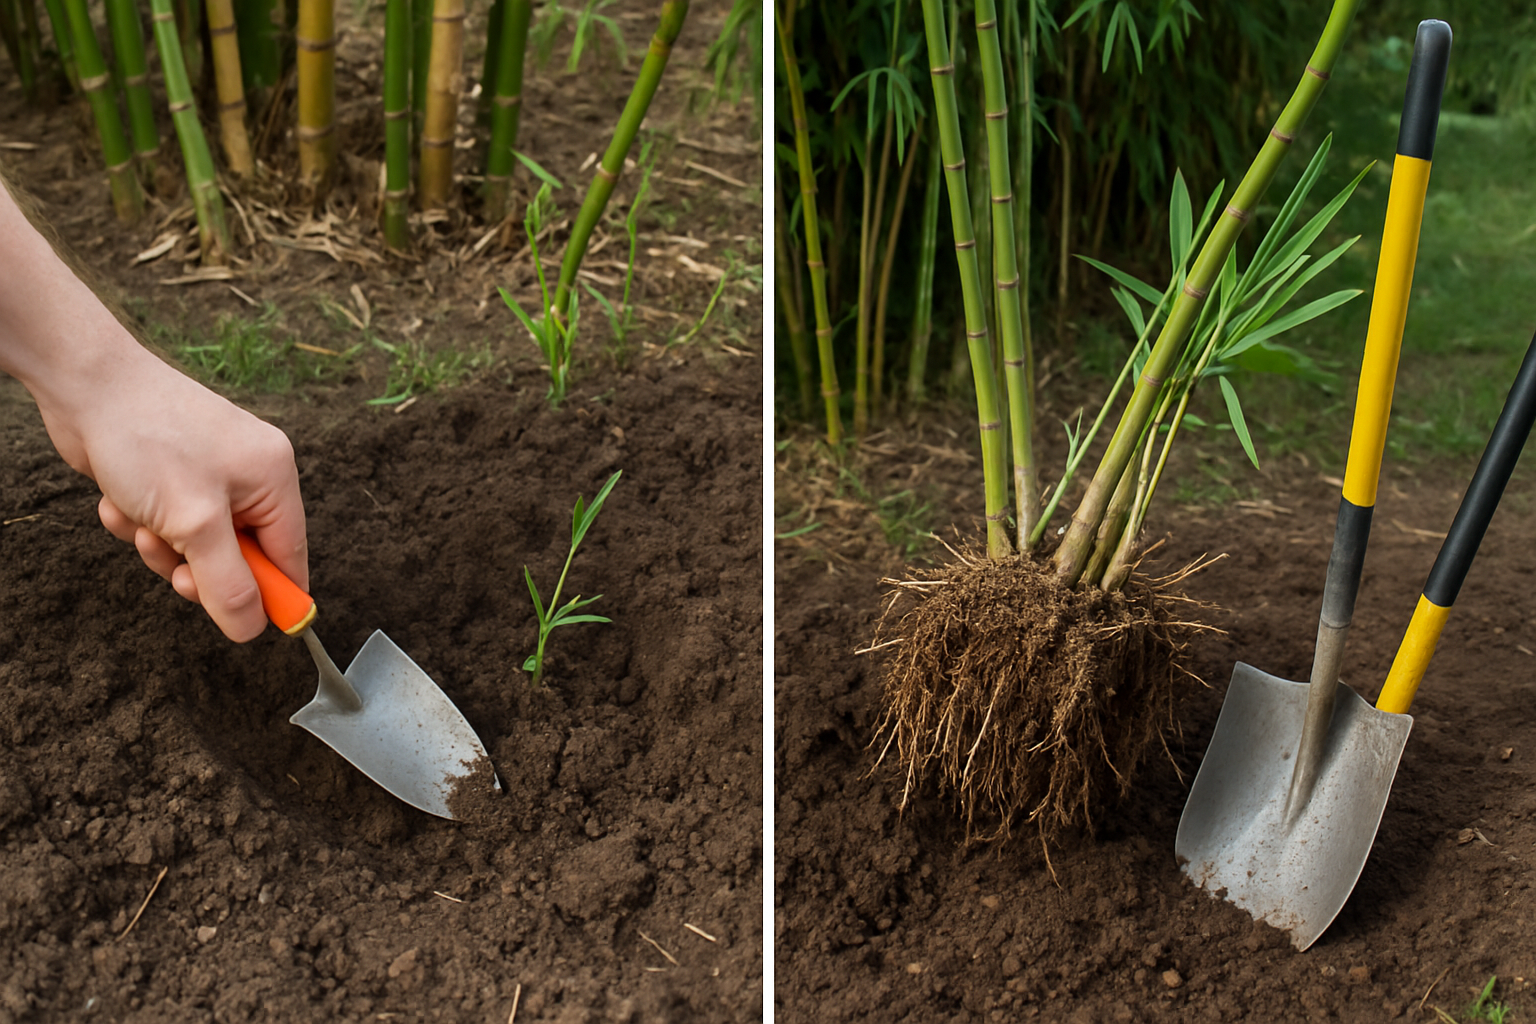
Step 1: Cut Down All the Canes First
Before you touch the soil, cut every cane down to ground level. This removes the top growth, makes the area manageable, and honestly makes the whole project feel less overwhelming. A reciprocating saw with the right blade makes short work of even thick canes — more on that in the tools section below.
Step 2: Define Your Work Zone
Don’t try to tackle the whole area at once. Mark out a section about three feet wide and work from one edge inward. This lets you actually see what you’re pulling out and prevents you from stepping on and snapping rhizomes you haven’t dug up yet — which just encourages them to reshoot from the broken end. Fun fact I also learned the hard way.
Step 3: Loosen, Don’t Just Dig
Use a heavy-duty spade to loosen the soil around and beneath the rhizomes before you try to pull anything out. Work the blade down alongside the rhizome, lever gently, and let the soil break apart around it. Once it’s loose, you can trace it in both directions and cut it free from the network. Trying to muscle out a rhizome that’s still locked in compacted soil is exactly how trowels die.
Step 4: Collect Every Piece
Bamboo rhizomes can regenerate from surprisingly small sections. As you pull pieces out, drop them straight into a wheelbarrow or bin — don’t leave them sitting on the soil surface. Even a fist-sized chunk left behind can sprout again given enough time and moisture.
Step 5: Repeat for Several Seasons
I know. I know. But it’s the truth. After your initial dig-out, monitor the area and remove any new shoots the moment they appear. Each time a shoot is removed before it matures, the root system loses stored energy. After one to two growing seasons of consistent shoot removal, most bamboo stands will exhaust themselves and stop resprouting.
Tools That Actually Help You Dig Out Bamboo Roots By Hand
If my snapped trowel taught me anything, it’s that bamboo removal is a tool investment situation. Here are the tools I actually use now, all of which have held up considerably better than that trowel.
For Cutting Canes and Thick Roots
A reciprocating saw is genuinely one of the best things I brought to this project. For green canes and woody rhizomes, I reach for the EZARC Japanese Teeth Reciprocating Saw Blades — the 15-inch arc-edge design gets into awkward angles really well, and the Japanese-style teeth slice through fibrous bamboo canes cleanly without binding. For thinner growth and buried rhizomes closer to the surface, the 5-Pack 9-Inch Wood Pruning Reciprocating Saw Blades are a more maneuverable option and the storage case keeps them from rattling loose in your tool bag.
For Digging and Loosening
The tool that replaced my tragic trowel is the Root Slayer Garden Shovel with Serrated Blade. The serrated edge on the sides of the blade means you can slice through lateral roots as you push down, rather than just hitting them and stopping. It’s the shovel I wish I’d had on day one.
For Pulling Out Stubborn Sections
Once rhizomes are loosened, a dedicated pulling tool saves your back enormously. For smaller woody stems and sapling-sized growth, the voominhtec Heavy-Duty Tree and Stump Puller grips stems from a quarter inch up to an inch and uses leverage rather than brute force — your lower back will thank you. For larger, more established clumps with bigger root systems, the CGENWDCH Large Size Sapling Puller handles woody stems up to two inches and is built for exactly the kind of deep, sprawling root systems that running bamboo develops over years.
A
-

What Nobody Tells You About Bamboo Until It’s Already Growing Into Your House
I still remember the morning I walked into my spare bedroom and noticed a thin green shoot poking up through a crack in the baseboard. At first I thought it was a weed that had somehow snuck in. Then it hit me — bamboo growing into house, my house, through the foundation wall. My stomach dropped. That little shoot was the beginning of a very expensive, very stressful few months that nearly cost me my friendship with the neighbor who had gifted me the “beautiful, fast-growing” bamboo plant three years earlier.
This post contains affiliate links. As an Amazon Associate, I earn from qualifying purchases.
If you’re here because you’re googling bamboo problems at midnight in a mild panic, first — breathe. Second — you’re not alone, and there is a way through this. I want to share what happened to me, what I learned the hard way, and the practical steps and tools that finally gave me my yard (and my sanity) back.
How a “Low-Maintenance” Plant Became a Full-Time Problem
My neighbor Diane meant well. She had a gorgeous stand of golden bamboo along her fence line and offered me a division for free. “It grows fast, it’s beautiful, and deer won’t touch it,” she said. All true. What she didn’t mention — probably because she didn’t know — was that running bamboo spreads through underground rhizomes that can travel 10 to 15 feet or more in a single season. Quietly. Invisibly. Until one day they’re not invisible anymore.
Within two years I had a lovely privacy screen. By year three, bamboo shoots were coming up through my lawn 20 feet from the original planting. And then came that morning in the spare bedroom. A contractor friend came over to take a look and confirmed my worst fear: a rhizome had followed the soil line along my foundation, found a small gap, and exploited it. The remediation cost me over $1,400 — demolition, patching, landscaping repair, and professional rhizome removal. Diane and I didn’t speak much that summer. It wasn’t her fault, but the tension was real.
Why Bamboo Growing Into Your House Is More Common Than You Think
Here’s the thing nobody tells you at the garden center: not all bamboo behaves the same way. There are two main types — clumping bamboo and running bamboo. Clumping varieties spread slowly outward from a central crown and are generally well-behaved neighbors. Running bamboo, on the other hand, sends out horizontal rhizomes that actively seek out new territory. Species like Phyllostachys aureosulcata (yellow groove bamboo) or the common golden bamboo (Phyllostachys aurea) are notorious runners.
Rhizomes don’t respect foundations, sidewalks, or driveways. They follow the path of least resistance through the soil, and when they encounter a crack — even a hairline fracture in a concrete footing — they will find it. Bamboo growing into house foundations is a documented problem, not a freak occurrence. And because the rhizomes travel underground, you often don’t know it’s happening until there’s already damage.
A few warning signs to watch for:
- New bamboo shoots appearing far from the original plant, especially near the house
- Shoots emerging through mulch beds directly adjacent to your foundation
- Cracks in concrete paths or patios near an established bamboo grove
- A spongy or uneven feeling under lawn areas between the bamboo and your home
What Actually Stops Bamboo Rhizomes (And What Doesn’t)
After my expensive lesson, I did a deep dive into bamboo containment. Here’s the honest truth: the only reliable long-term solution for running bamboo near structures is a physical root barrier installed correctly in the ground. Edging products, landscaping fabric, and repeated mowing will slow things down but will not stop determined rhizomes.
Effective root barriers need to be at least 24 inches deep (rhizomes rarely go deeper than 18 inches, but you want that margin), made of heavy-duty HDPE material at least 60 mil thick, and installed at a slight outward angle to redirect rhizomes upward where you can see and cut them. The barrier should also overlap at the seam by at least 6 inches and be sealed with the manufacturer’s recommended tape or connector.
Tools I Use and Recommend
After testing several options, these are the root barriers I trust and recommend. Choose the length that fits your situation — measure your planting perimeter before you order.
- For large established groves: Bamboo Shield – 50 feet x 24 inch x 60 mil — This is one of the most widely used barriers for serious bamboo containment. The 60-mil thickness gives you real stopping power against aggressive runners.
- For very large plantings or long fence lines: 75ft x 24in x 60mil Root Barrier — More linear footage so you can protect a longer perimeter without seams in the middle of a run.
- For smaller plantings or tight garden beds: 15ft x 24in x 60mil Root Barrier — Perfect if you’re installing a new clump and want to get containment right from day one.
- For foundation-adjacent protection: Convivium 12in x 20ft x 60mil Root Barrier — Compact and heavy-duty, made from recycled HDPE. Great for tight spaces between a planting and a structure.
- A solid all-around option: West Bay 20ft x 24in x 60mil Root Barrier — Well-reviewed and reliably thick. Works well for driveways, sidewalk edges, and general containment zones.
Installing a Root Barrier the Right Way
Even the best barrier fails if it’s installed poorly. Here’s the basic process I followed after my repair work was done:
- Dig a trench at least 24 inches deep around the bamboo on all sides facing your home or hardscape
- Remove any rhizomes you find during digging — do not skip this step
-
When Bamboo Attacked My Concrete Patio: A $3,000 Lesson in Root Barriers
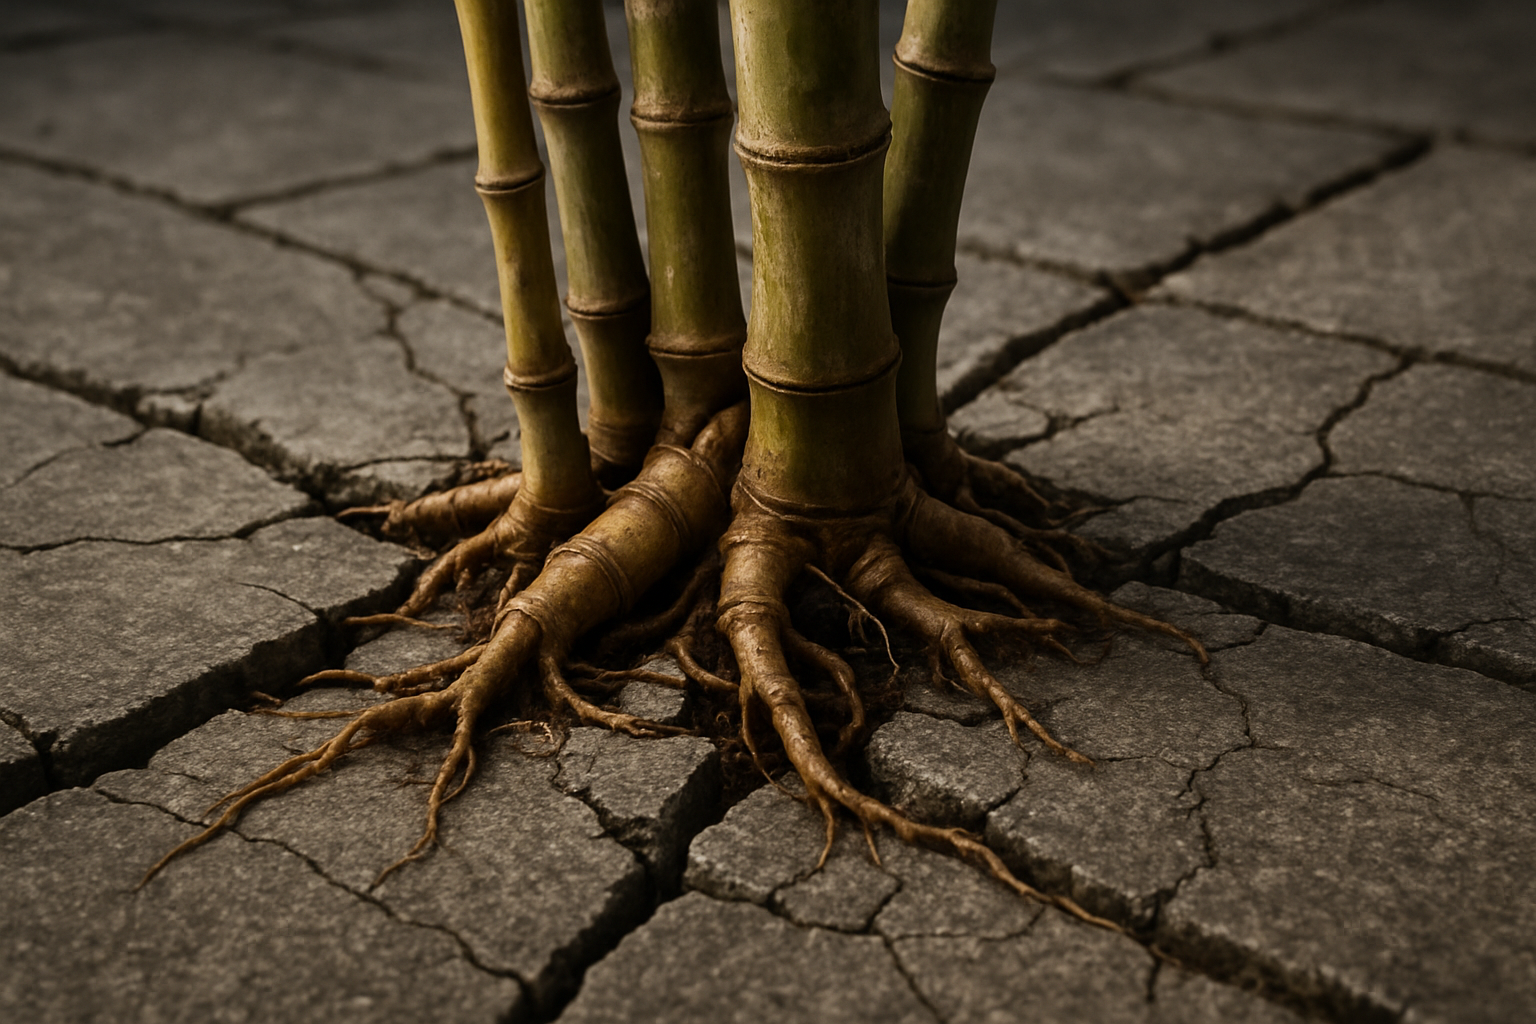
I still remember the sound — a low, muffled crack coming from the back patio on a Tuesday morning in late April. I thought maybe a branch had fallen overnight. What I found instead was a two-inch fissure splitting my concrete patio nearly in half, and a tangle of pale bamboo rhizomes snaking right through the middle of it like they owned the place. That single moment kicked off three weeks of contractor calls, a $3,000 repair bill, and one very tense conversation with my husband about the “charming bamboo grove” I had planted four years earlier. Bamboo roots concrete damage is real, it is aggressive, and I learned about it the hard way so you don’t have to.
This post contains affiliate links. As an Amazon Associate, I earn from qualifying purchases. If you click a link and make a purchase, I may earn a small commission at no extra cost to you. I only recommend products I genuinely believe in.
How a “Low-Maintenance” Plant Became a Very Expensive Problem
Back in 2019, I planted a beautiful stand of golden bamboo along our back fence line. The nursery called it “easy,” “elegant,” and “fast-growing.” I heard those words and pictured a lush, private screen between us and the neighbors. What they neglected to mention — or what I neglected to ask — was that golden bamboo is a running species. Unlike clumping bamboo, running bamboo sends out long horizontal rhizomes that travel underground, sometimes five to ten feet in a single growing season, searching for water and nutrients.
Our concrete patio sat about six feet from where I planted the bamboo. Six feet sounds like plenty of breathing room. It is not. By year two, I noticed a few new shoots popping up closer to the house than I expected. I thought it was charming. By year three, those shoots were appearing in the cracks between patio pavers. I pulled them and forgot about them. Year four brought that terrible Tuesday morning crack — and a contractor who looked at the damage, looked at my bamboo, and said with zero drama, “Yeah, this is a bamboo problem.”
Understanding Bamboo Roots Concrete Damage: What’s Actually Happening Underground
Here is the thing about bamboo that most people don’t visualize: the damage is rarely from one dramatic root punching through solid concrete like something out of a movie. What actually happens is more patient and arguably more destructive. Bamboo rhizomes are opportunistic. They find existing micro-cracks in concrete — hairline fractures from normal settling, freeze-thaw cycles, or age — and they push into them. As the rhizome grows and thickens, it acts like a slow wedge, expanding the crack from the inside. Water gets in, the crack widens further, and before long you have a structural problem that a simple crack filler won’t solve.
The root system can also undermine the soil base beneath a concrete slab, creating voids that cause the slab to sink and crack under its own weight. In my case, the contractor found both issues — active rhizomes in two cracks and a soft, disturbed soil base under one corner of the patio. That combination is what pushed the repair cost so high.
Running vs. Clumping Bamboo: Know Before You Plant
If you are considering planting bamboo near any hardscape, the single most important thing you can do is confirm whether your species is a runner or a clumper. Running bamboo (genera like Phyllostachys and Pleioblastus) spread aggressively via rhizomes and require either serious containment or significant distance from structures. Clumping bamboo (genera like Fargesia) grows in a tight, expanding circle and is far less likely to cause this kind of damage. I had planted Phyllostachys aurea — one of the most vigorous runners on the planet. Lesson learned.
What I Should Have Done: Root Barriers and Proper Installation
After the repair was done, I spent a lot of time reading everything I could find about bamboo containment. The answer that kept coming up — from horticulturalists, landscapers, and bamboo enthusiasts alike — was the same: install a proper root barrier before you plant, not after the damage is done. A high-quality HDPE (high-density polyethylene) barrier, installed at the right depth and with the right thickness, creates a physical wall that rhizomes cannot penetrate.
The key details matter enormously. The barrier needs to be at least 24 inches deep, and ideally 30 to 36 inches for vigorous running species. It needs to be thick enough — at least 60 mil, with 100 mil being the gold standard for aggressive runners. And critically, it needs to be installed with the top edge angled outward and sitting about two inches above the soil surface, so rhizomes that try to escape are redirected upward where you can see and cut them. A barrier that is too shallow or installed flat will just be bypassed.
Tools I Use and Recommend
These are the products I now recommend to anyone planting running bamboo near a home, patio, fence, or garden bed. I wish I had known about them four years ago.
- Bamboo Shield – 40 ft x 24 inch x 60 mil Root Barrier — A solid entry-level option for smaller bamboo plantings or less aggressive species. The 60 mil thickness handles moderate rhizome pressure well, and 40 feet is enough to enclose a modest grove.
- Bamboo Shield – 40 ft x 36 inch x 100 mil Root Barrier — This is the one I now have installed around my replanted bamboo. The 36-inch depth and 100 mil thickness are exactly what you want for vigorous running varieties like Phyllostachys. The extra depth gives you real peace of mind.
- Bamboo Shield – 50 ft x 36 inch x 100 mil Root Barrier — If you have a longer fence line or a larger grove to contain, this extended-length version of the same heavy-duty barrier is the way to go. More coverage without compromising on quality.
- RadonSeal Complete DIY Foundation Crack Repair Kit — If you have existing hairline cracks in your patio or foundation — whether from bamboo or simple age — seal them before bamboo roots find them. This low-viscosity urethane injection system is genuinely impressive for DIY crack repair and stops water infiltration cold.
- Hydra Stop 300 Fast Set Concrete Foundation Crack Repair Kit — Another excellent crack repair option, this one with a polyurethane injection system that sets quickly and creates a tough, waterproof seal. Great for basement walls or any concrete surface where water infiltration is a concern alongside structural cracks.
-
How I Removed 300 Square Feet of Bamboo By Myself (And Lived to Tell the Tale)
- Water the area deeply the day before you dig. Moist soil releases rhizomes far more cooperatively than dry, hard ground.
- Work in sections, not all at once. Trying to tackle 300 square feet in a single session will break your spirit (and your back).
- Wear thick gloves. Rhizome ends are sharp, and you’ll be plunging your hands into the ground constantly.
- ProValue HM-949 3-1/8 lb. Garden Hoe Mattock, 51″ Hardwood Handle — This was my workhorse. The mattock end broke through compacted soil and rhizome tangles better than anything else I tried. Heavy enough to mean business, balanced enough to swing for hours.
- Root Slayer 22011 Garden Shovel with Serrated Blade for Digging and Root Cutting — The serrated blade on this shovel cuts through roots instead of just pushing them aside. I used it constantly for slicing through rhizomes in the trench work. Absolutely worth it.
- Root Slayer RS220 Heavy Duty Garden Shovel with Serrated Blade for Digging and Root Removal — I actually borrowed a friend’s version of this model. If you’re tackling a larger area, having two serrated spades between two people speeds things up considerably.
- Rogue Hoe 7 Inch Wide Blade Heavy Duty Garden Cultivator Field Cotton Hoe Tool — Once the big rhizome clumps were out, this wide-blade hoe was perfect for raking through loosened soil and pulling out the smaller stragglers. Solid, heavy-duty construction that held up to abuse.
- 14 Inch Heavy Duty Curved Hoe, Without Welding, Gardening Tool, Oak Handle — The curved blade on this one was surprisingly useful for getting under rhizomes and popping them up from below. The oak handle felt solid and never gave me any flex under pressure.
- Water the area deeply the day before you dig. Moist soil releases rhizomes far more cooperatively than dry, hard ground.
- Work in sections, not all at once. Trying to tackle 300 square feet in a single session will break your spirit (and your back).
- Wear thick gloves. Rhizome ends are sharp, and you’ll be plunging your hands into the ground constantly.
The day I realized my bamboo had eaten my neighbor’s flower bed was the day I knew things had gotten serious. What started as a charming little privacy screen along my back fence had quietly — sneakily — spread six feet into Linda’s yard, strangling her hostas and creeping under her garden shed. She knocked on my door one Saturday morning, coffee in hand, smile on her face, but I could see it in her eyes. We had a problem. And it was entirely my problem to fix.
This post contains affiliate links. As an Amazon Associate, I earn from qualifying purchases.
I started researching bamboo removal DIY methods that same afternoon, equal parts motivated by guilt and sheer panic about the cost of hiring someone. Every contractor quote I got was somewhere between “ouch” and “absolutely not.” So I rolled up my sleeves, did my homework, and spent three weekends doing it myself. Here’s everything I learned — including what worked, what didn’t, and why the right tools made all the difference.
Understanding What You’re Actually Up Against
Before you grab a shovel and start hacking away, you need to understand the enemy. Bamboo — particularly running bamboo, which is what most people accidentally plant — spreads through an underground network of rhizomes. These are horizontal root-like stems that can travel several feet per year in every direction. When I dug my first test trench, I found rhizomes the diameter of my thumb running four to six inches below the surface in every direction like a tangled highway system.
The hard truth is that you can’t just pull up the canes and call it done. If even a small rhizome segment stays in the ground, it will resprout. Bamboo is extraordinarily resilient — it’s practically designed to survive. Your goal is to physically remove as much of the root mass as possible, then monitor and cut down any new growth repeatedly until the plant exhausts its energy reserves. This process takes persistence, not just muscle.
My Step-by-Step Bamboo Removal DIY Process
Step 1: Cut Down the Canes First
Start by cutting all the canes down to the ground. A sharp pruning saw or loppers work fine here. Get them as low as possible. This immediately makes the work area manageable and, more importantly, signals to the plant to send energy up — energy it will waste on regrowth attempts you’ll cut down again and again.
Step 2: Dig Out the Rhizome Mass
This is the hard part, and I won’t sugarcoat it. I spent two full Saturdays just on this phase. The goal is to loosen the soil around the root mass and pull out every rhizome segment you can find. Work from the outside edges inward so you’re not constantly stepping on ground you’ve already cleared.
A heavy-duty mattock is your single best friend here. Mine was a game-changer for breaking through the dense, tangled rhizome mat that had built up over years. Once things loosened up, I switched between a wide cultivating hoe for clearing debris and a sharp spade for cutting through stubborn roots.
Step 3: Trench the Perimeter
Dig a trench around the entire affected area, at least eight to ten inches deep. This serves two purposes: it lets you see exactly where the rhizomes end, and it creates a boundary you can check weekly for any sneaky re-runners. Anything you find in that trench, cut it and pull it out immediately.
Step 4: Monitor and Cut for the Long Haul
For the next growing season — and possibly two — you will see new shoots appear from rhizome fragments you missed. Cut them immediately at ground level. Don’t let them photosynthesize. Every time a new shoot grows and you cut it, the plant uses stored energy and gets weaker. Stay consistent and you will win.
Tools I Used (And Genuinely Recommend)
The right tools turned an impossible job into a merely brutal one. Here’s what I actually used throughout this project:
Honestly, I’d tried to start this project with a basic garden spade from my garage. I wasted an entire morning and barely made a dent. Once I had the right tools, I made more progress in two hours than I had all day. Don’t skip this part.
A Few Things I Wish I’d Known Earlier