Affiliate Disclosure: This article contains affiliate links. As an Amazon Associate, TerraBamboo earns from qualifying purchases. We only recommend products we have tested or believe will provide genuine value to our readers.
Key Takeaways
- A DIY bamboo pole screen can be built in two ways: purchasing pre-made rolled panels (fastest, 4–6 hours) or constructing from individual poles (more customizable, 8–12 hours labor)
- Untreated bamboo poles last 3–7 years outdoors; applying annual coats of tung oil or exterior sealant extends lifespan to 10–15 years
- Proper wall attachment requires air gaps of 1–2 inches between the screen and wall surface to prevent moisture-related deterioration
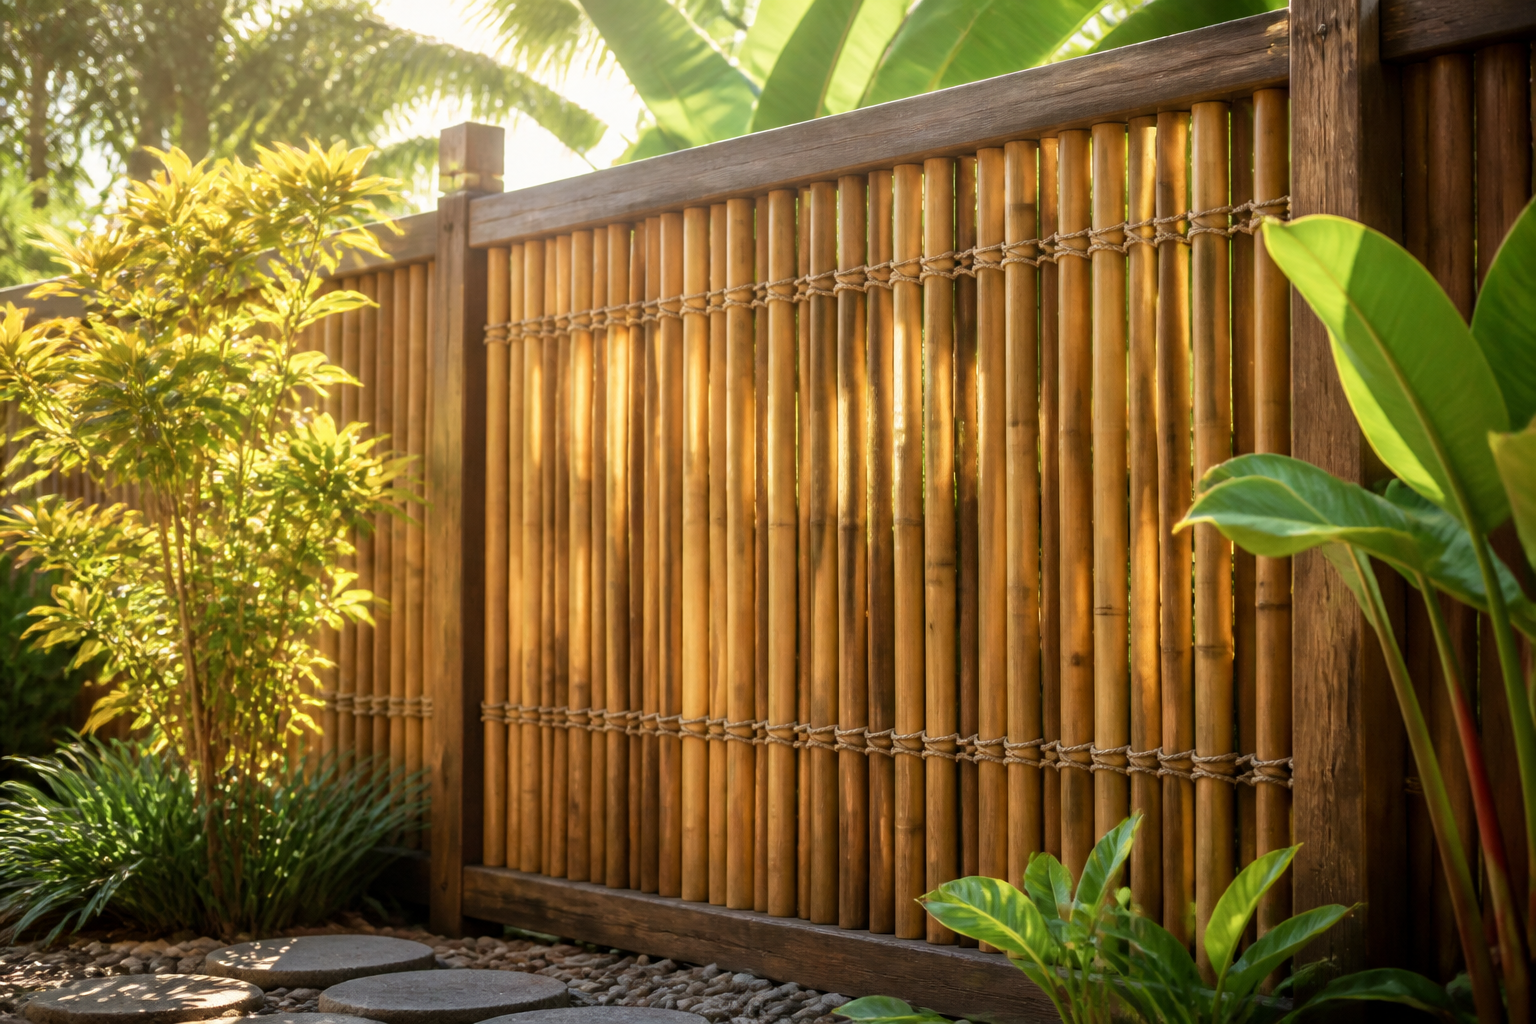
- Spacing bamboo poles at 0 inches provides full privacy; 1–2 inch gaps create filtered light and a modern aesthetic suitable for grill screens
- A 6×6 foot custom pole screen costs $150–$300 in materials, compared to $200–$400 for pre-made panels or $800–$1,200 for solid wood fencing
- Pre-drilling bamboo poles before fastening prevents splitting and ensures structural integrity in outdoor environments
How to Build a Bamboo Pole Screen: Two Proven Approaches
When planning how to build a bamboo pole screen DIY, homeowners and garden designers face a fundamental choice: purchase pre-made rolled bamboo screening panels and install them within a frame, or construct a custom screen from individual bamboo poles. TerraBamboo’s horticultural team has tested both methods extensively, and the decision depends on your timeline, budget, and aesthetic preferences.
Approach A: Rolled Bamboo Screening Panels (Fastest Method)
Pre-fabricated rolled bamboo screening panels are the quickest entry point to building a bamboo privacy panel. These panels typically come in 4×6, 6×8, or 8×12 foot dimensions, with poles already lashed together using natural twine or synthetic cord. Installation requires only framing the panel in a cedar or pressure-treated wood border, then attaching to a wall, fence, or freestanding posts. Total construction time: 4–6 hours for a single 6×8 panel, including site preparation and finishing.
Approach B: Building from Individual Bamboo Poles (Maximum Customization)
Custom-building a bamboo pole screen from individual poles offers superior control over spacing, diameter selection, and overall aesthetic. This method involves sourcing individual poles (typically 1.5–3 inch diameter), constructing a frame from cedar 4×4 posts and 2×4 rails, and manually attaching poles using galvanized screws, stainless wire, or traditional jute lashing. Total construction time: 8–12 hours, but the result is a one-of-a-kind privacy solution tailored to your exact specifications.
For this comprehensive guide, we focus primarily on the individual pole method, as it provides the greatest flexibility and demonstrates the core skills needed for any bamboo pole panel garden project.
What Materials Do You Need for a DIY Bamboo Privacy Panel?
Building a custom 6×6 foot bamboo fence screen requires sourcing materials from multiple suppliers. Here’s what TerraBamboo’s construction specialists recommend:
Bamboo Poles
The foundation of any DIY bamboo pole screen is the poles themselves. Asian bamboo poles—primarily from species such as Phyllostachys edulis (moso bamboo) or Phyllostachys pubescens—are widely available at home improvement retailers and specialty bamboo suppliers. Key specifications:
- Diameter: 1.5–2 inches for a lightweight, open-weave modern look; 2–3 inches for bold graphic presence and enhanced wind resistance
- Length: 6–8 feet for standard residential screening; select straight poles without visible cracks or soft spots
- Treatment status: Untreated poles offer authentic color and flexibility but require annual sealing; pre-treated poles cost 20–30% more but provide 10–15 year durability guarantees
- Quantity: For a 6-foot-wide screen with 1-inch spacing, you’ll need 7–8 poles; for 0-inch spacing (full privacy), plan for 12–14 poles
Frame Materials
- Vertical posts: Two cedar or treated 4×4 posts, 8 feet long (accommodates 6-foot visible height plus concrete anchoring)
- Horizontal rails: Four 2×4 cedar boards, each 6 feet long (two for top and bottom horizontal support)
- Concrete: 60-pound bags of fast-setting concrete mix (two bags per post for freestanding installations)
Fastening Materials
- Galvanized exterior screws: 3-inch #10 or #12 deck screws (rust-resistant, rated for outdoor use)
- Natural twine alternative: Food-grade manila rope or jute twine for traditional lashing (requires tightening every 1–2 seasons)
- Stainless steel wire: 16-gauge wire for semi-permanent lashing (requires specialized crimping tools)
Sealants & Finishes
- Raw linseed oil or exterior tung oil: Apply to all cut ends immediately after cutting to prevent moisture infiltration and cracking
- Exterior polyurethane or water-based sealant: One-gallon minimum for a 6×6 screen (covers approximately 300–400 sq. ft. per gallon)
Step-by-Step: How to Build a 6×6 Bamboo Pole Screen
Step 1: Build and Brace the Frame
Your frame is the structural backbone of the entire privacy panel. Begin by cutting and assembling the frame components:
- Cut two 4×4 cedar posts to 8 feet (these will be your vertical supports)
- Cut four 2×4 rails to exactly 6 feet (two horizontal rails will run between the posts at the top and bottom of the visible screen area)
- Assemble the frame by fastening the 2×4 rails to the 4×4 posts using 3-inch galvanized deck screws—two screws per connection point, creating a rectangular box structure
- Add diagonal corner bracing by installing additional 2×4 pieces diagonally across the rear of the frame to prevent racking under wind pressure
Measure diagonals corner-to-corner; if both measurements are equal (within ¼ inch), your frame is square.
Step 2: Seal All Cut Ends Immediately
This is a critical step that many DIYers skip. Freshly cut bamboo poles and cedar posts expose the interior cellular structure, which absorbs water rapidly and causes rot from the inside out.
- Brush raw linseed oil or exterior tung oil onto all cut ends of the 4×4 posts, 2×4 rails, and bamboo poles within 24 hours of cutting
- Allow oil to cure for 48 hours before proceeding with assembly
- This single step can extend the lifespan of your DIY bamboo privacy panel by 3–5 years
Step 3: Plan Your Pole Spacing
The spacing between bamboo poles determines both privacy level and aesthetics. Measure across your 6-foot frame width and decide:
- Full Privacy (0-inch gaps): Poles touch side-by-side. You’ll need 12–14 poles per 6-foot width. Provides complete sight-blocking but heavier appearance.
- Filtered Light (1-inch gaps): Modern, open aesthetic. Allows dappled sunlight while obscuring direct view. Requires 7–8 poles for a 6-foot width.
- Decorative Screening (2-inch gaps): Architectural effect. Recommended for grill screens or garden room dividers where airflow matters. Requires 5–6 poles.
Mark your spacing on the 2×4 rails using chalk or pencil before drilling, ensuring even distribution across the entire 6-foot width.
Step 4: Pre-Drill Bamboo Poles Before Fastening
This step prevents splitting and is non-negotiable. Bamboo’s hollow structure with internal nodes makes it susceptible to cracking when screws are driven directly into the material.
- Use a ½-inch drill bit to create pilot holes through each bamboo pole where it will attach to the 2×4 rails
- Drill entirely through the pole to ensure no internal pressure buildup
- Repeat for every pole-to-rail connection point (two connection points per pole = two pilot holes per pole)
Skipping this step is the #1 cause of pole splitting in DIY bamboo pole screens.
Step 5: Attach Poles Using Galvanized Screws or Lashing
Method A: Galvanized Screw Fastening (Recommended for Permanence)
- Drive 3-inch galvanized deck screws through the pilot holes you created, fastening each pole to both the top and bottom 2×4 rails
- Use a power drill with screw bit to minimize hand pressure that could cause splitting
- Ensure screws sit flush with the pole surface (do not over-tighten, which compresses bamboo fibers)
Method B: Lashing with Natural Twine (Traditional Aesthetic)
- Wrap food-grade manila rope or jute twine around each pole and the 2×4 rail, tying with a tight clove hitch knot
- Wrap 2–3 times per connection point to distribute stress evenly
- Natural twine requires annual re-tightening as it stretches and absorbs moisture
Step 6: Apply Finishing Sealer to the Complete Screen
Once all poles are attached, apply a comprehensive protective finish to the entire screen.
- Brush exterior tung oil or water-based polyurethane sealant across all bamboo pole surfaces, including the frame
- Apply in two coats, allowing 24–48 hours between coats for proper curing
- Pay special attention to joints, lashing points, and any remaining unfinished cut ends
Step 7: Install Posts in Concrete (for Freestanding Screens)
For screens not attached to existing structures, anchor the 4×4 posts securely in the ground:
- Dig holes 24 inches deep and 12 inches diameter at each post location
- Set the assembled frame into the holes, ensuring the frame is level and plumb (use a 4-foot level)
- Mix and pour fast-setting concrete around each post (two 60-pound bags per hole, mixed per manufacturer instructions)
- Allow concrete to cure for 48–72 hours before exposing the screen to wind or weight stress
How to Attach a Bamboo Screen to a Wall: Three Installation Methods
If you’re building a bamboo screen wall attachment rather than a freestanding panel, proper fastening is critical to prevent moisture damage and structural failure. TerraBamboo’s team has tested three methods extensively:
Method 1: Masonry Anchors (for Concrete or Brick Walls)
- Identify stud locations or solid masonry sections using a stud finder or knock test
- Drill ⅜-inch holes into the masonry at three points per frame (top, middle, bottom)
- Install expansion anchors rated for your estimated screen weight (minimum 50 lbs per anchor)
- Bolt the frame directly to the wall using ½-inch stainless steel bolts with washers
- Maintain a 1–2 inch air gap between the screen back and the wall surface to prevent moisture trapping
Method 2: Lag Bolts into Wood-Frame Walls
- Use a stud finder to locate wall studs (typically 16 inches on-center)
- Drill pilot holes into the studs that will align with your frame mounting points
- Install ½-inch stainless lag bolts with washers directly into the studs
- Tighten securely but do not over-tighten, which can compress the bamboo frame
Method 3: French Cleat System (for Adjustable Hanging)
A French cleat allows easy removal and adjustment of the screen:
- Build two 45-degree angled cleats from 2×4 boards, each running the full width of your screen frame
- Bolt one cleat directly to the wall studs, angled downward