- Bamboo Plant Food – Liquid Plant Food for New Shoot Growth, Rich Green Leaves & Strong Root Development, 8 oz — my go-to for regular bamboo feeding
- All Purpose NPK Fertilizer – Complete Liquid Plant Food for Balanced Nutrition, Vigorous Growth & Strong Root Development, 8 oz — great all-around option for the whole garden
- Lucky Bamboo Fertilizer – Liquid Plant Food for Greener Stalks, Healthy New Shoots & Steady Growth, 32 oz — ideal for indoor and container lucky bamboo
- Fertilome Chelated Liquid Iron and Other Micronutrients, 16 oz — great for treating chlorosis in smaller plantings
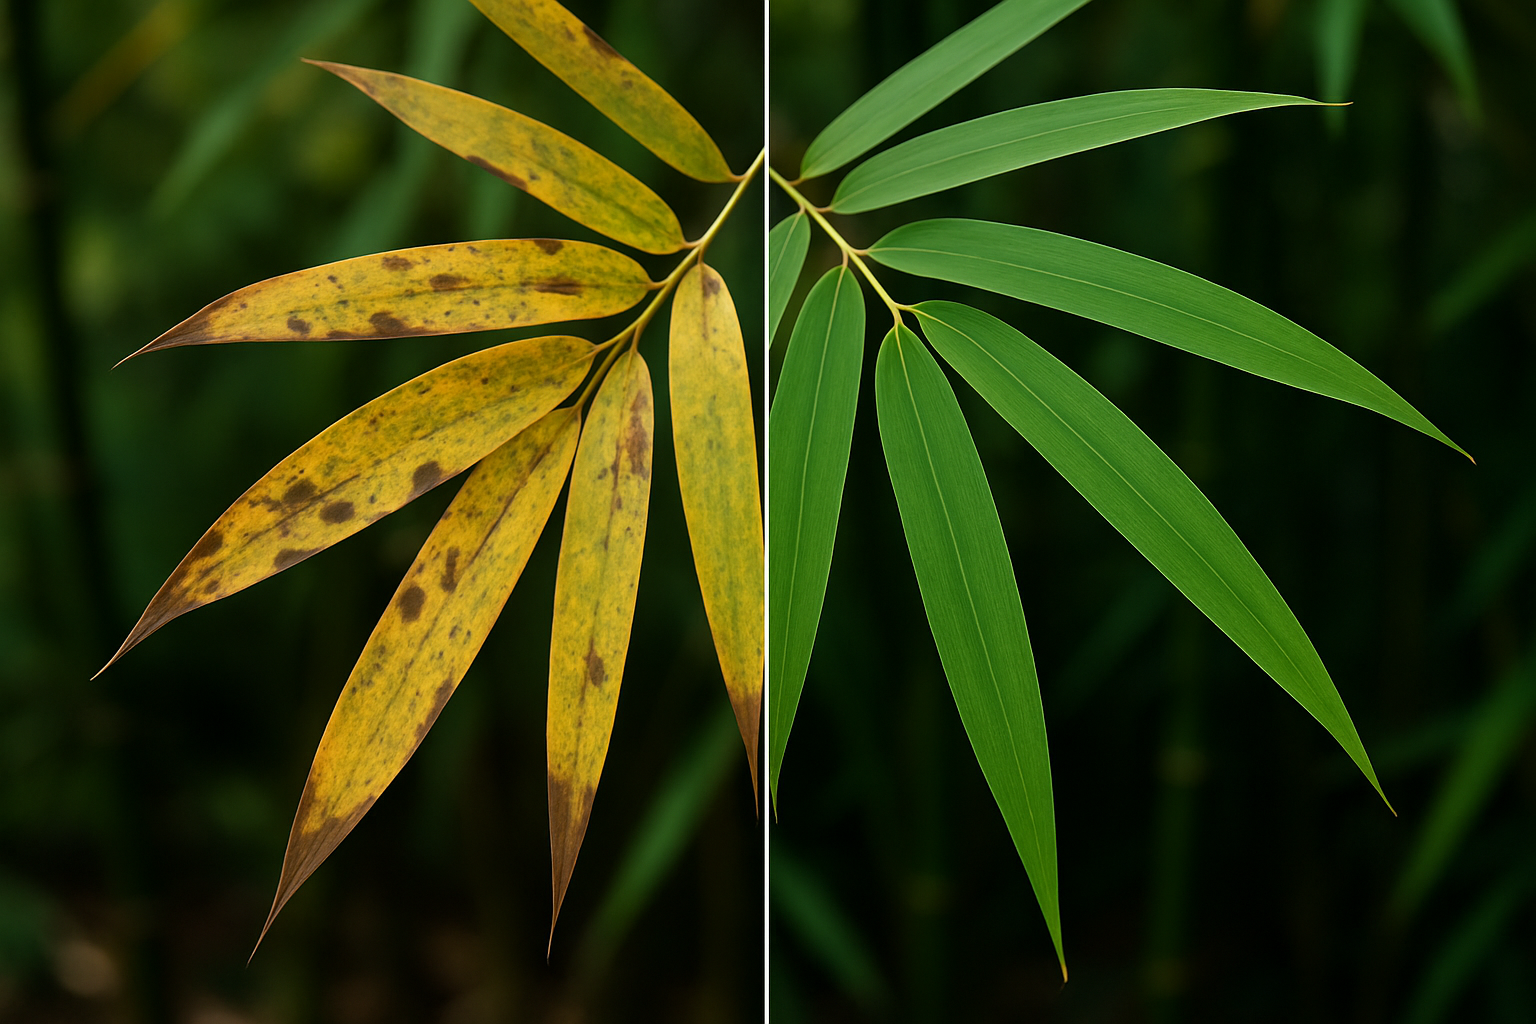
Why Are My Bamboo Leaves Turning Yellow? The 6 Most Common Causes
1. Nutrient Deficiency (Yes, Including My Tomato Fertilizer Disaster)
Bamboo is a heavy feeder, especially nitrogen. When it doesn’t get enough, the older leaves start yellowing first as the plant pulls nutrients from them to support new growth. The fix? A proper, balanced plant food formulated for the job. After my tomato food debacle, I switched to a dedicated Bamboo Plant Food — a liquid formula specifically designed to promote rich green leaves, new shoot growth, and strong root development. The difference was visible within weeks. If you want a broader option that works across your whole garden, the All Purpose NPK Fertilizer is a solid liquid plant food for balanced nutrition and vigorous growth across the board.
2. Iron Deficiency (Chlorosis)
This one is sneaky because it looks a lot like a nitrogen problem at first glance. The telltale sign of iron deficiency — technically called chlorosis — is yellowing leaves where the veins stay green. It’s especially common in alkaline soils or areas with hard water. I had a mild case of this alongside my nutrient mess, and chelated iron was the solution. I’ve used both the Fertilome Chelated Liquid Iron and Other Micronutrients (great for smaller gardens) and the Southern Ag Chelated Liquid Iron in the 1-gallon size for larger plantings. Chelated forms are absorbed far more efficiently than standard iron supplements, so don’t skip the “chelated” part when you’re shopping.
3. Overwatering or Poor Drainage
Bamboo loves moisture but absolutely hates soggy roots. Waterlogged soil suffocates the roots and leads to — you guessed it — yellow leaves. If your bamboo is planted somewhere that pools water after rain, that’s likely your problem. Make sure your planting area has good drainage, and let the top inch of soil dry out slightly between waterings. When in doubt, stick your finger in the soil before you reach for the hose.
4. Underwatering and Drought Stress
On the flip side, bamboo that’s too dry will also throw a yellow leaf tantrum — especially during hot summers. The leaves may also curl inward to conserve moisture. Deep, infrequent watering is better than a light daily sprinkle. Get the water down to the root zone where it actually matters, and consider a layer of mulch to help the soil retain moisture between waterings.
5. Natural Seasonal Shedding
Here’s one that catches a lot of new bamboo growers off guard: bamboo sheds old leaves naturally, usually in spring. It’s completely normal for a portion of the leaves to yellow and drop as the plant pushes out fresh new growth. If the yellowing is spread across older inner leaves and your bamboo otherwise looks healthy, take a breath. You’re probably fine. This is the one situation where the answer is genuinely just to leave it alone and let nature do its thing.
6. Root Bound or Compacted Roots
Container-grown bamboo can become root bound surprisingly fast — bamboo is ambitious that way. When roots have nowhere left to go, the plant stresses out and starts showing it through yellowing leaves. If your potted bamboo hasn’t been repotted in a couple of years, tip it out and check. If the roots are circling the pot or bursting out of drainage holes, it’s time to size up or divide the plant. For lucky bamboo specifically, the Lucky Bamboo Fertilizer in a generous 32-oz size can also help a stressed container plant recover once it has the space it needs.
Tools I Use and Recommend
After my fertilizer fiasco, I got a little more intentional about what I keep in my garden shed. Here’s a quick reference to the products I mentioned throughout this post:
- Bamboo Plant Food – Liquid Plant Food for New Shoot Growth, Rich Green Leaves & Strong Root Development, 8 oz — my go-to for regular bamboo feeding
- All Purpose NPK Fertilizer – Complete Liquid Plant Food for Balanced Nutrition, Vigorous Growth & Strong Root Development, 8 oz — great all-around option for the whole garden
- Lucky Bamboo Fertilizer – Liquid Plant Food for Greener Stalks, Healthy New Shoots & Steady Growth, 32 oz — ideal for indoor and container lucky bamboo
- Fertilome Chelated Liquid Iron and Other Micronutrients, 16 oz — great for treating chlorosis in smaller plantings
Author: kylebamboo
-
Why Bamboo Leaves Turn Yellow: 6 Causes I Discovered the Embarrassing Way
-
Scale Insects on Bamboo: My 3-Month Battle and the Moment I Finally Won
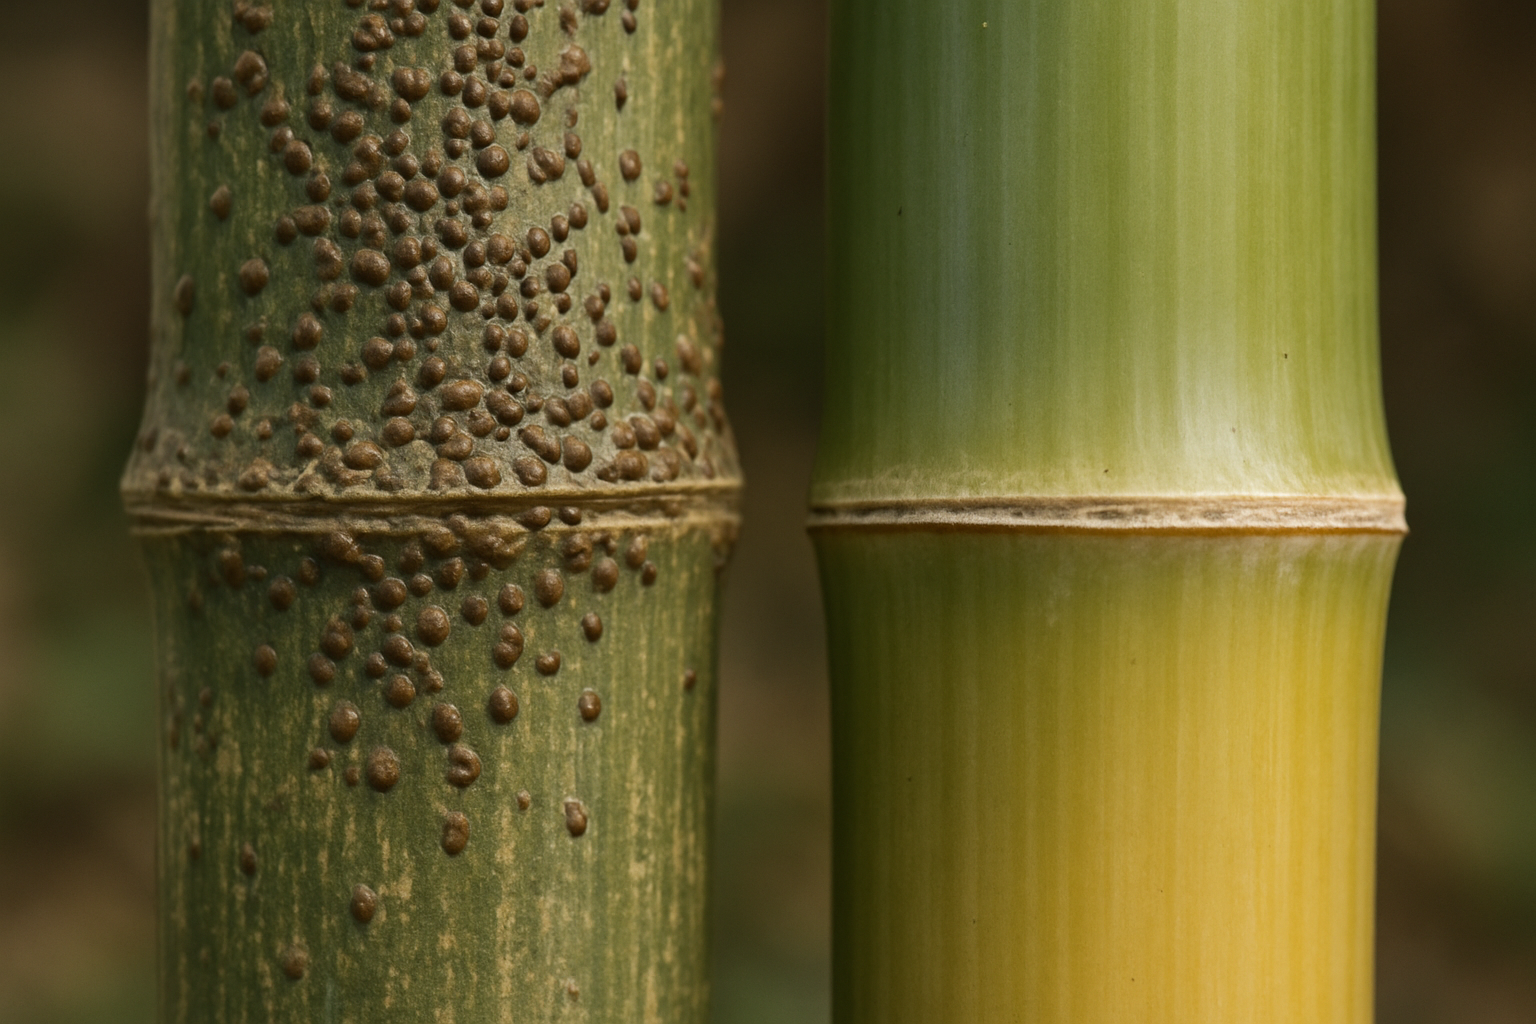
I still remember the morning I walked out to my bamboo grove and felt my stomach drop. What I thought were harmless little bumps on the culms were absolutely everywhere — and my prized Phyllostachys aureosulcata, the one I’d nursed from a small division for four years, was looking pale, stunted, and just… wrong. It took me another two weeks to finally diagnose what I was dealing with: scale insects on bamboo. By that point, I’d already lost a season of growth, spent money on the wrong treatments, and had a full-blown argument with my husband about whether we should just “rip it all out and start over.” This is the story of how I nearly lost my bamboo — and how I finally won.
This post contains affiliate links. As an Amazon Associate, I earn from qualifying purchases. This means I may earn a small commission if you click through and buy something, at no extra cost to you. I only recommend products I’ve personally used or researched thoroughly.
How I Missed the Early Signs of Scale Insects on Bamboo
Here’s the thing about scale insects — they don’t look like bugs at first glance. They look like tiny, waxy lumps. Some look like little oyster shells. Some look like flat brown discs. For weeks, I genuinely thought I was seeing some kind of natural growth variation on my culms. By the time I got close enough with a magnifying glass and did my research, the infestation had spread from one clump to three.
Scale insects feed by inserting their mouthparts into plant tissue and sucking out the sap. On bamboo, this shows up as yellowing or dropping leaves, weak new shoots, and a general decline in vigor. You might also notice a sticky residue on the culms or leaves — that’s honeydew, a byproduct of their feeding — which can then attract sooty mold, turning your beautiful bamboo a grimy black. It’s a cascading disaster, and it happens quietly.
The two most common types you’ll encounter are armored scale and soft scale. Armored scale (like oystershell scale) creates a hard, detachable waxy covering and is generally harder to kill with contact sprays. Soft scale produces a waxy coating that’s part of its body, and while it sounds less intimidating, it can spread honeydew more aggressively. Both are bad news for bamboo.
What Actually Works: My Treatment Protocol
I’ll be honest — my first two months of fighting this were a mess. I tried neem oil sprays I mixed myself (inconsistent results), I tried dish soap solutions (helped a little, not enough), and I spent one genuinely miserable afternoon scrubbing individual culms with a soft brush and rubbing alcohol. That last part actually does help on isolated infestations, but when scale has spread across multiple clumps, you need something more systematic.
The turning point came when I switched to a proper horticultural oil — specifically, a refined paraffinic oil that smothers scale insects by blocking their breathing pores. Unlike neem oil, which can degrade quickly and smells absolutely terrible, horticultural oil is lightweight, effective, and breaks down cleanly in the environment. The key is thorough, repeat application — you have to coat every surface, including the undersides of leaves and the joints of culms, where scale loves to hide.
For a severe or stubborn infestation, I also added a systemic soil drench to my protocol. Systemics work differently — the plant absorbs the active ingredient through its roots, and when scale insects feed, they ingest it. This is especially useful for bamboo because the dense culm structure makes it genuinely hard to get full spray coverage. A systemic approach means you’re treating from the inside out.
Treatment Tips That Made the Difference
- Treat in the crawler stage when possible — newly hatched crawlers are the most vulnerable because they haven’t yet formed their protective covering
- Spray in the early morning or evening to avoid leaf scorch and to protect beneficial insects
- Apply horticultural oil at 7–14 day intervals for at least three treatment cycles
- Don’t forget the soil surface and the base of culms — scale can overwinter in debris
- After treatment, rake and remove fallen leaves and debris to reduce reinfestation sites
- Avoid over-fertilizing with nitrogen during an infestation — lush new growth attracts scale
The Products That Finally Turned Things Around
After a lot of trial and error, these are the specific products I used in my recovery protocol. I’m sharing the exact ones because details matter — not all horticultural oils are equal, and the concentration and formulation make a real difference.
For Spray Treatment
I started with the Monterey Horticultural Oil Ready to Spray (32 oz) for my initial applications because I wanted something I could grab and use immediately without measuring or mixing. It’s OMRI Listed for organic gardening and comes bundled with a measuring spoon, which I appreciated. Once I confirmed it was working, I upgraded to the concentrate for better value — the Monterey Horticultural Oil 1 Quart concentrate is perfect if you have a small to medium grove, and the 1 Gallon version is the better buy if you’re dealing with a large planting or want to stay stocked for the season. All three are the same trusted formula — it just comes down to how much bamboo you’re treating.
For Systemic Treatment
For my worst-affected clumps, I used the Monterey Fruit Tree & Vegetable Systemic Soil Drench (1 gallon) as a soil application. This uses imidacloprid, which the plant absorbs systemically — meaning scale insects are exposed to it when they feed on plant tissue. I’ll note that systemics should be used thoughtfully; avoid applying them when bamboo is in active bloom (rare, but it happens) since pollinators could be affected. For a stubborn, widespread infestation, though, this was the tool that finally broke the cycle for me. There’s also a 1 Quart spray version available if you prefer foliar systemic application or have a smaller area to treat.
Preventing Scale From Coming Back
Once you’ve beaten an infestation, prevention becomes your new obsession — at least it did for me. Scale insects often arrive on new plants, so I now quarantine any new bamboo division for a few weeks before planting it near my established grove. I also do a visual inspection of my culms every spring when I’m doing general cleanup, and I keep horticultural oil on hand year-round.
I still remember the morning I walked out to my bamboo grove and noticed something was terribly wrong. The leaves that had always been a deep, glossy green were pale, stippled, and lifeless — like someone had dusted them with ash overnight. I had no idea then that I was looking at a bamboo spider mites infestation, and I certainly had no idea how bad things were about to get. If you’re here searching for bamboo spider mites treatment options, I want you to know: I’ve been exactly where you are, and there is a way through this.
This post contains affiliate links. As an Amazon Associate, I earn from qualifying purchases. This means I may earn a small commission if you click through and make a purchase — at no extra cost to you. I only recommend products I’ve personally used or would confidently use in my own garden.
How a “Little Yellowing” Turned Into a Full-Blown Crisis
It started in late July during one of the hottest, driest summers our area had seen in years. I noticed a few yellow leaves on my Phyllostachys aurea — my beautiful golden bamboo that I’d been growing for nearly six years. I chalked it up to heat stress and made a mental note to water more. That was my first mistake.
Two weeks later, the yellowing had spread to nearly a third of the canes. Leaves were curling, dropping, and that strange pale stippling had moved across the entire eastern edge of my grove. My neighbor — a retired horticulturalist — came over, took one look, and said quietly, “You’ve got mites. Bad ones.” He handed me a magnifying glass and told me to look at the underside of a leaf. I did, and what I saw made my stomach drop. Tiny, almost invisible creatures were moving across a fine web of silk. Spider mites. Hundreds of them on a single leaf.
I spent that night reading everything I could find. What I learned scared me. Spider mites — particularly the two-spotted spider mite (Tetranychus urticae) — thrive in hot, dry conditions, reproduce at an explosive rate, and can devastate a bamboo grove in a matter of weeks if left unchecked. And I had left them unchecked for nearly a month.
Understanding Bamboo Spider Mites: What You’re Actually Dealing With
Spider mites aren’t insects — they’re arachnids, which is part of why many common insecticides do nothing to stop them. They pierce leaf tissue and suck out the contents of individual cells, which causes that telltale bronze or silver stippling pattern. As the damage accumulates, leaves yellow, dry out, and fall. In severe infestations, you’ll see fine webbing on the undersides of leaves and between stems.
Bamboo is particularly vulnerable during periods of drought stress. When a plant is already struggling to maintain moisture, its natural defenses are weakened, and spider mites move in fast. A few key things that make infestations worse:
- Hot, dry, dusty conditions — mites hate humidity
- Overuse of nitrogen-heavy fertilizers, which creates lush, tender growth mites love
- Killing off beneficial predatory insects with broad-spectrum pesticides
- Crowded plantings with poor air circulation
- Ignoring early warning signs like minor leaf stippling or faint webbing
I had checked nearly every box on that list. The summer heat, a recent fertilizer application, and my own delayed response had created perfect conditions for the mites to explode.
Bamboo Spider Mites Treatment: What Actually Worked for Me
Once I understood what I was dealing with, I attacked the problem from multiple angles. Here’s the honest, step-by-step approach that saved my grove.
Step 1: Water Blast First
Before reaching for any product, I used a strong jet of water from my garden hose to blast the undersides of as many leaves as I could reach. This physically dislodges mites and disrupts their colonies. It won’t eliminate them, but it knocks the population back immediately and makes your treatments more effective. I did this every other day throughout the treatment period.
Step 2: Neem Oil — My First Line of Chemical Defense
Neem oil is the gold standard for organic mite control, and for good reason. It disrupts the mites’ hormonal systems, suffocates eggs and adults on contact, and leaves minimal chemical residue. I used Bonide Captain Jack’s Neem Oil Ready-to-Use Spray because I needed something I could grab and deploy immediately across a large area. It’s also approved for organic gardening, which matters to me since my grove is close to a vegetable bed.
I alternated it with BioAdvanced Organics Neem Oil Ready-to-Use to prevent the mites from building resistance to any single formulation. I applied both products in the early morning or evening — never in direct midday sun, which can cause leaf burn — and made sure to coat the undersides of leaves thoroughly. That’s where the mites live and breed.
Step 3: Systemic Protection for Heavy Infestations
Because my infestation had gone so far, I also added Bonide Systemic Houseplant Insect Control Granules to the soil around the base of my most affected canes. Systemic products are absorbed through the roots and distributed throughout the plant tissue, providing longer-lasting protection from within. This is especially helpful when you can’t reach every leaf with a spray bottle. I used this as a complement to, not a replacement for, my surface treatments.
Step 4: Broad-Spectrum Backup When Things Were at Their Worst
At the peak of my infestation, I brought in BioAdvanced 3-in-1 Insecticide and Fungicide Ready-to-Spray. This product combines insect, mite, and disease control in a single application — which was useful because a secondary fungal issue had developed on some of the weakened canes. I used this sparingly and only on the most heavily affected sections of the grove.
Step 5: Environmental Changes to Stop the Cycle
Chemical treatment alone won’t work if you don’t address the conditions that allowed mites to thrive in the first place. I made these changes alongside my spray schedule:
- Deep watered every 3–4 days instead of light daily watering, encouraging roots to reach deeper moisture
-
How Bamboo Charcoal Saved My Compost Pile (And My Relationship With My Neighbors)
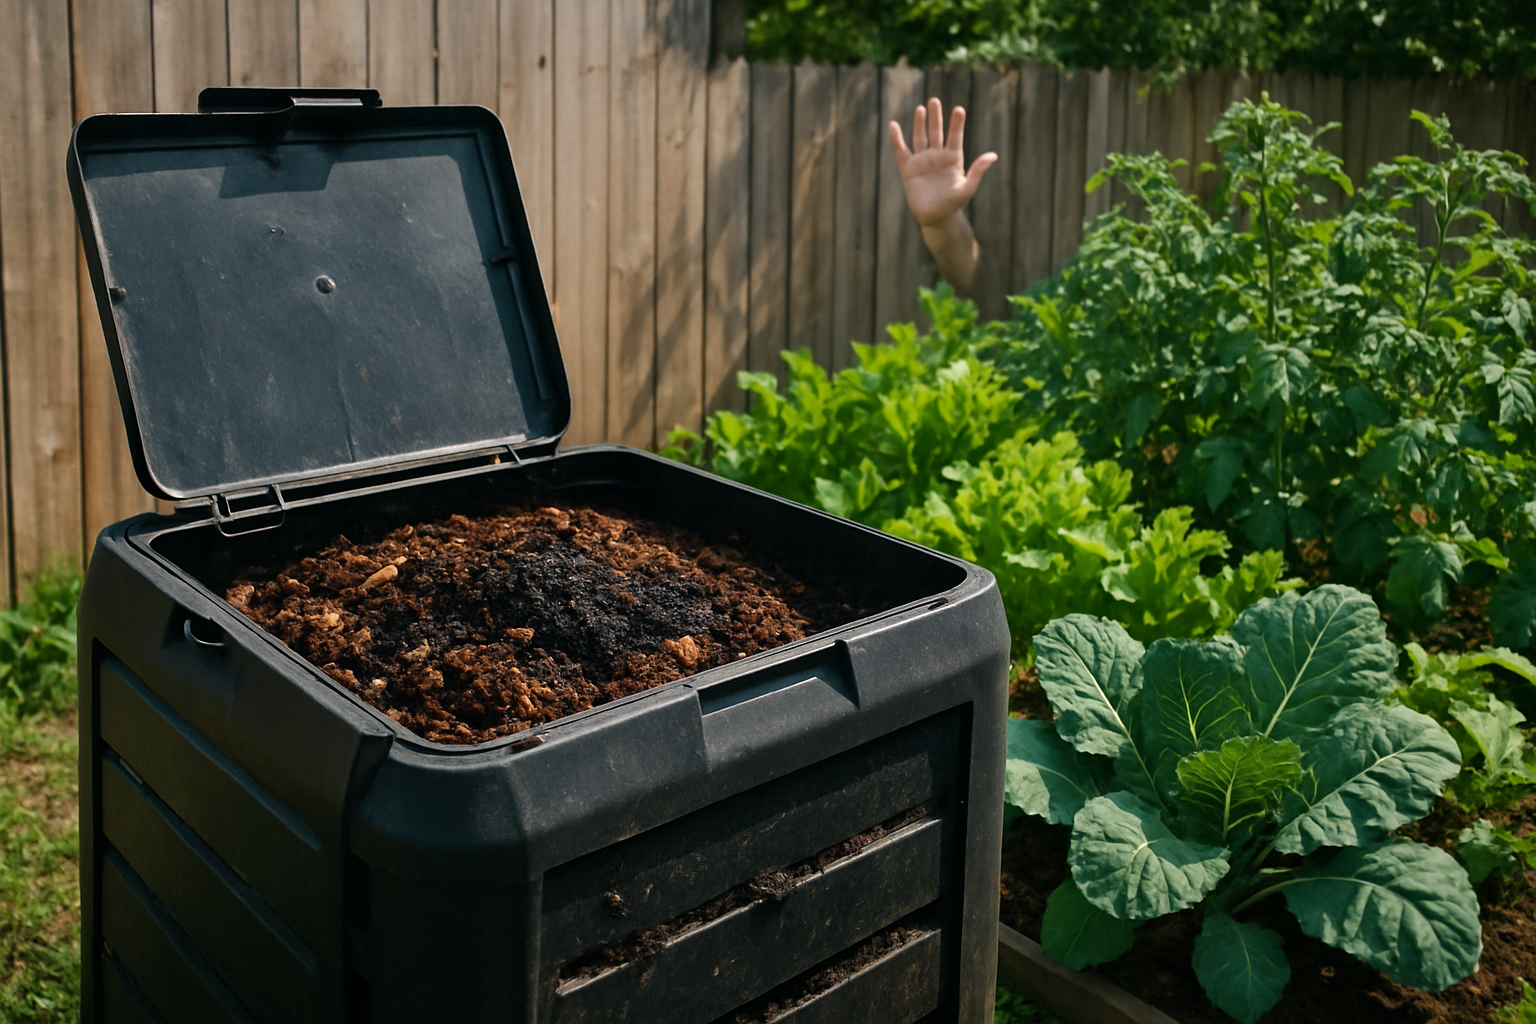
Last summer, my neighbor Janet stopped waving at me. Not a cold shoulder exactly — more of a pointed avoidance that only people who’ve lived next to each other for eight years can pull off with such surgical precision. The culprit? My compost pile. Specifically, the smell coming off my compost pile, which had apparently crossed the property line and taken up permanent residence in her yard. I didn’t fully understand what had gone wrong until I discovered bamboo charcoal compost methods — and honestly, that discovery didn’t just rescue my garden, it rescued my friendship.
This post contains affiliate links. As an Amazon Associate, I earn from qualifying purchases.
But before we get to the happy ending, let me back up and tell you exactly how I turned a beautiful composting setup into what Janet diplomatically called “a genuine biohazard situation.”
When My Compost Pile Went Completely Off the Rails
I’d been composting for about three years without any real trouble. I had a nice three-bin system in the corner of my yard, I was turning it regularly, and I genuinely felt good about what I was doing for my soil. Then I decided to go big. I added a massive batch of bamboo cuttings from a trim I’d done on my running bamboo, layered in some kitchen scraps, grass clippings, and coffee grounds — and then promptly got slammed with a brutal two-week work project that left me no time for the garden.
When I finally walked outside on a Saturday morning, the smell hit me before I even reached the back door. Anaerobic. Sulfuric. The kind of odor that makes you genuinely reconsider your life choices. Janet was standing at her fence with the expression of a woman who had been suffering in polite silence for far too long. That was the last time she waved.
I spent the next two weekends trying to fix things the traditional way — aerating, adding more brown material, adjusting moisture levels. I made progress, but the smell lingered. The pile was sluggish. And every time I glanced toward Janet’s yard, I felt a small, specific kind of shame that gardeners know well: the shame of a pile gone wrong.
How Bamboo Charcoal Compost Changed Everything
I’d been reading about biochar on a few gardening forums and kept seeing bamboo charcoal mentioned as a powerful compost amendment. The science behind it genuinely fascinated me. Bamboo charcoal — and biochar in general — is created through a process called pyrolysis, where organic material is burned at high temperatures in a low-oxygen environment. The result is a highly porous carbon structure that acts almost like a sponge in your compost and soil.
Here’s why that matters for a struggling compost pile:
- Odor absorption: That porous structure physically traps volatile compounds — the ones responsible for the sulfur and ammonia smells that come from anaerobic decomposition.
- Microbial housing: The tiny pores create a protected habitat for beneficial microbes, giving your compost’s decomposer community a place to thrive and multiply.
- Moisture regulation: Biochar helps balance moisture in the pile — absorbing excess water that leads to anaerobic conditions and slowly releasing it when things dry out.
- Long-term soil benefit: Once that finished compost goes into your garden beds, the charcoal stays active in the soil for hundreds — sometimes thousands — of years, continuing to improve structure and nutrient retention.
Bamboo makes an especially excellent source material for biochar because bamboo grows so rapidly and densely, producing a highly structured carbon that’s particularly effective as a soil amendment. If you’re already growing bamboo, you’re sitting on a future resource. But for immediate help with a compost problem, a quality commercial biochar product is the practical move.
What I Actually Did (Step by Step)
Once I understood the mechanism, I put together a rescue plan for my pile. Here’s exactly what I did over the course of about ten days.
Step 1: Aerate First
Before adding anything, I turned the entire pile aggressively to reintroduce oxygen. Anaerobic decomposition is the root cause of that horrible smell, so you have to break it up first. I used a long-handled garden fork and worked through the pile in layers, pulling material from the center outward.
Step 2: Add the Biochar in Layers
As I rebuilt the pile, I sprinkled biochar generously between layers — roughly one part biochar to every ten parts of compost material by volume. I worked it throughout the pile rather than just dropping it on top. The distribution is what makes it effective.
Step 3: Accelerate the Microbial Activity
A sluggish pile needs a microbial jumpstart alongside the biochar. I used a compost accelerator to reintroduce active microbial cultures and speed up the decomposition that had essentially stalled out. The combination of biochar (which houses microbes) and an accelerator (which delivers them) works remarkably well together.
Step 4: Balance the Carbon-to-Nitrogen Ratio
My pile had gone heavy on nitrogen-rich greens, which is a classic cause of anaerobic conditions. I added shredded cardboard, dried leaves, and some of those bamboo culm pieces I had on hand (bamboo is a fantastic brown material for compost) to bring things back into balance.
Step 5: Maintain and Monitor
I turned the pile every three days for the first two weeks and checked moisture levels regularly. With proper aeration and the biochar doing its job, I could smell the difference within 72 hours. Not perfect — but dramatically, noticeably better.
Tools I Use and Recommend
These are the products I actually used during my compost rescue mission and still reach for regularly. I’ve included a couple of size options on the biochar so you can start with whatever makes sense for your setup.
For the Biochar Amendment
Char Bliss Organic Biochar — 24 Qt (Best Value for Larger Piles) — This is the size I use now that I’ve made biochar a regular part of my composting routine. OMRI-listed for organic use, and the quality is consistent. If you’re treating an established compost pile or amending garden beds, this size will go fast and it’s worth getting the larger quantity.
Char Bliss Organic Biochar — 16 Qt (Great Middle-Ground Option) — A solid choice if you want to try biochar in your compost system without fully committing to the larger
-
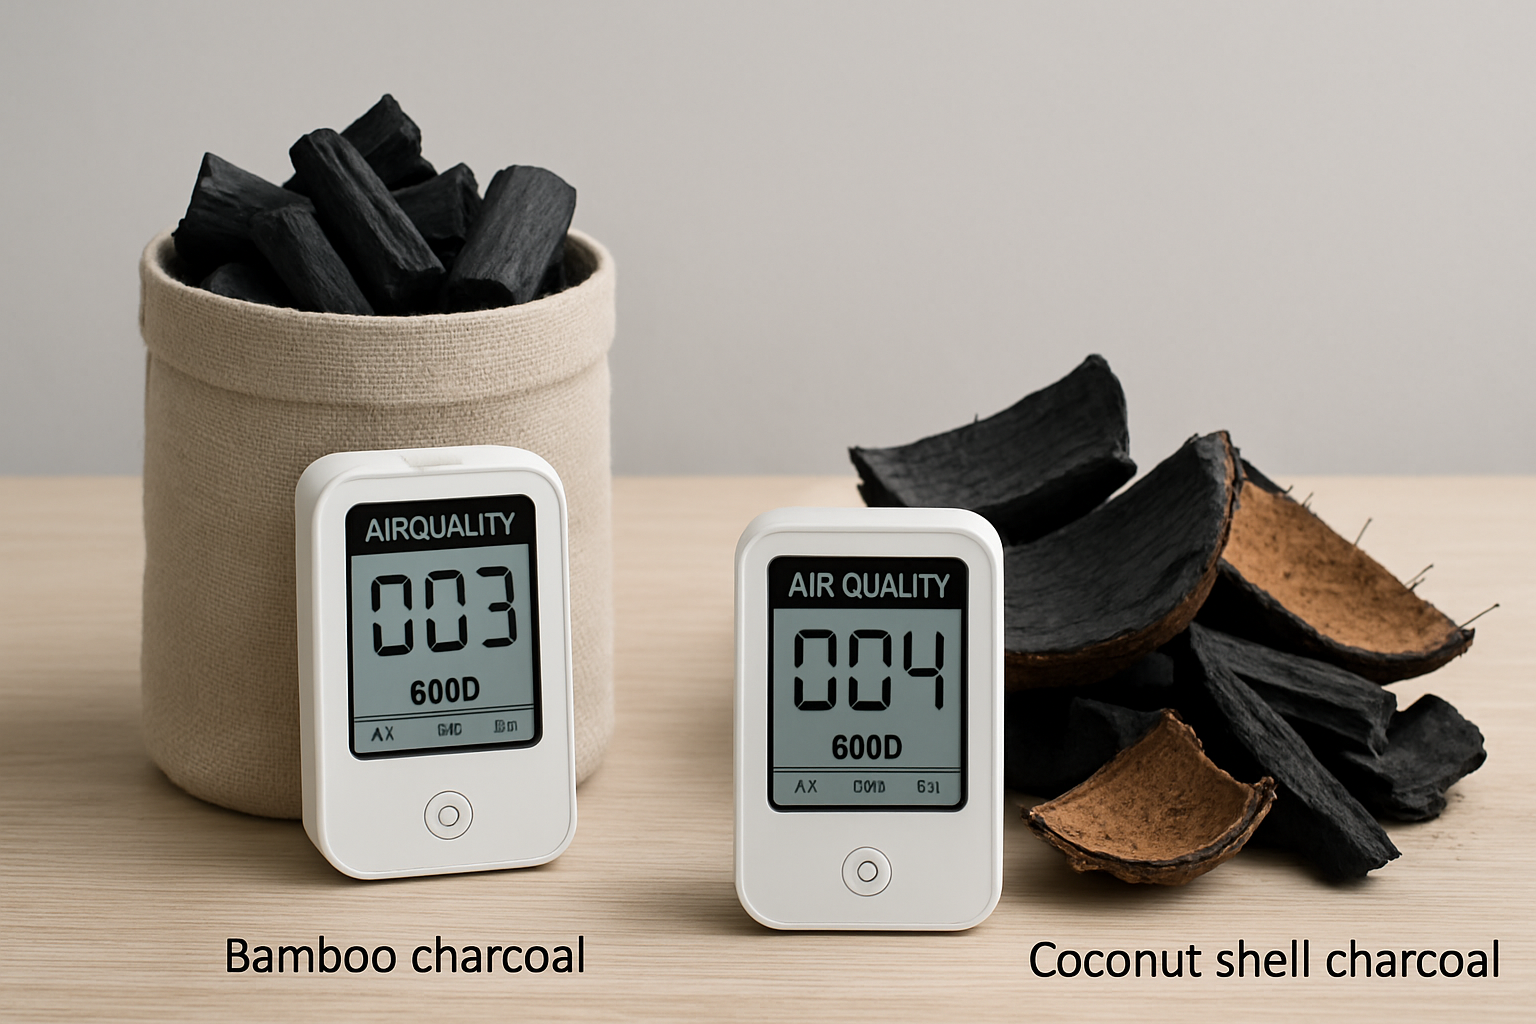
Bamboo vs Coconut Shell Activated Charcoal: I Tested Both for 3 Months
- NaturaLife Labs Activated Charcoal 1200mg – from Coconut Shells – 100 Veg Capsules — Non-GMO, gluten-free, and easy to find. A great baseline coconut charco
I want to tell you about the morning I accidentally turned my kitchen counter, my favorite white dish towel, and roughly 40% of my left hand completely black — all in the name of science. Well, “science.” I was doing a bamboo vs coconut charcoal comparison, and things escalated quickly.
This post contains affiliate links. As an Amazon Associate, I earn from qualifying purchases.
It started innocently enough. I’d been growing bamboo in my backyard for a few years and had gotten increasingly curious about activated charcoal — specifically whether bamboo-sourced charcoal lived up to its reputation compared to the more common coconut shell variety. So I ordered both, set up a little notebook, and told my partner I was “running an experiment.” She gave me the look. You know the one. I pressed on anyway.
Why I Decided to Do a Bamboo vs Coconut Charcoal Comparison in the First Place
As someone who grows bamboo and genuinely nerds out over everything the plant can do, I kept coming across takesumi — the Japanese term for bamboo charcoal — in wellness and gardening circles. Bamboo is already celebrated for being one of the fastest-growing, most renewable plants on earth, and the idea that its charcoal might perform differently than coconut shell charcoal genuinely fascinated me.
Here’s what I knew going in: activated charcoal, regardless of source, works through a process called adsorption — that’s adsorption with a “d,” not absorption with a “b.” It binds toxins and impurities to its highly porous surface rather than soaking them up. The surface area of activated charcoal is genuinely mind-bending. A single gram can have a surface area of up to 3,000 square meters. Both bamboo and coconut shell charcoal go through an activation process using steam or chemicals to create all those tiny pores.
The question I wanted to answer: does the source material actually matter for everyday use? And could I test this without making a complete disaster of my kitchen? (Spoiler: no.)
The Great Charcoal Incident of a Tuesday Morning
Here’s where things went sideways. I’d ordered loose coconut shell charcoal powder in addition to capsules — thinking I’d compare textures, mixability, and uses for things like DIY face masks and teeth whitening. What I did not adequately account for was that activated charcoal powder is approximately as containable as smoke in a windstorm.
I opened the bag. A small puff of black powder drifted upward in the morning light. I thought, “that’s fine.” I tapped a measured teaspoon toward a glass of water. Reader, I did not tap gently enough. What followed was a slow-motion catastrophe that ended with me looking like a Victorian chimney sweep, my white dish towel achieving a permanent new aesthetic, and my partner standing in the doorway holding her coffee with an expression of profound unsurprise.
“The experiment is going great,” I told her, with a black handprint on my cheek.
This is why capsules exist, people. Capsules are civilization.
What I Actually Found After Three Months
Once I got past my powder-related humiliation and switched primarily to capsule form for both varieties, the three-month comparison got genuinely interesting. Here’s a breakdown of what I noticed across the main use cases I was testing:
Digestive Support and Gut Comfort
I alternated between bamboo charcoal and coconut shell charcoal capsules across the three months, keeping notes on bloating and general gut comfort after meals where I knew I’d overindulged. Both worked. Honestly, both worked well. The bamboo charcoal — specifically the takesumi variety — felt slightly gentler in my experience, though I’ll be the first to admit that’s entirely subjective and your body may respond differently.
Teeth Whitening
This is where I used the powder forms, carefully and with lessons learned. Both did a reasonable job as an occasional whitening agent, though I want to be clear: dentists recommend using activated charcoal sparingly since it can be mildly abrasive. Neither bamboo nor coconut charcoal powder blew the other out of the water here. Results were comparable over time.
Face Masks
Mixed with a little water and a dab of honey, both made an effective pore-clearing mask. The coconut powder had a slightly finer texture in the batch I ordered, which made for a smoother application. The bamboo powder mixed a little chunkier but still worked well.
The Sustainability Angle
This is where bamboo charcoal wins, and it’s not particularly close. Bamboo is a grass that can be harvested in three to five years and regrows without replanting. Coconuts are also a renewable crop, but bamboo’s growth rate and carbon sequestration profile make it the more sustainable raw material. If environmental impact matters to your purchasing decisions — and given that you’re on a bamboo gardening website, I’m guessing it might — bamboo charcoal gets the edge.
Tools I Use: Recommended Products for Your Own Comparison
Whether you want to try bamboo charcoal, coconut charcoal, or run your own slightly less catastrophic comparison, here are the exact products I used and recommend:
Bamboo Charcoal Options
- Orinthalixium Takesumi Activated Charcoal 2000mg – 120 Vegan Capsules — A solid single-bottle option to start with. High dosage, vegan capsules, easy to take.
- Orinthalixium Takesumi Bamboo Charcoal 2000mg – 2 Bottle Pack — If you want to commit to a longer trial (like I did), the two-bottle bundle is the better value.
- Supreme Nutrition Takesumi Supreme – 90 Pure Activated Bamboo Charcoal Vegetarian Capsules — A trusted brand in the wellness space with a clean, minimal ingredient list.
Coconut Shell Charcoal Options
- NaturaLife Labs Activated Charcoal 1200mg – from Coconut Shells – 100 Veg Capsules — Non-GMO, gluten-free, and easy to find. A great baseline coconut charco
- NaturaLife Labs Activated Charcoal 1200mg – from Coconut Shells – 100 Veg Capsules — Non-GMO, gluten-free, and easy to find. A great baseline coconut charco
-
Making Biochar From My Bamboo Prunings: A Surprisingly Fun Backyard Experiment
I want you to picture this: me, standing in my backyard at dusk, covered head to toe in soot, holding a garden hose in one hand and a half-melted oven mitt in the other, while my neighbor Dave leaned over the fence with a look that said he was genuinely reconsidering our friendship. That was the day I accidentally turned my bamboo pruning session into a neighborhood smoke event — and somehow, accidentally, made the best batch of biochar I’ve ever produced. If you’ve been curious about making biochar from bamboo, buckle up, because I have some hard-won wisdom to share.
This post contains affiliate links. As an Amazon Associate, I earn from qualifying purchases.
Every spring I hack back my running bamboo with the kind of ruthless enthusiasm that my plants probably resent. I end up with a mountain of culms, branches, and leafy debris that always makes me ask the same question: now what? Burning it in a regular bonfire feels wasteful. Composting bamboo takes forever because the culms are so fibrous. This year I decided to try something I’d been reading about for months — turning those prunings into biochar to feed back into my garden beds. Reader, it did not go smoothly at first. But the ending is genuinely great, so stick with me.
What Is Biochar and Why Does Bamboo Make Such Good Stuff?
Biochar is essentially charcoal that’s been made specifically for use as a soil amendment. The process — called pyrolysis — involves burning organic material at high temperatures with limited oxygen so it carbonizes rather than turning to ash. The result is a porous, stable carbon structure that can hang out in your soil for hundreds of years, improving drainage, feeding beneficial microbes, and helping retain nutrients that would otherwise leach away.
Bamboo is genuinely one of the best feedstocks for biochar, and here’s why. Bamboo culms have an unusually high silica content and a dense cellular structure, which means they pyrolyze beautifully into hard, highly porous char. Studies have shown that bamboo biochar tends to have a very high surface area compared to biochar made from softer wood, which translates directly to better microbial habitat in your soil. Basically, your bamboo prunings are not garden waste �� they’re gold waiting to be unlocked.
My Chaotic First Attempt at Making Biochar From Bamboo
Here’s where I confess my spectacular mistake. I’d watched approximately eleven YouTube videos on the “cone pit method” for making biochar, which involves digging a cone-shaped pit, burning material in layers, and quenching the char before it turns to ash. Straightforward enough. I dug my pit, I stacked my bamboo prunings, and I got a beautiful fire going. I was feeling very competent.
What I had failed to account for was that bamboo, being hollow and full of air pockets, burns with extraordinary enthusiasm. Within about four minutes my “controlled smoldering process” had become what I can only describe as a bamboo rocket launch. Segments were popping like firecrackers. Embers were arcing across my yard in cheerful little parabolas. My dog sprinted inside through her own doggy door and did not come back out for two hours. Dave appeared at the fence. “You good?” he asked, in the tone of a man who was already composing a non-emergency phone call in his head.
I quenched the whole thing with my garden hose in a mild panic, fully expecting to find a pit of useless wet ash. Instead, I found a gorgeous batch of deep black, chunky bamboo char — porous, solid, and genuinely beautiful. Turns out my accidental fast burn had actually created excellent biochar. The key, as I later confirmed in my reading, is getting the material hot fast and quenching quickly. I had done this entirely by accident.
Practical Tips for Making Biochar From Bamboo the Right Way
If you’d like to replicate my results without the neighborhood drama, here’s what I’d actually recommend:
- Cut your culms into shorter sections (12–18 inches). This reduces the explosive popping that happens when air is trapped in long bamboo tubes. Splitting them lengthwise is even better.
- Use the cone pit or trench method. Dig a cone-shaped or trench-style pit about 2 feet deep. This naturally limits oxygen flow and encourages pyrolysis rather than full combustion.
- Burn in layers, not all at once. Add bamboo in stages, waiting for each layer to char before adding more. This keeps things manageable and gives you better quality char.
- Watch the smoke color. White or bluish smoke means you’re in good pyrolysis territory. Thick black smoke means too much oxygen or unburned material.
- Quench before it turns to ash. Once the material is fully charred and glowing orange, douse it thoroughly with water. You want char, not ash — ash has almost none of the soil benefits.
- Check local regulations first. Open burning rules vary wildly by area. Do a quick search for your county or municipality before lighting anything up.
Once your biochar is made and cooled, charge it before adding it to soil. Raw biochar is actually nutrient-hungry and will temporarily pull nitrogen from your soil if added dry. Mix it into compost, soak it in diluted liquid fertilizer, or blend it with worm castings for a few weeks first. Your plants will thank you enormously.
Not Ready to DIY? Grab Some Quality Bamboo Biochar Instead
Look, not everyone has a backyard suitable for a pit fire, and not everyone wants their neighbor Dave staring at them over a fence. If you want to get biochar into your garden without the adventure, there are some genuinely excellent ready-made options worth having on hand.
Tools and Products I Recommend
Wakefield BioChar – Premium Garden Soil Conditioner (1 cu/ft, 25 lbs) — This is a workhorse product that I keep around even when I’ve made my own batch. OMRI Listed for organic use, it’s great for raised beds, potting mix, and lawn applications. Consistent quality and a generous bag size make it a solid staple.
→ Check it out on AmazonBiochar by Lewis Bamboo – Natural Soil Additive (1.25 Gallon Bag) — This one is made specifically from bamboo, which I love. Lewis Bamboo knows their material, and this is a great option if you want bamboo-source biochar with the full benefits of that high-surface-area char structure without DIYing it yourself.
→ Check it out on AmazonOld Potters Premium Biochar Soil Enhancer – 100% Organic (24 Quarts) — A big bag for serious gardeners. This is a great pick if you’re amending multiple raised beds or a larger growing area. The 24-quart volume gives you enough to make a real dent in improving your soil structure.
-
Bamboo Charcoal for Humidity and Odors: I Tested Every Room in My House
I want to tell you about the day I confidently placed a single bamboo charcoal bag the size of a sandwich in my 400-square-foot basement — and then stood back with my arms crossed, fully expecting to smell fresh mountain air within the hour. Reader, I did not smell fresh mountain air. What I smelled was approximately the same musty combination of old carpet and regret that I had always smelled down there. Turns out, one little bag and a whole lot of wishful thinking is not a bamboo charcoal humidity odor control strategy. That was six months ago. These days, my house smells genuinely, embarrassingly wonderful, and I have the bruised ego and the hard-won knowledge to prove it.
This post contains affiliate links. As an Amazon Associate, I earn from qualifying purchases.
What Even Is Bamboo Charcoal and Why Does It Work?
Before I get into my spectacular failure (and eventual triumph), let me give you the quick science, because it genuinely is fascinating. Bamboo charcoal is made by burning bamboo stalks at very high temperatures — usually somewhere between 800°C and 1200°C — in a low-oxygen environment. The result is a porous, carbon-rich material filled with millions of microscopic holes. That honeycomb-like structure is the secret. Those tiny pores physically trap moisture molecules and odor-causing particles through a process called adsorption. Not absorption, where liquid soaks in like a sponge. Adsorption, where particles bond to a surface. The distinction matters, and knowing it made me feel very smart at dinner parties until I told this to my husband and he said, “Cool, does it work in the bathroom?” Yes, dear. It does.
Bamboo is actually a uniquely excellent source of charcoal because it grows so fast — some species shoot up several feet in a single day — which means the carbon structure is incredibly dense. Bamboo charcoal bags are also reusable. Once a month, you set them in direct sunlight for a couple of hours and the UV light purges the trapped particles, essentially resetting the bag. A good quality bag can last up to two years. Compared to chemical air fresheners that just spray perfume over problems, or disposable moisture absorbers that end up in the landfill every few weeks, bamboo charcoal is a legitimately sustainable and effective option. I was sold on the concept from the start. My execution, as you now know, needed some work.
My Room-by-Room Bamboo Charcoal Humidity Odor Control Experiment
After my basement humiliation, I did what any stubborn person does: I over-corrected. I ordered an almost absurd quantity of bamboo charcoal products and went room by room through my entire house like I was conducting a very low-stakes scientific study. My methodology was simple. I spent one week noting how each room smelled and felt humidity-wise, placed the appropriate bags, waited two weeks, and reassessed. Here is what I found.
The Basement (Where It All Began)
The lesson I learned here is that square footage matters enormously. The general guideline is roughly 200 grams of bamboo charcoal per 90 square feet of space. My 400-square-foot basement needed at least 800 grams, not the 200-gram bag I started with. Once I placed four properly sized bags around the perimeter — including one near the sump pump where moisture concentrates — the results were noticeable within about ten days. The musty smell faded significantly and the air felt less heavy. I also learned to keep bags away from walls with poor airflow. Give them open air exposure so they can actually do their job.
Closets
Closets are honestly where bamboo charcoal shines the brightest. The enclosed space means the bags work in a concentrated area, and you notice results faster. I hung bags near my winter coats, which had developed that particular closed-closet staleness that no amount of cedar blocks ever fully fixed. Within a week, genuinely gone. I also tucked smaller bags into shoe cubbies, which was a game changer for my husband’s running shoes. He was skeptical. He is skeptical no longer.
Bathrooms
High humidity, small space — bathrooms are ideal candidates. I placed one medium bag on the vanity shelf and one under the sink where I’d noticed occasional mustiness near the pipes. Between the moisture control and the odor absorption, the bathroom now smells like a bathroom that someone actually takes care of. Which, to be fair, someone does now.
The Car
This one surprised me. We have a dog. Our car smelled like we have a dog. I wedged a couple of small bags under the seats and forgot about them for two weeks. My mother-in-law got into the car for the first time since I’d placed them and said, and I quote, “Oh, it doesn’t smell like Biscuit anymore.” Biscuit is our golden retriever. He is not offended. He cannot read.
Products I Actually Used and Recommend
Here are the specific products that made it into my rotation. I tested a lot, and these are the ones that genuinely earned their spots.
For Basements and Large Rooms
For large spaces, you need serious coverage. The CLEVAST Bamboo Charcoal Air Purifying Bags (Large, 4×200g) give you 800 grams total, which is exactly what finally turned my basement around. The linen bags are breathable and sturdy, and they hold up well to monthly sun refreshing without falling apart. This is the one I wish I had started with instead of my sad little single bag.
For Closets and Medium Spaces
The 12 Pack Bamboo Air Purifying Bag set is brilliant for covering multiple rooms without spending a fortune. You get a mix of 50g and 150g bags, which lets you match the bag size to the space. Smaller bags in bathroom corners, larger ones in bedroom closets. I keep a running supply of these and rotate new ones in as older ones get refreshed in the sun.
For Shoes (A Public Service)
The Activated Charcoal Shoe Odor Eliminator bags are shaped and sized specifically for footwear, which sounds like a small thing until you use them and realize how much difference the right fit makes. Slip them inside shoes between wearings and the difference is remarkable. These make great gifts, too, for people you want to help without directly telling them their shoes smell.
For Closets with Humidity Problems
If your closet has a real moisture problem beyond just mild mustiness, I’d pair bamboo charcoal bags with a dedicated hanging dehumidifier. The Vacplus Hanging Closet Dehumidifier Bags with Activated Charcoal combine
-
Bamboo Charcoal Toothpaste: I Used It Every Day for 30 Days — Here’s What Happened
I showed up to my own birthday dinner with a gray tongue. Not a little gray — I mean full Gandalf the Grey gray. My husband looked at me across the restaurant table, tilted his head, and whispered, “Honey, are you… feeling okay?” That was day three of my bamboo charcoal toothpaste review experiment, and I had absolutely no idea that activated charcoal could temporarily stain soft tissue. Nobody told me. I did not read the directions. Classic me.
Affiliate Disclosure: This post contains affiliate links. As an Amazon Associate, I earn from qualifying purchases. If you click through and buy something, I may earn a small commission at no extra cost to you. I only recommend products I’ve personally tested and genuinely liked — gray tongue incident included.
So yes. I spent thirty days brushing with bamboo charcoal toothpaste, made every rookie mistake in the book, and came out the other side with noticeably whiter teeth, a better morning routine, and a story I will apparently be telling forever. If you’re curious whether this stuff actually works, stick around. I’ve got the full, embarrassingly honest account right here.
Why I Decided to Try Bamboo Charcoal Toothpaste
A little background: I am a devoted coffee drinker. Two cups minimum before I say a single word to another human being. Years of this habit had left my teeth looking less “Hollywood smile” and more “aged parchment,” and no amount of whitening strips seemed to make a lasting difference. My sister — who, annoyingly, has perfect teeth — mentioned she’d been using a charcoal-based toothpaste and loved it. I rolled my eyes the way you do when your sibling suggests something. Then I went home and ordered three different kinds immediately.
Bamboo charcoal specifically caught my attention because it fits right into the broader world I already love here at TeraBamboo. Bamboo is endlessly useful — in the garden, in the home, and apparently, in your mouth. Bamboo charcoal is made by burning bamboo at very high temperatures, creating an incredibly porous material that binds to surface stains and lifts them away during brushing. It’s a gentler version of activated charcoal, and many formulas pair it with natural ingredients like coconut oil, baking soda, or mint.
My Honest Bamboo Charcoal Toothpaste Review: The 30-Day Breakdown
Week One: Chaos, Gray Tongue, and Lessons Learned
Back to that birthday dinner. Here’s what happened: I brushed enthusiastically, spit, did a quick glance in the mirror, declared myself presentable, and left the house. What I failed to do was rinse thoroughly. Charcoal particles can linger on the tongue and soft tissue if you rush the rinse. My husband was a good sport about it. Our waiter was professionally composed. I, however, wanted to crawl under the table.
Lesson one: rinse well. Rinse again. Take one more look in a good light before you leave the house. Once I slowed down and actually followed the process — brush gently for two minutes, rinse thoroughly, check your work — week one became much more pleasant. The mint flavor was surprisingly refreshing, and I stopped dreading the black foam situation entirely.
Weeks Two and Three: Settling Into the Routine
By week two I had my rhythm down. I brushed once a day with charcoal toothpaste (mornings, after coffee — which felt poetic) and used my regular toothpaste at night. Most dentists suggest not using charcoal formulas more than once daily, and alternating with a fluoride toothpaste is a smart move for overall enamel health. I noticed my teeth looking a bit brighter around day ten. By week three, two different coworkers asked if I’d done something different. Neither of them guessed “I brush with a paste that looks like midnight.”
Week Four: The Results
By day thirty, I was genuinely impressed. My coffee staining had faded noticeably, my breath felt cleaner throughout the morning, and the whole routine had become something I actually looked forward to. My husband — the same man who interrogated my tongue at my birthday dinner — asked if he could try some. Vindication never tasted so minty.
Practical Tips Before You Start
- Use a soft-bristled brush. Charcoal is mildly abrasive, and a soft brush protects your enamel while still getting the job done.
- Don’t brush too hard. Gentle circular motions. You’re polishing, not sanding.
- Rinse thoroughly every single time. I cannot stress this enough. Ask my birthday dinner table.
- Use it once a day, not twice. Alternate with a fluoride toothpaste to maintain enamel strength.
- Give it time. Most people see noticeable results between days ten and twenty. Patience pays off.
- Check the sink after. Charcoal can temporarily darken grout or leave marks. A quick rinse of the basin keeps things tidy.
Products I Recommend (The Ones I Actually Used)
I tested several formulas over the thirty days, buying some and sampling others that arrived in the same order. Here are the ones worth your time and money:
For a Classic Paste Formula
The Organic Bamboo Charcoal Toothpaste 100% Natural Teeth Whitening 3 Pack was my everyday workhorse. The three-pack value is excellent, the flavor is pleasant, and it’s made with natural ingredients I could actually pronounce. Great starting point for beginners.
If you want something widely available with a familiar brand feel, Hello Epic Whitening Charcoal Toothpaste with Coconut Oil is fluoride-free, SLS-free, and has a lovely fresh mint flavor. It’s the one I’d hand to a charcoal skeptic to ease them in gently.
The Bamboo Charcoal Toothpaste Whitening Formula Fresh Breath Whitener is a great compact option if you’re traveling or want to try charcoal paste without committing to a big purchase.
For a Powder Alternative
If paste isn’t your thing, charcoal powder works beautifully.
-
Grilling With Bamboo Charcoal: 15 BBQ Sessions and My Definitive Verdict
I set off the smoke alarm three times before I even put a single piece of food on the grill. That’s how my bamboo charcoal grilling journey began — standing in my backyard in an apron that said “Grill Sergeant,” waving a dish towel at my back door like I was surrendering to the neighbors.
This post contains affiliate links. As an Amazon Associate, I earn from qualifying purchases.
It was my first serious attempt at bamboo charcoal grilling, and I had done exactly zero research. I figured charcoal was charcoal. How different could it be? Spoiler: very different. But also — after fifteen full BBQ sessions spread across two seasons — better in ways I genuinely didn’t expect. If you’re curious whether bamboo charcoal is worth the switch, I’ve done the sweaty, smoke-filled, occasionally humiliating legwork for you.
What Even Is Bamboo Charcoal and Why Should Grillers Care?
Bamboo charcoal is made by carbonizing bamboo stalks at very high temperatures — typically between 800°C and 1200°C. Because bamboo is an incredibly dense grass with a tight, fibrous structure, the resulting charcoal is harder and more carbon-rich than most standard wood charcoals. That translates to a few things you’ll notice immediately at the grill: higher heat output, longer burn times, and significantly less ash.
It’s also naturally free of the chemical additives and binders you’ll find in many conventional briquettes. No lighter fluid smell seeping into your food. No mystery accelerants. Just bamboo, heat, and time.
From a sustainability angle, bamboo is one of the fastest-growing plants on Earth — some species grow three feet per day — which makes it a dramatically more renewable fuel source than hardwood alternatives. For those of us who care about the garden and the planet, that matters.
Bamboo Charcoal Grilling: What 15 Sessions Taught Me
After that first smoke-alarm disaster (caused, I should confess, by attempting to light bamboo charcoal with a tiny handheld lighter and the sheer force of my optimism), I did what I should have done from the start: I got a proper chimney starter and actually read some instructions.
Over the next several months, I grilled everything. Steaks, chicken thighs, whole fish, vegetables, pizza, and once — at the enthusiastic suggestion of my eight-year-old — a hot dog wearing a cheese helmet. Science demands variety.
Here’s what I consistently found across all fifteen sessions:
- Burn time is legitimately impressive. Most sessions, the coals were still usable well past the two-hour mark. Some bamboo charcoal products advertise up to seven hours of continuous burn, and while your mileage will vary with airflow and quantity, long burns are real.
- Heat runs hot. Bamboo charcoal burns hotter than most standard wood charcoal. This is fantastic for searing steaks. It requires more attention when grilling delicate proteins like fish.
- Ash cleanup is minimal. I’m talking a small cup’s worth after a long session. Compared to the dusty gray snowstorm of conventional charcoal cleanup, this alone might convert you.
- Smoke is mild and clean. No acrid chemical smell. Guests at my summer cookout actually commented on how pleasant the smoke was — which is not something anyone has ever said at a charcoal grill before.
- Lighting takes patience. This is the only real learning curve. Bamboo charcoal is denser, so it takes longer to fully ignite than lighter-soaked briquettes. A good chimney starter is non-negotiable.
My Top Practical Tips for Getting Started
- Always use a chimney starter. Never skip this. I learned the hard way.
- Give the coals a full 20–25 minutes to ash over before cooking. They should glow orange with a light gray coating.
- Use fewer coals than you think you need — bamboo burns hot, and you can always add more.
- Keep a two-zone fire setup: a hot direct zone and a cooler indirect zone. This gives you control over that intense heat.
- Store your bamboo charcoal in a dry place. It absorbs moisture readily, which affects lighting.
Tools I Use: Recommended Products for Bamboo Charcoal Grilling
I’ve tested several bamboo charcoal products over these fifteen sessions, and I’ve landed on clear favorites. Here’s what’s actually in my garage right now.
For the Charcoal Itself
My first love was the BBQ Bamboo Charcoal – Premium 100% Natural Chemical-Free Smokeless Fuel. The 10-pound bag advertises up to seven hours of continuous use, and it consistently delivered long, hot, clean burns. This is what I’d recommend to a first-timer who wants reliable performance without any additives.
I also really liked the FANEAMADE 10lb Natural Bamboo Charcoal, particularly for longer smoking sessions. Low ash, long burn, and it handled indirect heat beautifully during a three-hour chicken smoke that made my neighbor actually lean over the fence to ask what I was cooking.
If you’re grilling for a crowd and want the best value per pound, the Bamboo Charcoal Briquettes – 16 lb Box is worth serious consideration. The briquette form lights a bit more evenly than lump, and the larger quantity means you’re set for the entire summer season.
For Lighting (The Most Important Purchase You’ll Make)
I cannot overstate how much a good chimney starter changes everything with bamboo charcoal. The Kingsford Heavy Duty Deluxe Charcoal Chimney Starter has the capacity and airflow design to get dense bamboo charcoal going efficiently. The heat shield and stay-cool handle are genuinely useful features, not marketing fluff.
If you’re working with a smaller grill like a Smokey Joe, the
-
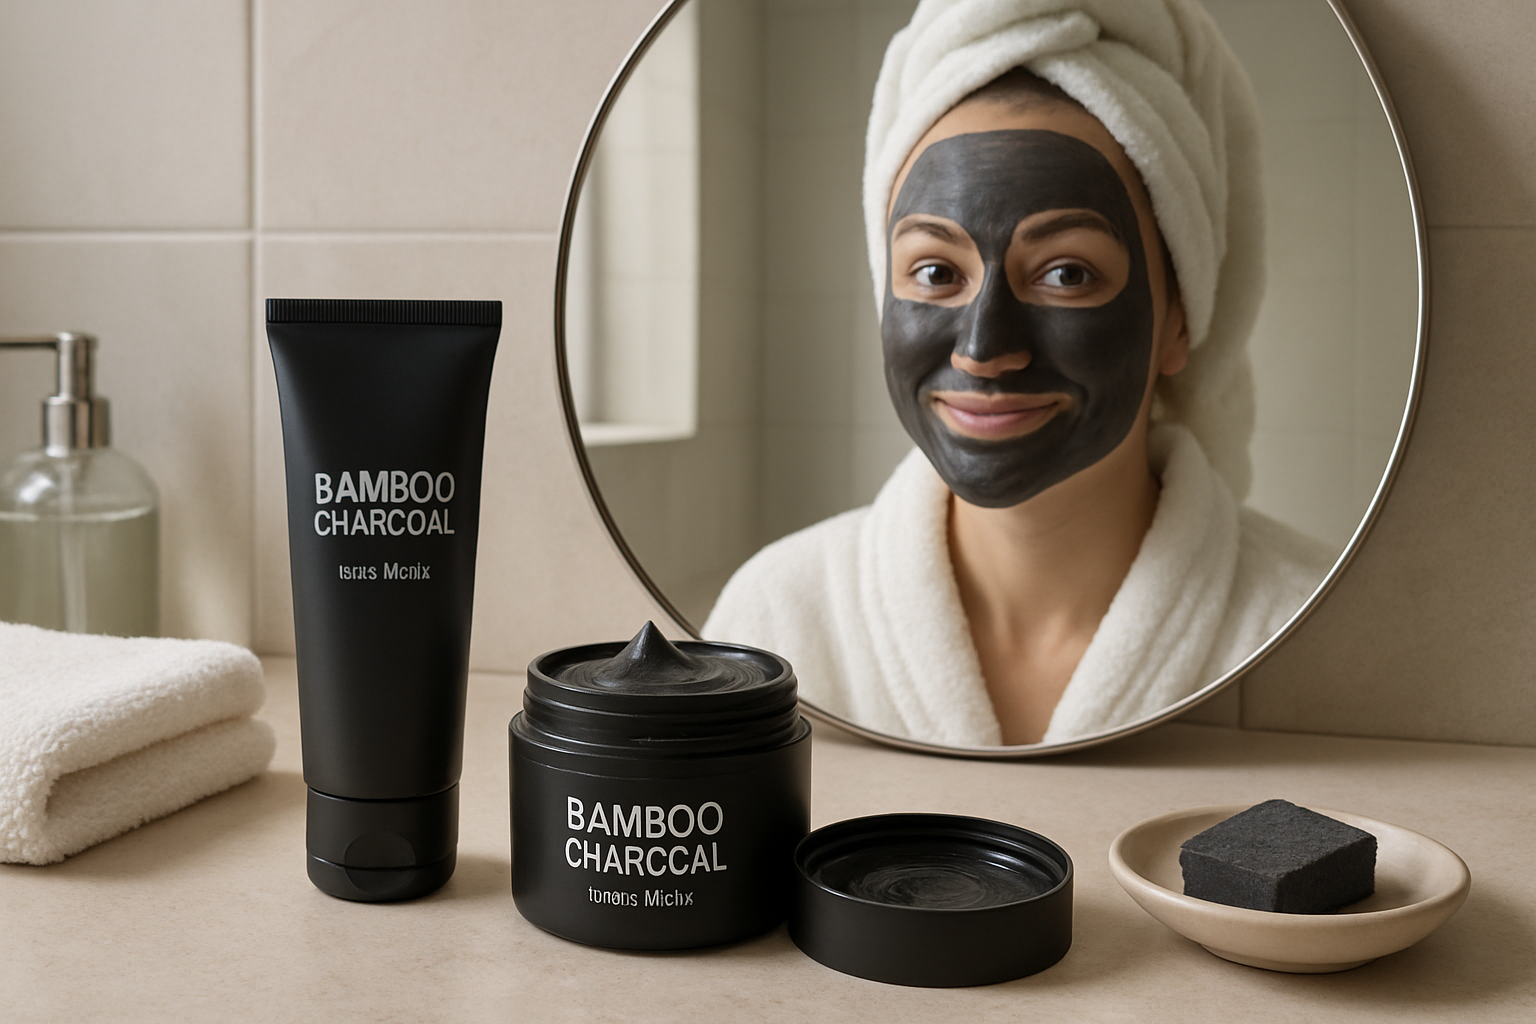
Bamboo Charcoal Face Mask: The Skincare Discovery I Made by Burning My Lunch
I burned my lunch so badly last Tuesday that the smoke alarm went off, my neighbor knocked on the door to check if I was alive, and I ended up accidentally discovering my new favorite skincare routine. Let me explain. I’d been meaning to try a bamboo charcoal face mask for months after seeing them pop up everywhere, but I kept putting it off. Then I scorched a pan of rice so thoroughly that the bottom layer turned into a perfect slab of matte black carbon, and something clicked in my brain. Bamboo. Charcoal. Face. Right now.
This post contains affiliate links. As an Amazon Associate, I earn from qualifying purchases. This means if you click a link and make a purchase, I may earn a small commission at no extra cost to you. I only recommend products I genuinely think are worth your time.
Okay, I did not actually smear burnt rice on my face. I want to be very clear about that. But standing there in my smoke-filled kitchen, waving a dish towel at the ceiling detector while my rice resembled a lump of coal, I finally understood something I’d been reading about for ages: bamboo, when burned under controlled conditions, produces one of the most useful natural substances on the planet. And skincare fans have known this for years.
What Is Bamboo Charcoal and Why Is It All Over My Instagram?
Bamboo charcoal is made by burning bamboo — specifically mature bamboo stalks — at extremely high temperatures, usually between 800°C and 1200°C, in a low-oxygen environment. This process is called pyrolysis, and it’s been practiced in East Asia for centuries. The result is a highly porous material with an enormous surface area packed into a tiny amount of substance. We’re talking about millions of microscopic pores per gram.
That porous structure is the whole secret. Those tiny chambers act like magnets for impurities, drawing out dirt, oil, bacteria, and toxins from whatever they come into contact with. In the garden, bamboo charcoal improves soil drainage and nutrient retention. In skincare, those same properties go to work on your pores. It’s the same plant doing two completely different jobs brilliantly, which honestly feels very on-brand for bamboo.
Bamboo reaches maturity faster than almost any other plant on earth — some species grow several feet in a single day — which makes it a genuinely sustainable source for charcoal production. When you’re using a bamboo charcoal product, you’re benefiting from something that can be responsibly replenished, which isn’t something you can say about a lot of skincare ingredients.
How a Bamboo Charcoal Face Mask Actually Works on Your Skin
Here’s the part I kept glossing over until burnt-rice Tuesday forced me to actually sit down and read. A bamboo charcoal face mask typically works in one of two ways: as a peel-off mask or as a wash-off clay-style mask. The peel-off variety is the dramatic, satisfying one you’ve probably seen in those oddly compelling videos where someone slowly peels a black sheet off their face and looks unreasonably pleased about it.
When you apply a peel-off bamboo charcoal mask, the formula adheres to the surface of your skin and, more importantly, into your pores. As it dries and firms up, it grabs onto blackheads, excess sebum, dead skin cells, and environmental grime. When you peel it away, all of that comes with it. It’s essentially a deep-cleaning session that goes beyond what a regular face wash can manage.
A few things to keep in mind before you dive in:
- Always do a patch test on your inner wrist before applying any new mask to your full face, especially if you have sensitive skin.
- Apply to clean, slightly damp skin for best adhesion and more comfortable removal.
- Avoid the eye area, eyebrows, and hairline — you’ll thank yourself during removal.
- Most formulas work best when left on for 15 to 20 minutes, until fully dry.
- Once or twice a week is plenty. Over-masking can strip your skin’s natural barrier.
- Follow up with a good moisturizer, since charcoal masks are thorough and your skin will appreciate some hydration afterward.
Recommended Products: The Bamboo Charcoal Masks I’d Actually Put on My Face
After my kitchen epiphany, I went down a proper research rabbit hole and landed on these options. Whether you’re a first-timer or looking to upgrade your routine, there’s something here for everyone.
Best for Blackhead Removal: Tailgenci Blackhead Remover Peel-Off Mask
This one does exactly what it says on the label. The Tailgenci Bamboo Charcoal Peel Off Face Mask is formulated for both men and women, targets blackheads and acne, and comes in a generous 4.23 oz size. It’s a solid starting point if you’ve never tried a charcoal peel-off before and want a reliable, no-fuss option.
Best for Deep Pore Cleansing: Eveellyn Bamboo Charcoal Peel Off Mask
If shrinking the appearance of pores is your main goal, the Eveellyn Bamboo Charcoal Peel Off Face Mask is worth a look. The 120ml formula is designed specifically for deep cleansing, targeting dirt, acne, and excess oil while working to minimize pores. Great for both men and women who deal with combination or oily skin.
Best for Smooth, Balanced Skin: Shaeva Peel Off Face Mask
The Shaeva Bamboo Charcoal Peel Off Mask takes a slightly more holistic approach, focusing on oil reduction and overall skin smoothing alongside blackhead removal. If your skin tends to get shiny by midday and you want something that addresses that at the root, this 120g formula is a thoughtful pick.
Best Complete Set: Ebanel Charcoal Peel Off Mask with Applicator
This is the one I’d recommend if you want to go all-in properly. The Ebanel Charcoal Peel Off Mask Set includes an applicator brush and packs in some seriously impressive supporting ingredients: niacinamide, hyaluronic acid, vitamin C, and green tea alongside the bamboo charcoal. It’s a proper skincare experience, not just a mask.
Best Gift Option